


We’ve created Calendar Boost with simplicity in mind, which means you’ll be able to get started in just a couple of minutes and set up your first appointment.
The first step is to sign up for a Calendar Boost account and fill out the necessary fields we need to help you get started smoothly. Once you’ve done that, Calendar Boost will generate some sample data on your account, allowing you to begin using the app right away.
The next time you want to use Calendar Boost, you only need to log in. You’re automatically a super admin on your Calendar Boost account, and you’ll need to set up some basic account settings such as personal information, integrations, and time zone.
Don’t worry! It’s as easy as it gets, and you can follow our quick start guide to speed up the process.
Welcome to Calendar Boost! This guide will walk you through the process of signing up for a free account. Follow the simple steps below to create your Calendar Boost account and get started with managing your appointments and services.
To begin, click on the "Get started for free" button located on Calendar Boost’s homepage. This will redirect you to the sign-up process, where you'll enter your details and set a password for your new account.
Embark on your Calendar Boost journey with our free sign-up process. No need to enter your card details — simply create your account and enjoy a 14-day trial. During this trial period, all features and integrations are at your fingertips, allowing you to experience Calendar Boost's full capabilities before choosing the perfect plan for your needs.
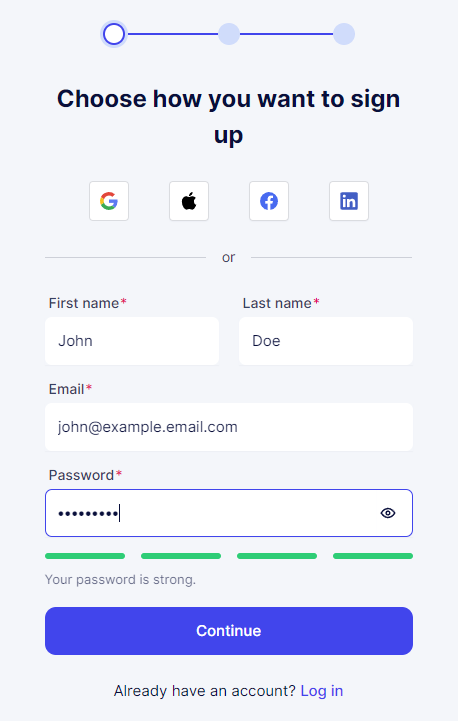
After entering your details, you'll proceed to a page where you'll make a few selections for your business. Calendar Boost will then generate some sample data on your account, allowing you to begin using the app right away.
Start by choosing your industry category, such as salons, training, consulting, or healthcare, or you can select "Other" for a custom category. Next, input your company name and define your Booking Website's URL. To proceed, check the box to agree to our Terms of Use.
The final step is selecting the theme for your booking website, which you can always change later to best suit your business's style and branding.
After making these selections, click on "Create Your Account" at the bottom of the page, and you're all set to begin using Trafft!
Our Onboarding Process
After completing the signup process, you'll land on your Calendar section. Click the question mark icon in the upper right corner to access a few helpful options, including a short 2-minute video tutorial.
In addition to the video, you'll also find buttons for support, documentation, and an option to suggest a feature.
We prioritize security to maintain a safe environment for all users. To prevent misuse by spammers, Email and SMS notifications require email verification. Please check your inbox and complete the verification process to enable notifications and fully utilize the app.
Once your email address is verified, you can continue exploring Calendar Boost. We've provided some sample Employees, Services, and Appointments so you can immediately view Calendar Boost's Booking Website by clicking on the Booking Website button in the top left.
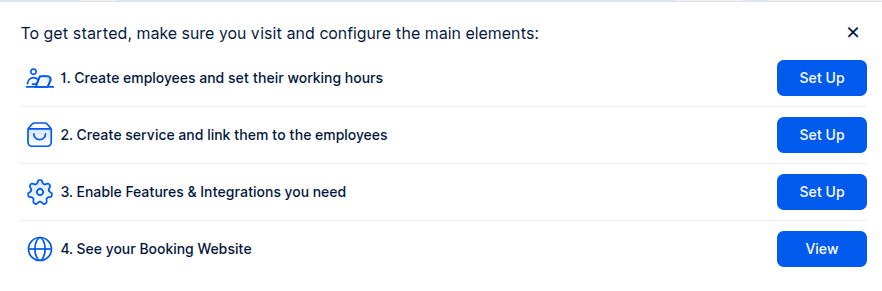
The Dashboard page features links to the core components of Calendar Boost, including Employees, Services, Features & Integrations, and the Booking Website. These links are helpful for new users to navigate the app. While you have the option to permanently hide them by clicking "Dismiss," we suggest exploring these links to become acquainted with Calendar Boost's functionalities.
Please note: During the sign-up process, Calendar Boost generates some dummy data based on the information you provided. You can easily modify this data to suit your needs or delete it entirely if you prefer to start from a clean slate.
Log in
To log in to your existing Calendar Boost account, visit calendarboost.com and click on the "Log In" button at the top right. You'll then be prompted to enter your email and password. After entering your password, click "Continue" to access your Calendar Boost account.
Depending on how you signed up, you'll have the option to use the social login (Gmail, Facebook, LinkedIn, or Apple) or enter the email and the password you configured when you registered for Calendar Boost.
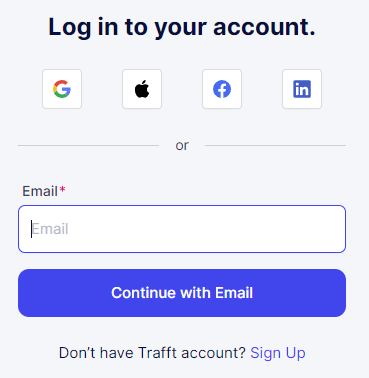
Logging in through this page works for all users (admins, superadmins, and employees) but not your customers. If you allow only registered users or a combination of registered or guest users through your Customize section, registered users will need to visit the booking website and log in there.
For example:
https://johnsbarbershop.calendarboost.com/login/
Forgot password
If you can't remember your password, don't worry. Click on the "Get Help" option next to "Forgot your password?" and enter the email you used to create your Calendar Boost account. Then click "Reset."
Since the email is automatically checked when you enter it in the previous step, you'll already know whether the email you've entered is correct or not — but please take care if you have multiple accounts and emails. Once the "Reset" button is clicked, we will send you an email with a link to set up a new password. After creating your new password, you can use it along with your email to access your admin dashboard.
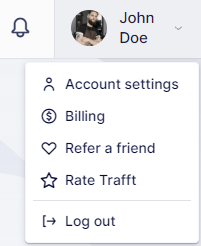
When you log into your Calendar Boost account as a super admin and click on your name or picture in the top right corner, you'll see the following options:
Account Settings
Billing
Refer a Friend
Rate Calendar Boost
Account Settings
The options available in the screenshot above vary based on the user role of the person logging into Calendar Boost. Similarly, the options that appear when you click on Account Settings may vary:
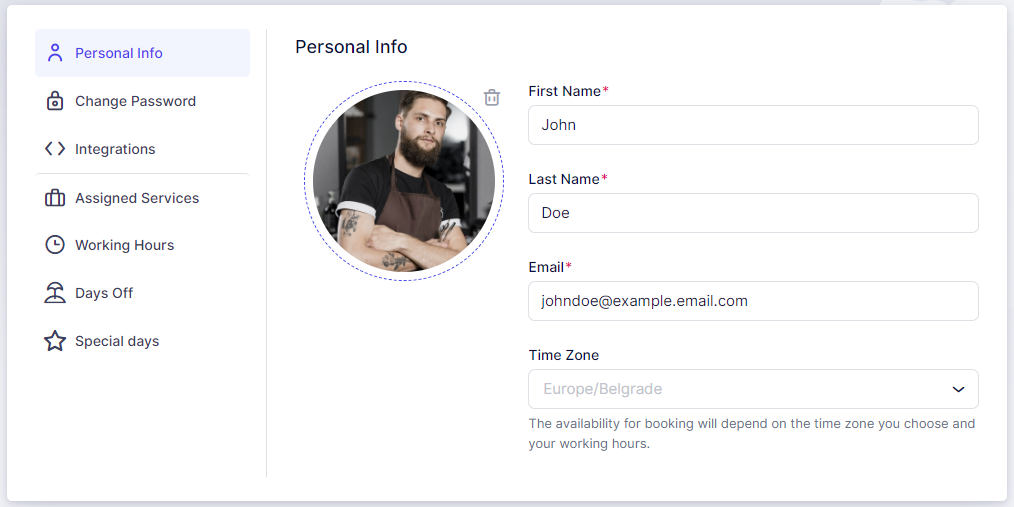
Personal Info (available to all users)
In this section, you can modify your First Name, Last Name, Email, and Time Zone. Additionally, you can upload your profile picture by clicking on the photo field or dragging and dropping a photo into the designated area. After making any changes in the Personal Info settings, be sure to click "Save Changes" at the bottom of the screen.
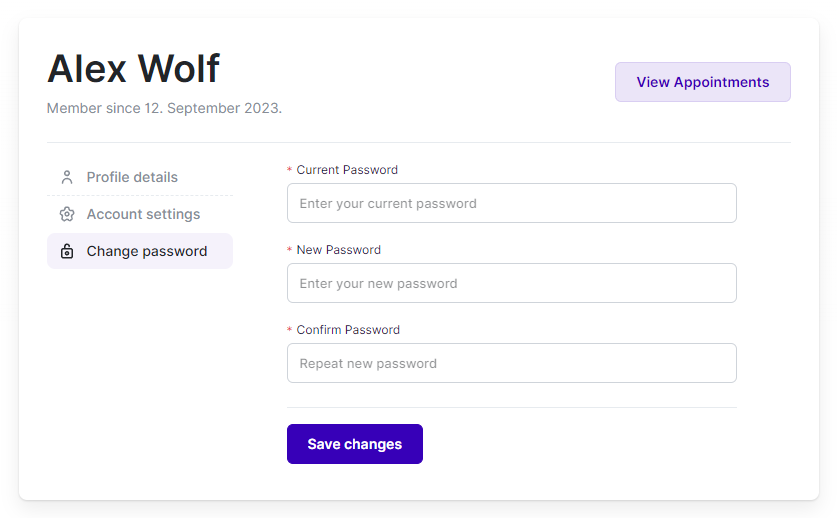
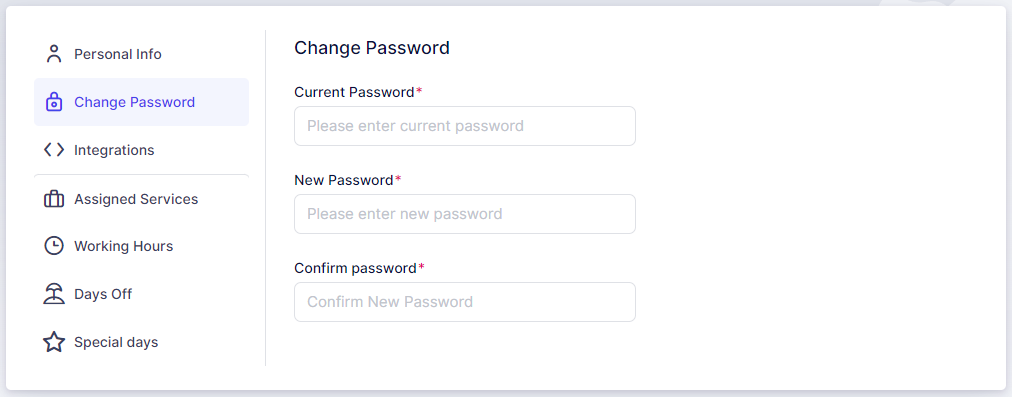
Change Password (available to all users)
In this section, you can update the password you initially set during sign-up. To do so, enter your current password, followed by your new password, and then confirm the new password by entering it again.
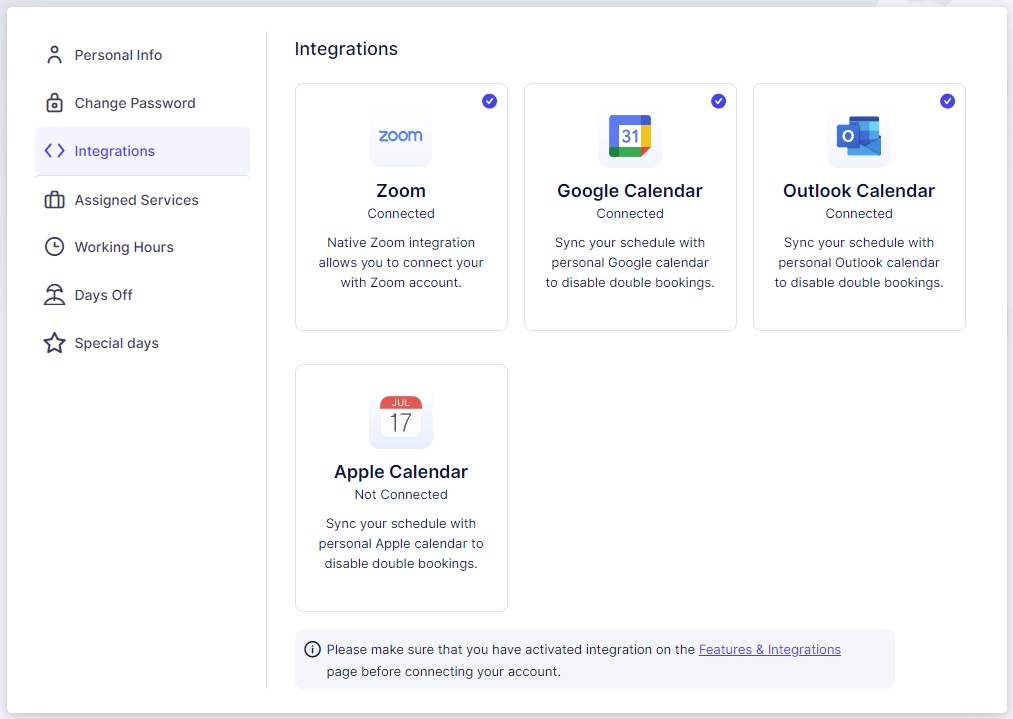
Integrations (available to all users)
In this section, you can connect your own Zoom, Google Calendar, Apple Calendar, and Outlook Calendar with your Trafft account. Other users will also have this option if the admin has activated these integrations on the Features and Integrations page.
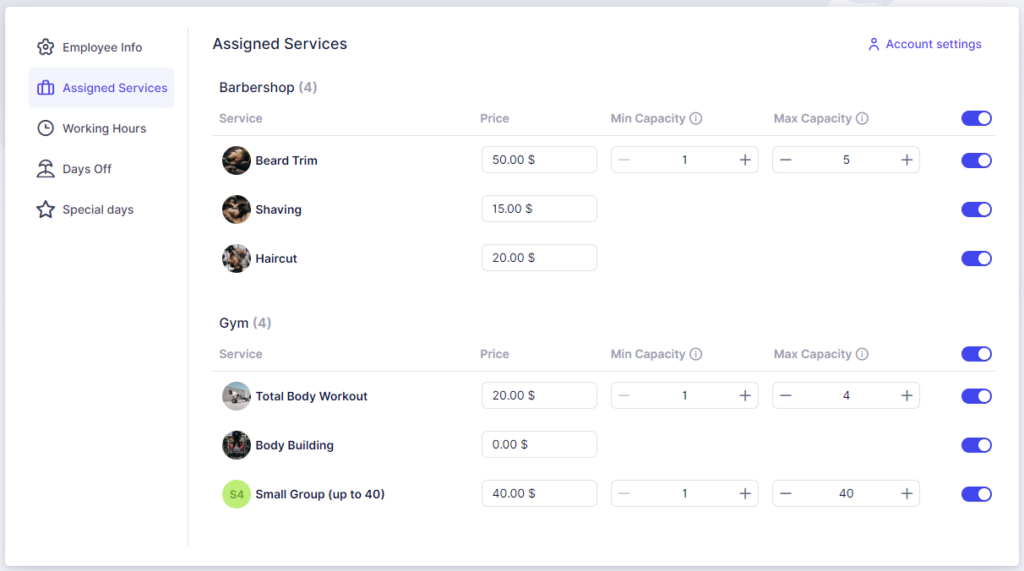
Assigned Services (available to admins or users with custom roles)
This section allows admins or users with custom roles to enable the services they are assigned to as employees.
Working Hours (available to admins or users with custom roles)
Here, the working hours for your account can be configured.
Days Off (available to admins or users with custom roles)
Configure non-working days for your account in this section.
Special Days (available to admins or users with custom roles)
If enabled in Calendar Boost’s Features & Integrations section, this option appears in Account Settings. Here, you can configure special working days that do not follow the standard Working Hours.
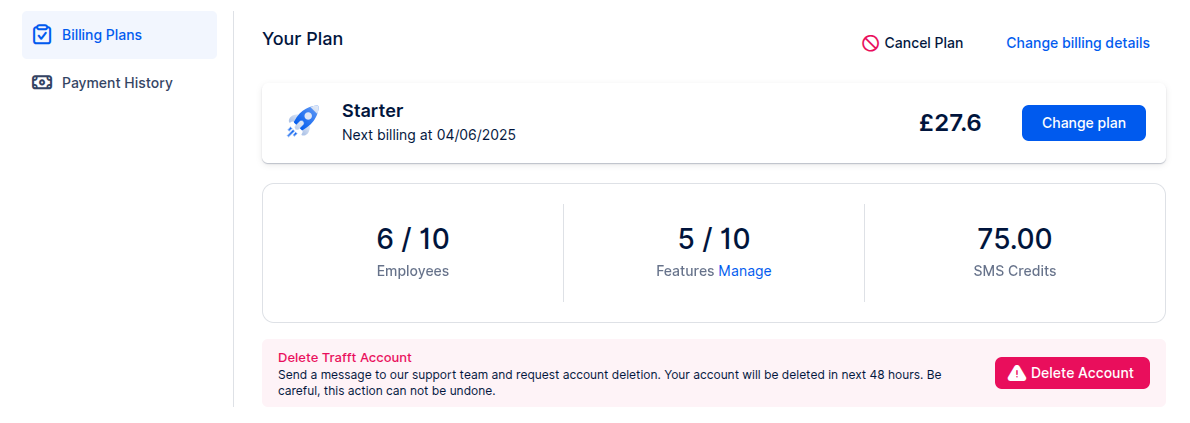
Billing
The Billing page shows your current subscription plan, with options to change the plan or update billing details. You can view your invoice history, check the amount and date of the next subscription charge, and see your SMS credit purchase history.
It also displays:
The number of active features compared to your plan limit
Your current SMS credit balance
The number of active users (employees)
Refer a Friend
Invite a friend to try Calendar Boost by entering their email. They will receive an invitation to create their account.
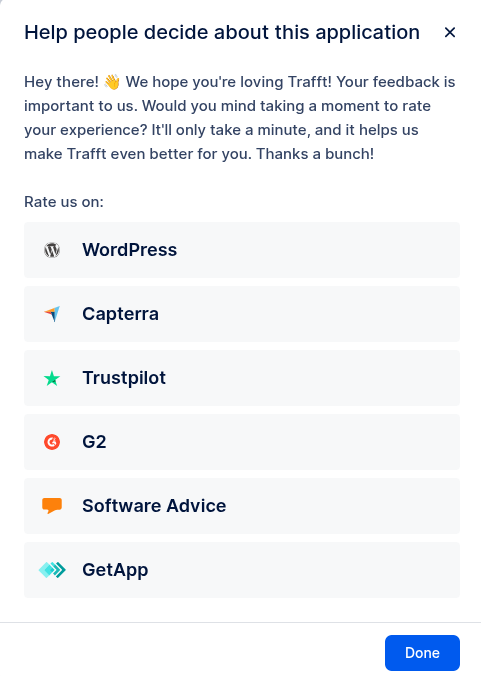
Rate Calendar Boost
If you’re enjoying Calendar Boost, we’d really appreciate your feedback. It only takes a minute and helps us grow.
A new window will open with links to WordPress, Capterra, Trustpilot, G2, Software Advice, and GetApp.
Welcome to Calendar Boost
Welcome to Calendar Boost, your all in one appointment scheduling solution. This comprehensive guide is designed to help both new users and those who are just starting to use the app get up and running quickly.
For New Users currently exploring Calendar Boost
1. Sign Up and Log In
Start by visiting Calendar Boost and signing up for a new account.
After registration, Calendar Boost will automatically log you into your account.
2. Set Up Your Profile
Upon logging in for the first time, complete your profile information.
Navigate to Settings to customize your business details, including your business name, logo, working hours, and contact information.
3. Configure Services
In the Services section, create the various services you offer to your clients.
Add service details such as name, duration, price, description, and any additional extras or add ons.
4. Add Employees
Head to Employees to add your staff members to Calendar Boost.
Assign specific services to each employee based on their expertise and availability.
5. Customize Your Booking Page
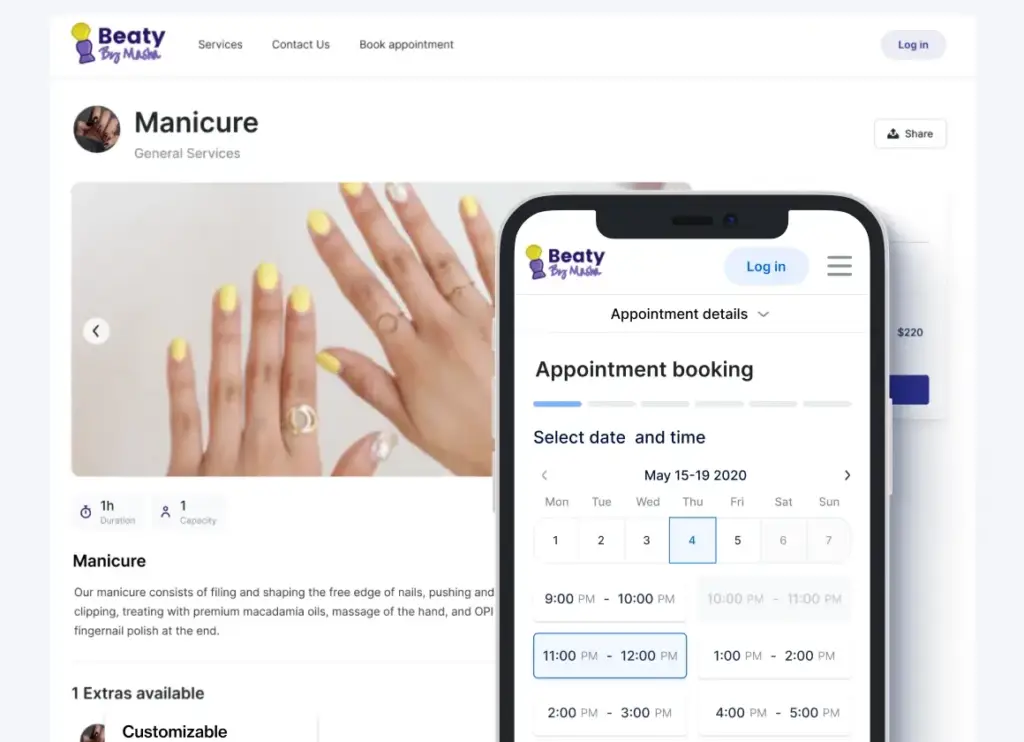
The Booking Page is where your clients will schedule their appointments.
Personalize your online booking page by choosing colors, uploading images, and setting up booking rules and policies through the Customize section.
6. Front End Booking for Clients
Clients can now visit your customized booking page to easily schedule appointments.
They select their desired service, preferred employee, and convenient date and time for the appointment.
7. Back End Booking for Admins and Employees
As an admin or employee, you can create appointments from the back end.
Navigate to the Appointments or Calendar section and click on Add Appointment to fill in the necessary details.
For Existing Users (Just Started Using the App)
1. Review Your Setup
Log in to your Calendar Boost account to review your existing setup.
Ensure your profile details, services, and employee assignments are accurate and up to date.
2. Manage Appointments
Use the Appointments section to efficiently manage all your scheduled appointments.
Easily view, edit, and delete appointments as needed.
Use filters and search options to quickly find specific appointments.
3. Group Appointments
Enable the Group Booking feature for services that allow multiple customers per appointment.
The +X indicator next to a customer's name shows the number of additional customers in a group appointment.
For services allowing customers to bring guests, view the total number in the appointment details.
4. Advanced Features
Explore additional features such as custom fields, discount coupons, and recurring appointments.
Use the Three Dots menu within appointments to access options like editing, duplicating, viewing activity logs, or deleting appointments.
5. User Roles and Permissions
Understand the different user roles in Calendar Boost: Admin, Superadmin, and Employee.
Admins and superadmins have full access to appointments, services, and customer data.
Employees can only view and manage appointments assigned to them, ensuring privacy and organization.
6. Exporting Data
Export your appointment data for record keeping or analysis.
Select Export Data to choose the desired delimiter and columns for the exported CSV file.
Appointments will be exported based on the selected date range.
7. Custom Roles (Optional)
For advanced control over user permissions, create custom roles in Settings → Users & Roles.
Customize roles to grant specific capabilities, such as viewing all appointments, employees, customers, services, and locations.
8. Support and Help
For any questions or assistance, Calendar Boost offers a comprehensive Help Center.
Reach out to Calendar Boost’s dedicated support team for personalized support and prompt assistance.
Congratulations!
Whether you're a new user just getting started or an existing user exploring more features, you are now equipped to streamline your appointment scheduling process with Calendar Boost. Explore the diverse features, tailor settings to your preferences, and provide your clients with a seamless booking experience. Experience the efficiency and convenience Calendar Boost brings to managing appointments for your business.
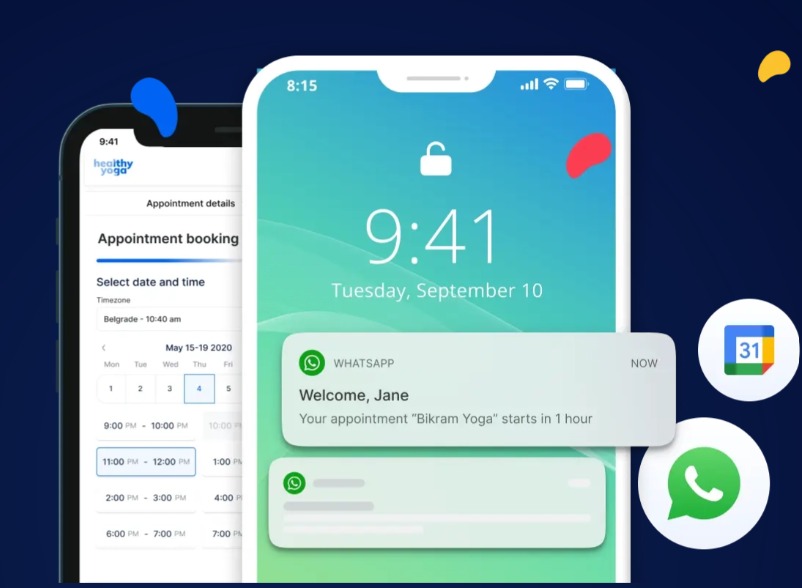
Manage Your Account on the Go
Manage your entire Calendar Boost account on the go with our mobile app. The app provides the same functionality as the desktop version, allowing you to:
View and manage appointments, services, and clients
Add and edit bookings in real time
Receive instant notifications and updates
Manage employees, locations, and resources
Access analytics and reports
Download the app and keep your business running from anywhere:
Download on the App Store
Get it on Google Play
Can I Have a Branded Mobile Application?
Yes! Calendar Boost offers fully branded mobile applications for both iOS and Android, allowing businesses to extend their services directly to mobile users. These apps can be tailored for two main use cases:
Dashboard Apps for Business Owners – Manage bookings, employees, services, and clients directly from a branded mobile app. Keep your operations smooth and accessible from anywhere.
Customer Booking Apps – Provide your clients with a dedicated app for booking appointments, purchasing services, and receiving notifications, fully branded with your company identity.
Our branded apps ensure a seamless experience across devices, reflecting your brand and improving engagement with your team and customers.
You can request your iOS and Android apps using the forms below:
Request iOS App
Request Android App
We understand that you may have questions about using Calendar Boost and its features. Below are some frequently asked questions to provide you with quick answers:
Can multiple services be booked at once?
Booking multiple services simultaneously is not directly supported, but there is a workaround using Extras. For example:
Service: Beard Trim
Extras: Haircut and Ear Waxing
Service: Haircut
Extras: Beard Trim and Ear Waxing
Service: Ear Waxing
Extras: Beard Trim and Haircut
By setting up Extras in this way, it mimics the functionality of booking multiple services. You can define the duration and price of each extra, allowing customers to book their appointments with additional services.
Can multiple Google or Outlook accounts be linked to a single employee?
Yes, by linking via Account Settings. In short, avoid assigning calendars through the Features & Integrations → Google (or Outlook) Calendar settings page. Instead, the employee should log into their account and navigate to Account Settings. From there, they can add and manage multiple Google or Outlook calendars.
Can I create different durations in anything other than 30 minute increments?
Yes, you can create durations in increments other than 30 minutes. The increments depend on the Default Time Slot Step, which is defined in General Settings. For example, if you want to offer a service lasting 2 hours with buffer times of 5 minutes, set the Default Time Slot Step to “5 minutes.”
Can my employees log into their accounts?
Yes, employees can log into their accounts. To enable this, go to Settings → Users & Roles. Next to each user, you will find a three dots option. Click on it to enable login for the employee. If login was already enabled, you can reset the password from the same menu.
Can I send emails from my email address?
Of course. Email notifications are enabled automatically and are sent from no-reply@calendarboost.com, but you can enable and configure the SMTP Feature to use your own email address for sending messages to your customers.
How can I block a time slot after a certain number of users are booked?
Currently, there is no direct option to block a time slot based on a defined minimum of public bookings. However, you can achieve a similar result using the Group Booking feature:
Group Booking with Private Bookings:
Use the Group Booking feature with the option to make the bookings private.
Define the minimum capacity of a group service.
When a single customer books for a number of people between the minimum and maximum capacity, the time slot will automatically close and create a private group appointment.
By using the Group Booking feature with private bookings, you can effectively block a time slot after a certain number of users are booked.
Can the form be embedded on another website?
Yes, you can easily embed the booking form on another website. In the Admin Section, click on the Share Booking option at the top. From there, you can create an embed form for all categories and services (by leaving the filters blank) or be more specific by selecting a category, service, employee, location, date range, or time. After making your selections, copy the automatically generated embed code and paste it onto your desired website.
Can employees cover multiple locations?
Yes, employees can cover multiple locations within the system. By default, employees are assigned a single location. However, you can assign them to multiple locations in the Working Hours section. Navigate to the Working Hours tab, edit the existing periods, and either select different locations for each period or choose multiple locations within the same period. This allows for a versatile scheduling system that accommodates various work locations for employees.
How can I create a one time event?
While Calendar Boost does not currently offer a dedicated Events feature, it is on our roadmap for future development. In the meantime, you can create one time events using Services. Simply set up a service that corresponds to the event, assign it to a specific employee, and configure the date and time using the Special Days feature. This workaround allows you to effectively manage one time events within the Calendar Boost platform until the Events feature is implemented.
Can I change my Calendar Boost subdomain (booking page URL)?
Yes. If you need to change the subdomain (for example, from yourname.calendarboost.com to newname.calendarboost.com), contact our support team with the requested change.
This cannot be done directly through the dashboard, but we are happy to help on our end.
Can I add my logo to email notifications in Calendar Boost?
Yes, you can add your logo to email notifications. To do this, go to Settings → Email Notifications, select the notification you want to edit, and click on the placeholder to open the HTML editor. From there, you can insert your logo using an <img> tag with the logo URL. This allows you to customize the look and feel of your emails to match your brand.
Setting Up Calendar Boost
We’ve paid special attention to making configuration in Calendar Boost a breeze for our users. You can access all general settings, features, and customization options immediately after logging in. To help you set up everything smoothly, we’ve divided the settings into Global Settings and Appointment Settings.
Global Settings are focused on customizing Calendar Boost to fit your needs perfectly. Here, you can set up time format, time zones, date format, and more.
Appointment Settings allow you to configure all the necessary appointment details to make booking management as easy as possible. You can choose whether you want to manually approve appointments, set default time slots, and define time limitations.
Additionally, you can also configure:
Company Settings (you’ve already filled most of these fields during the signup process)
Office Hours
Company Days Off
Services
Employees
Locations
Schedule
Email Notifications
SMS Notifications
Payment Settings
Users and Roles
Time Zones
General Settings
General Settings are designed to allow you to configure fundamental options that will be applied throughout the entire Calendar Boost application. Currently, these settings are divided into two main sections:
Appointment Settings
Global Settings
To access them, click on the Settings icon in the bottom left corner of your Admin section.
Appointment Settings
In the Appointment Settings section, you'll find essential configurations for managing time slots and appointments within Calendar Boost.
Default Time Slot Step

Default Time Slot Step
This setting determines the time increment used throughout the application for various durations, including employee working hours, special days, service durations, and buffer times.
By default, it is set to 30 minutes, but you have the flexibility to adjust it according to your needs. It is important to note that all durations in Calendar Boost must be divisible by this number.
Example:
If you want to offer a service lasting 2 hours with buffer times of 5 minutes, set the Default Time Slot Step to 5 minutes.
Use Service Duration as Booking Time Slot
This option affects how time slots are displayed to your customers:
Disabled:
When disabled, the Default Time Slot Step determines the available booking increments.
For example, if the default time slot step is 5 minutes and your service lasts 1 hour, the offered time slots will be:
09:00 to 10:00, 09:05 to 10:05, 09:10 to 10:10, and so on.
When a customer books an appointment, the service duration will block overlapping time slots. For example, if a customer books at 09:55, the surrounding time slots will be blocked due to the one hour service duration.
Enabled:
When enabled, the service duration (plus any extras) determines the available time slots.
For example, if the service lasts 1 hour and an extra adds 30 minutes, the appointment duration becomes 1.5 hours.
If an employee works from 09:00 to 17:00, the offered time slots will be 09:00 to 10:30, 10:30 to 12:00, and so forth.
Enabling this option also allows you to use the Add buffer time to the duration of the service when showing time slots setting.
For instance, with a 30 minute buffer added to the example above, the appointment duration becomes 2 hours, and the offered time slots will be 09:00 to 11:00, 11:00 to 13:00, and so forth.
Status and Time Limitations
The following options apply to all appointments in Calendar Boost.
However, note that Minimum Time Required Before Booking and Number of Days Available for Booking in Advance can also be configured per service.
If these options are defined differently within the Service Settings, they will override the global settings configured here.
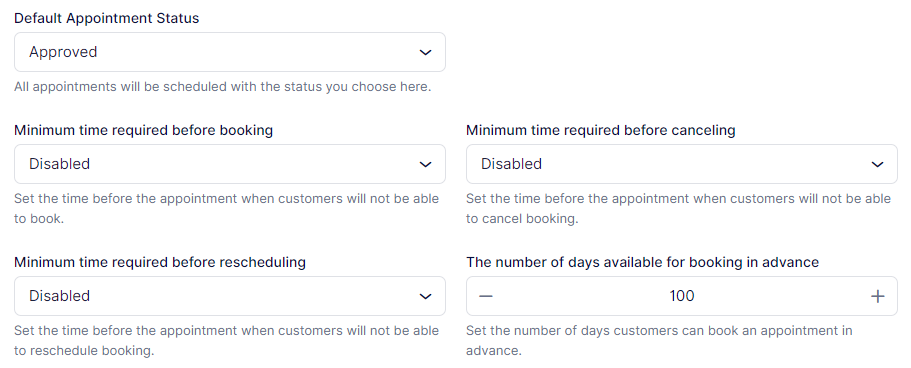
Default Appointment Status
This setting determines the initial status of all appointments when scheduled.
By default, it is set to Approved, meaning appointments are automatically confirmed.
When email, SMS, or WhatsApp notifications are configured, this status triggers the Appointment Approved notification for both customers and employees.
Changing the status to Pending requires manual approval by the site admin, super admin, or assigned employee.
Note:
Even if the default status is Approved, Group Appointments with a minimum capacity above 1 will initially appear as Pending until the minimum capacity is reached. Once it is reached, the status will automatically update to Approved.
Minimum Time Required Before Booking
This option sets how soon before an appointment a customer can book.
For example, setting it to 1 day means customers cannot book appointments within the next 24 hours.
By default, this is Disabled, allowing customers to book any available slot, even a few minutes before the appointment starts.
Minimum Time Required Before Canceling
This setting defines how soon before an appointment a customer can cancel.
For instance, if set to 2 hours, customers cannot cancel within two hours of the scheduled appointment time.
By default, this is Disabled, meaning customers can cancel at any time.
Minimum Time Required Before Rescheduling
Similar to canceling, this setting prevents customers from rescheduling too close to the appointment start time.
For example, if set to 1 hour, customers cannot reschedule an appointment that begins within the next hour.
By default, this is Disabled, allowing rescheduling at any time.
Period Available for Booking in Advance
This determines how far in advance customers can schedule appointments.
The default value is 100 days.
Adjust this setting if you want to limit how far ahead customers can book.
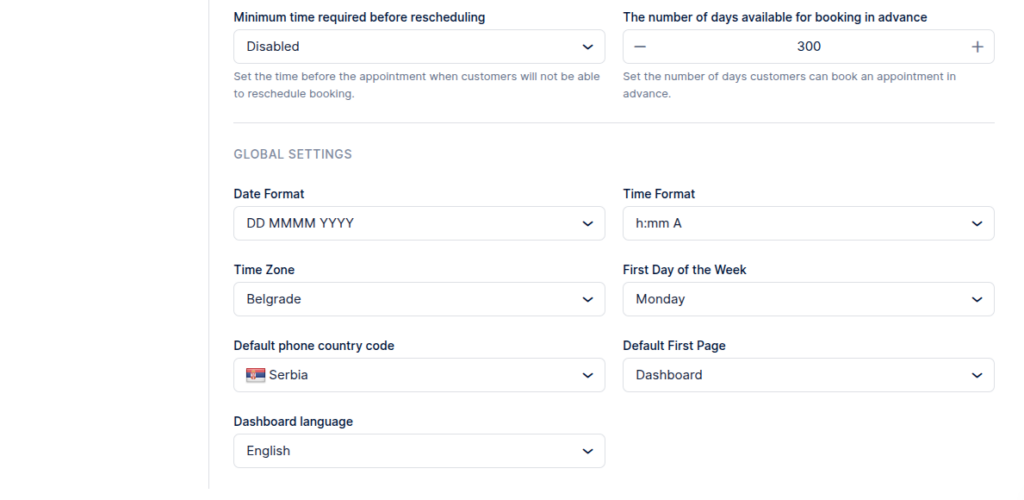
Global Settings
These settings manage formats, time zones, and several aspects of your backend view in Calendar Boost.
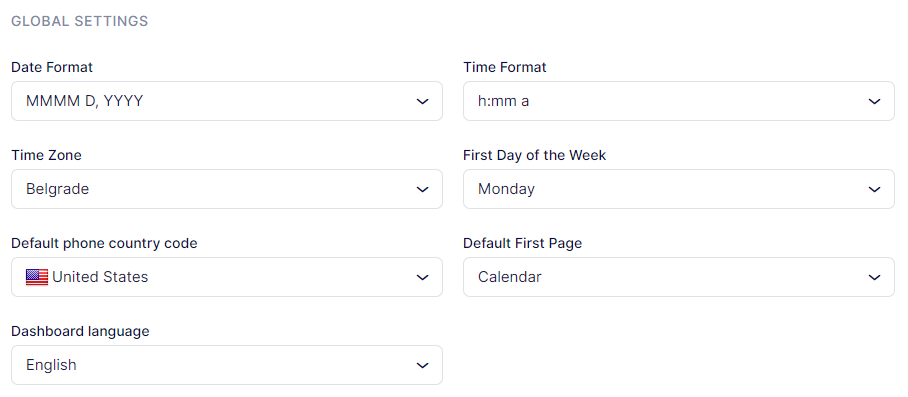
Date Format
Choose from various date formats used globally and select the one that best suits your business and customers.
Time Format
Similar to the date format, Calendar Boost lets you choose between a 12 hour or 24 hour time display.
Time Zone
Select the time zone for your business operations. This will apply to all employees unless their schedules are set in different zones.
Both you and your employees can modify this setting in the Employee Panel.
Your customers will always see available time slots in their local time zone, but the display behavior can be adjusted in the Customize section.
First Day of the Week
Choose which day your calendar starts on.
By default, it is Monday, but you can select any day that best matches your business week.
Default Phone Country Code
Set the default phone country code used in your region. This code will be automatically applied throughout the system.
Default First Page
Choose the initial page you land on when accessing the admin section.
By default, it is set to Calendar, but you can change it to Dashboard or Appointments depending on your preference.
Dashboard Language
In addition to English, the Calendar Boost dashboard is available in:
Brazilian Portuguese, Czech, German, French, Italian, Dutch, Russian, Spanish, Serbian, Swedish, and Thai.
As new translations are completed, they will be added to the platform.
If you wish to contribute to Calendar Boost translations, please email our support team at help@calendarboost.com.
Services are the foundation of your business, allowing customers to schedule appointments with you or your employees. In this section, we'll guide you through creating, managing, and customizing services using the Calendar Boost booking system.
Video Version
https://youtu.be/Us5wqNga8jQ
Creating Categories
When your account was created, Calendar Boost automatically generated some sample services and placed them in the Default Category. This category is provided to give you a starting point. While it cannot be deleted, you can easily rename it by clicking on the three-dots menu on the category bar and selecting Edit Category.
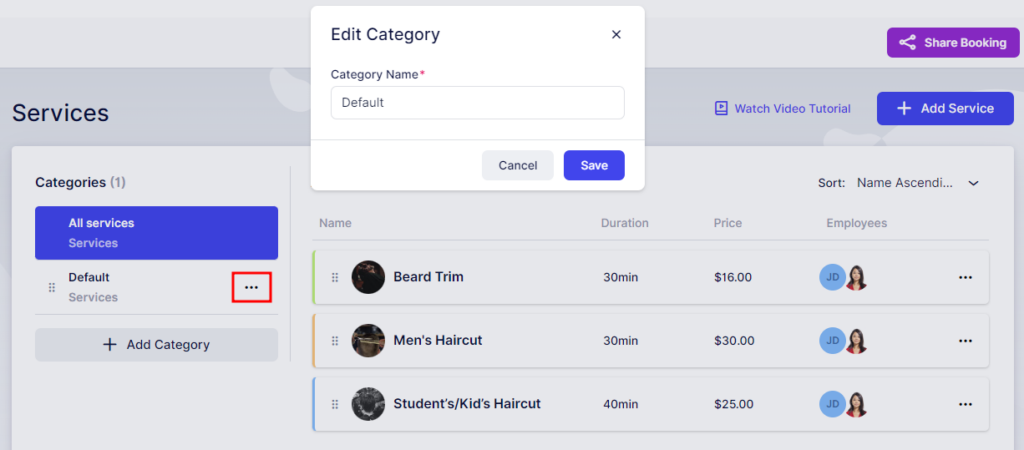
Creating Categories
To create new categories, click on the + Add Category button located on the left side of the page, just below the Default Category.
Enter the desired category name, then click Add Category to include it in the list on the left side of the page.
You can reorder categories by clicking and dragging the drag-and-drop icon next to each category.
The order you set for categories here will determine how they appear on your Booking Website. Next to each category, you’ll see a three-dots menu offering the following options:
Edit Category: Modify the category name.
Share Category: Share the booking form with the selected category preselected.
Delete Category: Remove the category (except for the Default Category, which cannot be deleted).
Sharing Options
The Share Booking option allows you to share a specific category with your customers. Clicking on it provides several sharing methods:
Share Link: Direct link to the category.
Embed Code: HTML code to embed the category on your website.
QR Code: Scannable code for quick access.
Email: Send the category link via email.
Social Media Post: Share the category on social platforms.
WordPress Plugin Download: Download the WordPress plugin to integrate the category into your site.
When you choose one of these options, the category will be preselected for easy sharing. You can share the entire category or select specific services, employees, locations, date ranges, or time slots as needed.
Note: If all services within a category are hidden, sharing the category will not be possible. You can manually share an individual hidden service, but currently, sharing a category containing only hidden services is not supported.
Creating Services
To create a new service, click the + Add Service button located in the top right corner. A popup modal will appear where you can enter the details for your new service.
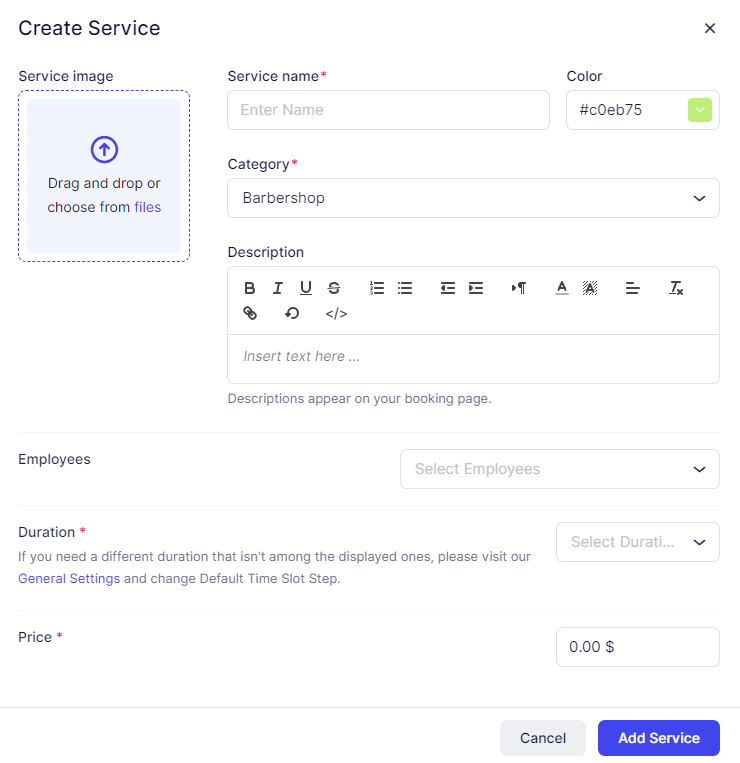
Creating a New Service
In this modal for creating a new service, you can configure all the details for the service you’ll offer to your customers on the Booking Website:
Service Image: Upload the main service photo here. This image will appear on the Services page in your admin dashboard and on the Booking Website to visually distinguish your offerings. Click anywhere in the upload square to select a photo from your files, or simply drag and drop an image into the area.
Service Name: This field is mandatory and defines the name of your service. Without entering a name, the service cannot be saved.
Color: Choose a color for the service avatar. This color will be displayed on both the admin services page and the Booking Website if no service photo has been uploaded. Click on the color box to open the palette, or manually enter a HEX or RGB code for a specific color.
Category: Select the category where this service will be stored. This field is mandatory because every service must belong to one category. Note that a single service cannot exist in multiple categories; however, you can duplicate a service and move the duplicate to another category if needed.
Description: Use this field to describe your service. While short service names like “Men’s Haircut” may not require lengthy explanations, adding a clear and informative description helps customers understand what to expect. The description appears when customers click “Learn More” on the Booking Website.
Employees: Choose the employees who will provide this service. While not mandatory, assigning at least one employee is essential for the service to appear on the Booking Website and be available for booking. Services without assigned employees cannot be booked.
Duration: Define how long the service lasts. The available time slots depend on the Default Time Slot Step set in your General Settings. If the desired duration is unavailable, adjust the Default Time Slot Step accordingly in Settings → General Settings.
Price: This field is required, though you can set the price to $0.00 if the service is free. The currency format, position, decimal places, and separators are determined by your Payment Settings. You can modify these preferences in Settings → Payments.
Note: Calendar Boost does not automatically convert exchange rates. If you set a service price in one currency and later change the Payment Settings to another currency, the numeric value will remain the same but will be displayed with the new currency symbol.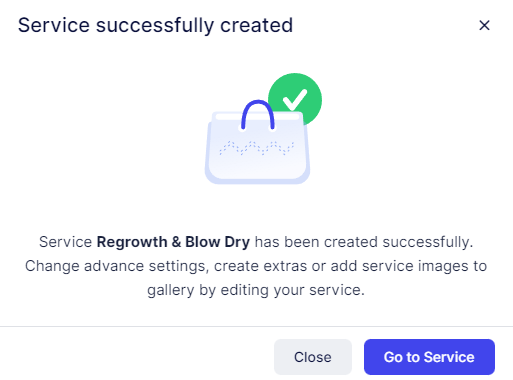
Managing Services
Once you’ve created a service, you can return to the Service List by clicking Close.
Alternatively, clicking Go to Service will redirect you to the service’s dedicated page, where you can configure additional options for that specific service.You can also access a service’s page by clicking the three-dots menu next to the service name and selecting Edit Service from the dropdown options.
When editing a service, you’ll find four menu items on the left side of the screen:
General
Pricing
Capacity
Custom Fields
Once you've created the service, you can return to the Service List by clicking "Close." Alternatively, clicking "Go to Service" will redirect you to the service's page where you can configure additional options for that specific service.
You can also access the service's page by clicking the three-dots menu next to the service and selecting "Edit Service" from the options.
When editing a service, you'll find four menu items on the left:
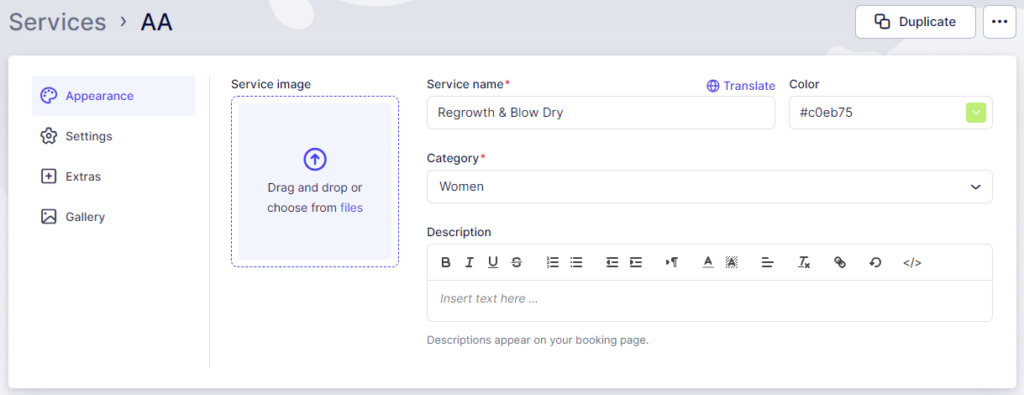
Service Tabs
When editing a service in Calendar Boost, you’ll find two key tabs that let you manage both the visual presentation and advanced configuration of the service:
Appearance
This tab contains all the appearance options you set during the creation of the service. If you wish to modify any of these settings—such as the service image, name, color, or description—you can do so here.
Settings
This tab allows you to configure additional options that determine how the service operates:
Employees: Select the employees who will be assigned to this service. Only employees assigned here will be able to accept bookings for it.
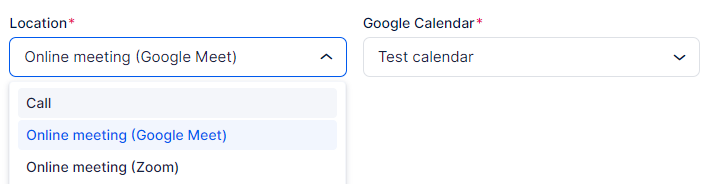
Where do you want to provide the service: Define whether the service will be provided Online, On-Site, or at All Locations.
To offer the service Online, you must first set up at least one online meeting integration (such as Zoom or Google Meet).
For on-site services, the location will be determined by the employee’s assigned Default Location. However, employees can work at multiple locations as defined in their Working Hours or Special Days.
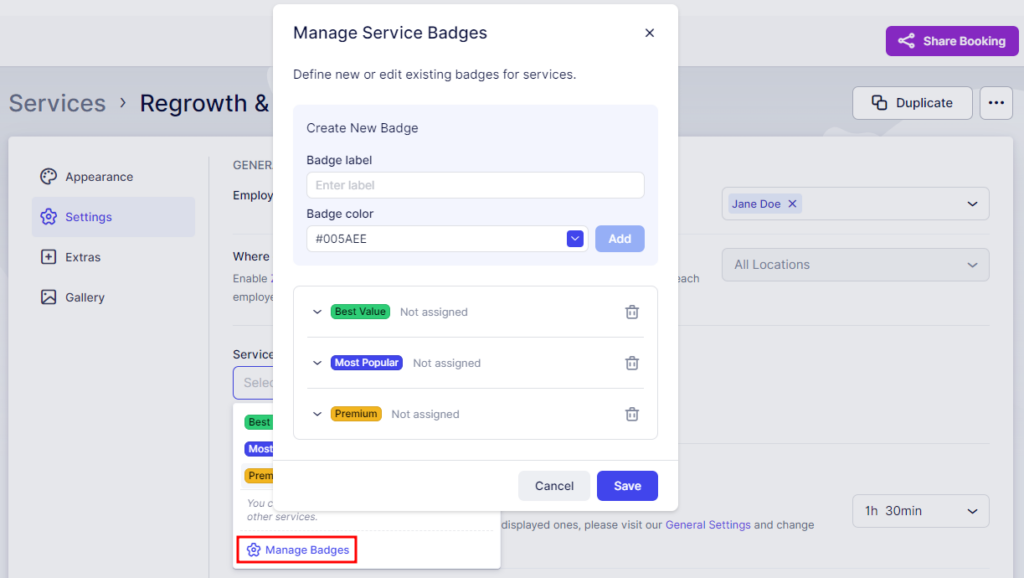
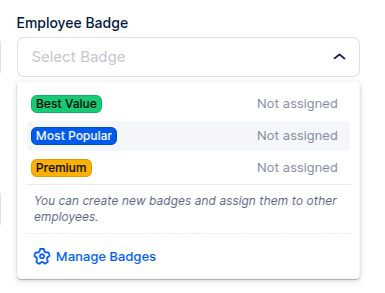
Service Badge: Assign a badge to highlight the service to your customers. Expand the drop-down menu to view default badges such as Best Value, Most Popular, and Premium.
Selecting Manage Badges allows you to edit or delete existing badges or add new ones. These badges are great for promoting special offers, featured services, or premium options.
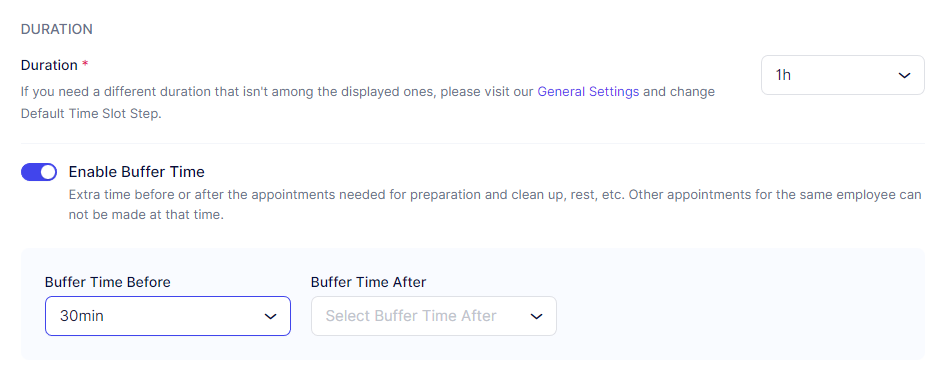
Duration and Buffer Time
Duration:
This is the duration you configured when creating the service, but you can adjust it here if needed. The service duration determines how long each appointment will last.Enable Buffer Time:
When this option is enabled, two additional fields appear — Buffer Time Before and Buffer Time After. These settings allow you to define the amount of time before and/or after an appointment during which the employee will be unavailable.Customers will not see buffer times on the Booking Website, but they are visible on the Admin Calendar once the appointment is booked. Buffer time reduces the total number of available time slots in a day since it’s added to the appointment’s overall duration.
Example:
A 1-hour service with 30 minutes of buffer time will take up 1.5 hours on the calendar and block 1.5 hours in the employee’s schedule.Buffer Time Before: Allows your employee to prepare for the appointment.
Buffer Time After: Gives the employee additional time to rest, clean up, or prepare for the next appointment.
The time slot options available here are based on the Default Time Slot Step defined in your General Settings.
Pricing and Payment Options
Price:
This is the price you configured when creating the service, but you can update it here if needed. The price determines what customers will pay when booking the service.Tax:
By default, Calendar Boost does not have any taxes configured. When you expand the Select Tax drop-down, you may see No Data.
To add taxes, navigate to the Finance section on the left menu, then open Taxes. After adding tax options, you’ll be able to select the appropriate one when editing the service.Payment Method:
If you’ve connected at least one Online Payment method and haven’t disabled the On-Site payment option in Payment Settings, you can choose how this specific service will handle payments:Online: Customers must pay online.
On-Site: Customers pay in person.
All: Both online and on-site payments are available.
Enable Deposit Payments:
This option is disabled by default and cannot be activated until you’ve added at least one Online Payment method. Once available, this feature allows customers to pay a deposit instead of the full amount upfront.This is a Private Service:
When enabled, the service becomes invisible on the Booking Website. However, you can still book appointments for it via the back end (from the Appointments page).
You can also share this private service with customers by using the Share Booking option at the top of the Calendar Boost dashboard. When accessed through that specific link, the service will be visible only to those who have it.Enable Recurring Appointments:
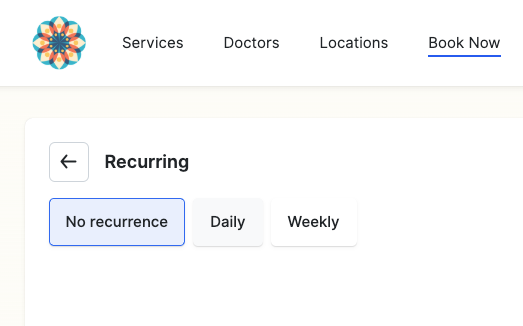
Enabling this feature allows you to set up the service for recurring bookings. Once activated, you can configure:Recurrence frequency: Daily, weekly, or monthly.
Minimum and maximum number of recurring appointments a customer can select.
Payment handling: How recurring appointments will be billed (e.g., per session or upfront).
Unavailable slots: How the system will handle non-available dates or times in a recurring sequence.
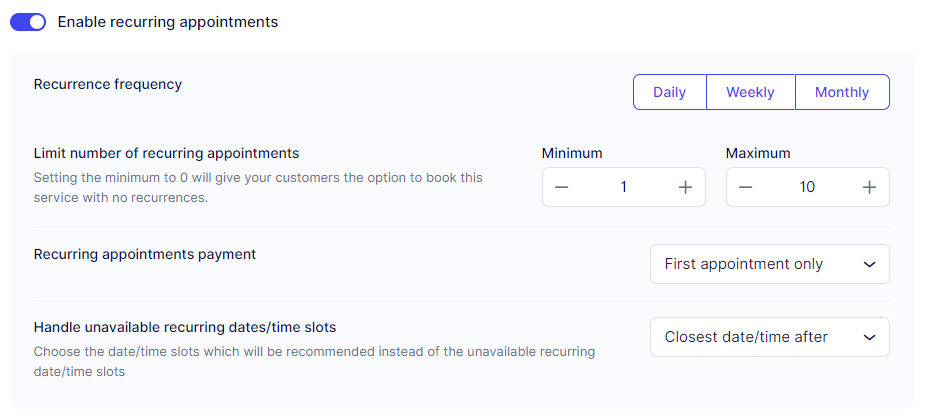
If the minimum number of appointments is set to 0, customers can book a one-time appointment instead of a recurring one.
Redirects and Group Booking
Redirect URL After a Successful Booking:
Enabling this option allows you to specify a URL where customers will be redirected after successfully booking an appointment.
This can be configured individually for each service. If enabled in Service Settings, it will override the Redirect URL defined in the Customize section.
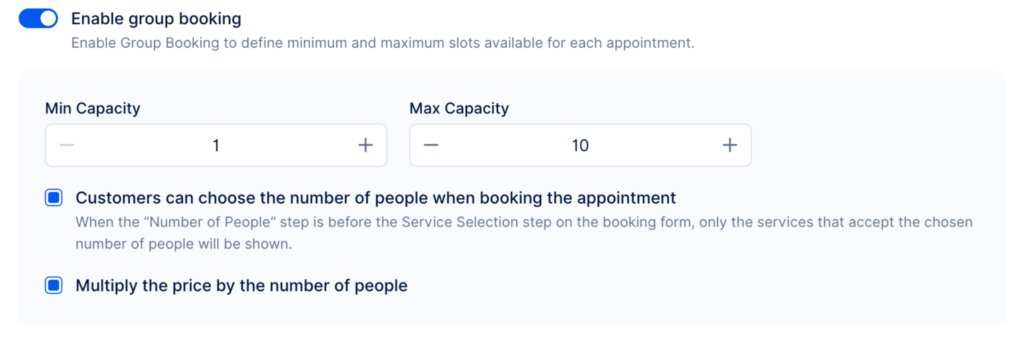
This is particularly useful for redirecting customers to a thank-you page, a special offer, or a custom confirmation page after booking.Enable Group Booking:
When this option is enabled, two additional fields become available — Min Capacity and Max Capacity. These determine the minimum and maximum number of people who can book the service.By default, both values are set to 1, meaning each appointment is for a single customer only.
Increasing the Max Capacity above 1 enables group appointments, where multiple customers can book the same time slot.
Once Max Capacity is set higher than 1, two more options appear:
Customers Can Choose the Number of People When Booking:
Allows customers to specify how many people they are booking for. If disabled, customers will only be able to book for themselves.Multiply the Price by the Number of People:
By default, the service price applies to the entire appointment. Enabling this option multiplies the price by the number of people in the booking.
You can configure capacity globally for the entire service and apply it to all assigned employees, or set different capacities per employee in the employee’s individual settings (see the Employees page for details).
To allow multiple customers to book the same appointment slot until the maximum capacity is reached, navigate to Features & Integrations → Group Booking, and enable the Group Booking feature there. Once activated, multiple customers can book the same appointment until the defined capacity is full.
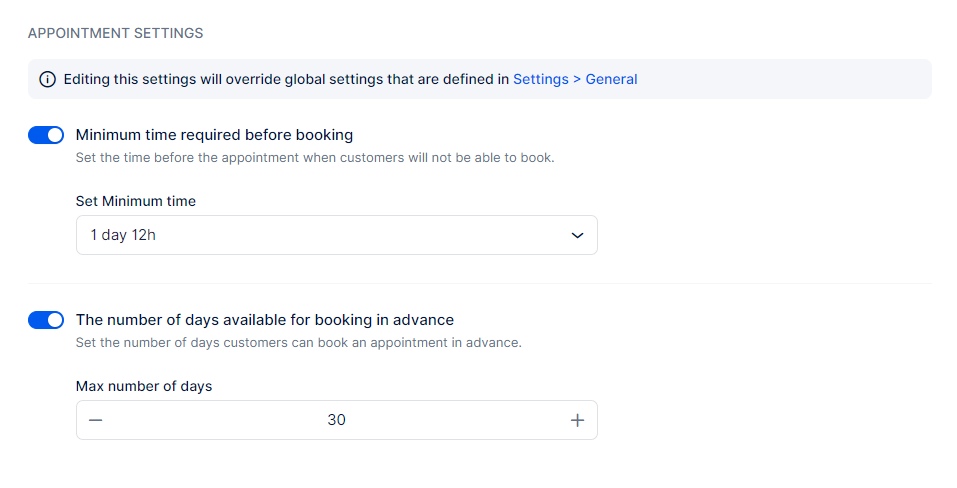
Appointment Settings
The Appointment Settings section includes two options that you may have already encountered in Calendar Boost’s General Settings:
Minimum Time Required Before Booking
Number of Days Available for Booking in Advance
These settings allow you to override the default behavior defined in Calendar Boost’s General Settings for individual services.
For example, if the global Minimum Time Required Before Booking is set to 1 day, you can customize a specific service to require 7 days’ notice or any other time frame that best fits your scheduling needs.
Similarly, while the Number of Days Available for Booking in Advance is typically set to 365 days by default, you can adjust this for certain services to shorten or extend how far in advance customers can book.
This flexibility allows each service to have its own booking rules, ensuring that your scheduling process aligns perfectly with the specific needs of your business.
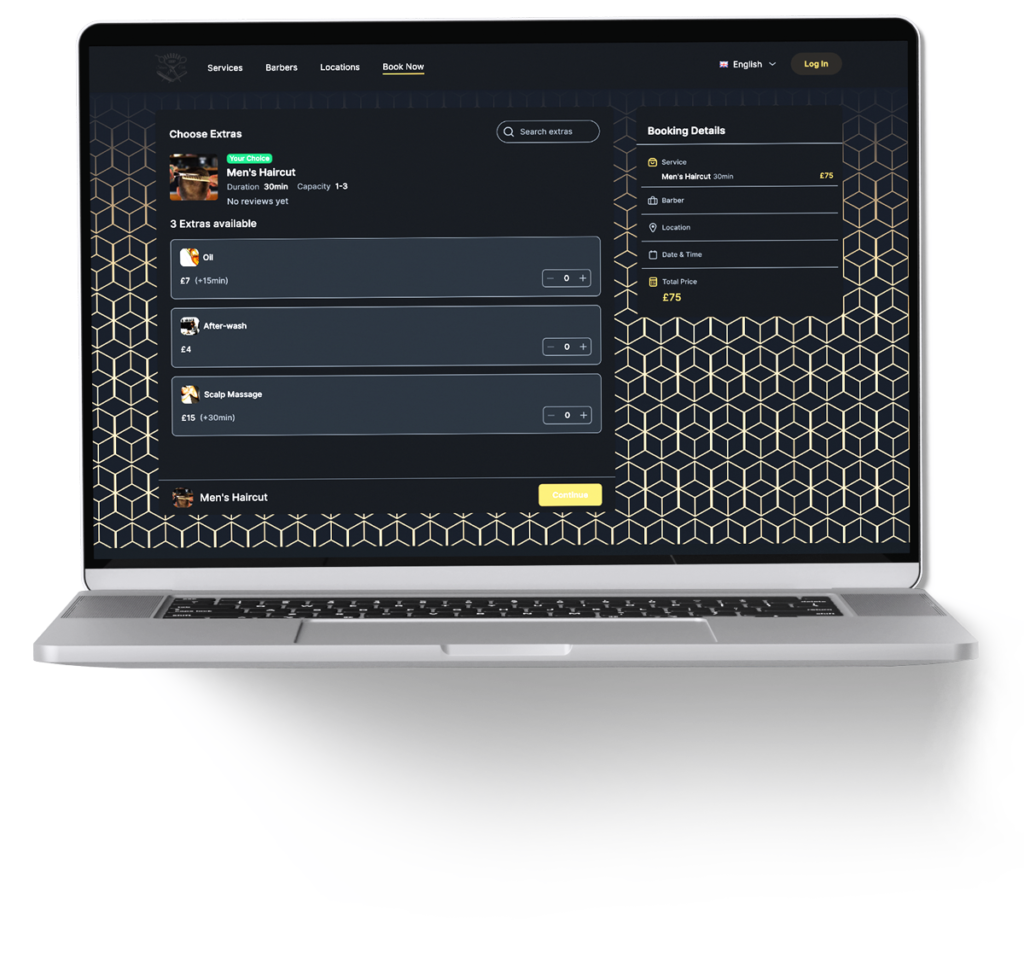
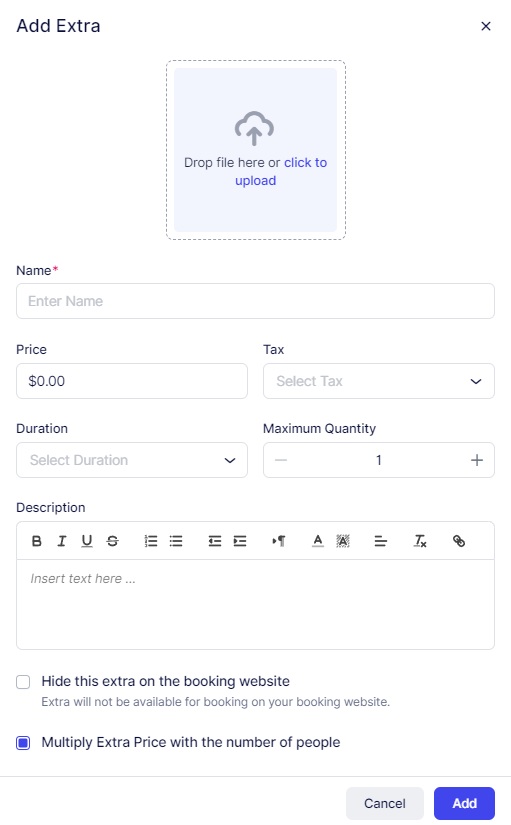
Extras
The Extras tab allows you to enhance your services by offering additional add-ons, known as extras. These can serve as upsells that give customers the option to personalize or upgrade their booking experience.
For example, a barber might offer “Beard Oil” as an extra that clients can add to their haircut appointment during the booking process.
When creating or editing an extra, you can configure the following options:
Picture: Upload an image that represents the extra.
Name: Enter the name of the extra.
Price: Set the additional price that will be added to the main service cost.
Tax: Apply a tax rate to the extra if applicable.
Duration: Define any extra time required for this add-on.
Maximum Quantity: Set the maximum number of units a customer can select for this extra.
Description: Provide details about the extra to help customers understand what it includes.
Hide this extra on the Booking Website: Choose whether to make this extra visible or hidden on your Booking Website.
Multiply Extra with the Number of People: Enable this if the price of the extra should be multiplied by the number of participants (useful for group services).
Extras are a great way to boost your revenue, offer more customization, and create a premium experience for your customers.
Gallery
The Gallery tab lets you display images that visually represent your service, helping you create a more engaging and trustworthy booking experience. This section serves as an image showcase for your website, allowing potential customers to see what your service is all about before they book.
You can upload a variety of images, such as:
Photos of your workspace or office
Action shots of your employees providing the service
Before-and-after examples or images of the process
Industry-related visuals that highlight the atmosphere or quality of your services
All uploaded images will appear as a slideshow on the booking page, providing a professional and visually appealing presentation of your service. This helps customers understand what to expect and builds confidence in booking with you.
Employees are the individuals who deliver services within your company. Depending on your chosen Calendar Boost license plan, you may be a solopreneur where you are the sole employee, or you may have a team of employees. As an admin, you can easily set their unique schedules and monitor their business activities.
If you are the sole service provider, there’s no need to worry. Your admin details were used during the onboarding process to create the first employee. However, it’s important to ensure that this employee is connected to at least one service. If you didn’t set this up during onboarding, you can continue reading to learn how to do it.
Video Version
https://youtu.be/qeegAYnC9Oc
Creating Employees
To add a new employee, go to the Employees page by clicking the icon in the sidebar. Then, click on the "+ Add Employee" button to open the employee details page.
As a new user, you'll see five tabs with options to configure. Keep in mind that the "Special Days" tab is a Custom Feature, which needs to be enabled in the Features & Integrations section to use.
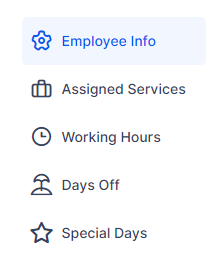
Employee Info
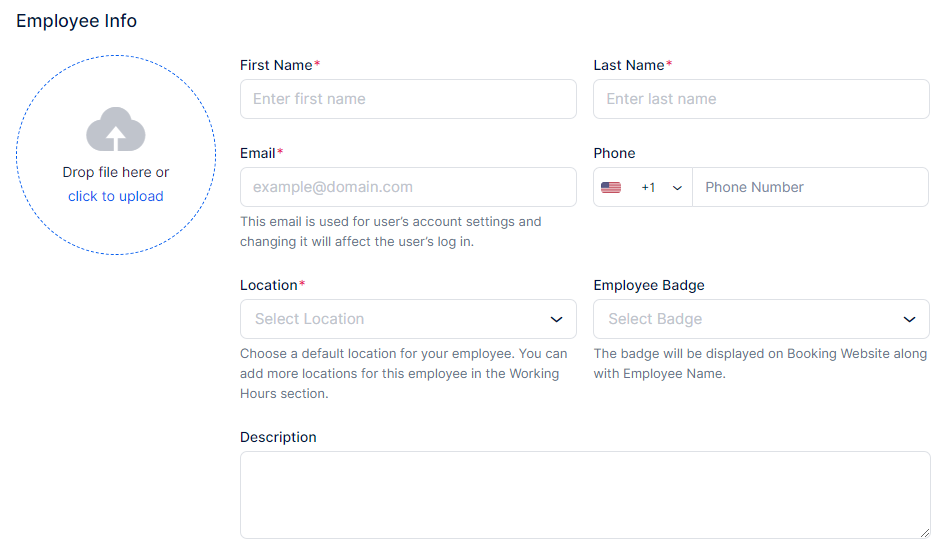
When creating a new employee profile, it's important to start by configuring the employee’s basic information:
Profile Image: Upload an image to help identify the employee in the Calendar, Employees, and Appointments pages. This gives customers a visual reference during the booking process, making it easier to recognize the employee.
First Name: This field is mandatory and must be filled out.
Last Name: Also mandatory, ensure this field is completed for accurate identification.
Email: The email address is used to register the employee as a user in Calendar Boost. It is mandatory and serves as the primary contact for notifications and login purposes. Each email must be unique across all users.
Phone: The default country flag is set in General Settings, but you can adjust it here for individual employees if needed.
Location: This field will not be visible until at least one location is created in the Locations section of Calendar Boost. While an employee can cover different locations during Working Hours, selecting a Default Location is mandatory, especially if you have multiple business locations.
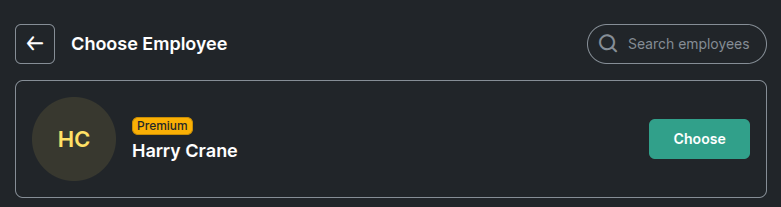
Employee Badge: Calendar Boost provides 3 default badges (Best Value, Most Popular, and Premium), which can be edited or changed. You can also create new badges to promote an employee’s services on the booking website.
Time Zone: The default Time Zone is configured in Calendar Boost’s General Settings. However, since you may have employees in various regions, you can set the time zone per employee. This ensures that when the employee logs into their account, they see appointments in their local time zone. As an admin, you will view appointments in your own time zone, simplifying scheduling and management.
Description: Use this field to provide a brief but informative description of the employee. Including details such as their experience, working style, and specialties helps customers choose the right employee for their specific needs and preferences. This personal touch enhances the customer’s booking experience and builds trust in the services offered.
If you configured the Zoom, Microsoft Teams, or Google Meet integration through their respective pages in Features & Integrations and linked your employee with Google/Zoom/Microsoft accounts, these platforms will appear as locations in the employee's profile.
Employee Badge
The Employee Badges feature in Calendar Boost allows you to highlight specific employees on your booking page, making them stand out from the rest. You can choose from default badges such as Best Value, Most Popular, and Premium, or create custom ones tailored to your business needs.
This feature is ideal for promoting top-performing employees, guiding customers toward preferred choices, or distinguishing specialists with unique expertise. Use employee badges to enhance visibility, improve booking decisions, and increase engagement with your team.
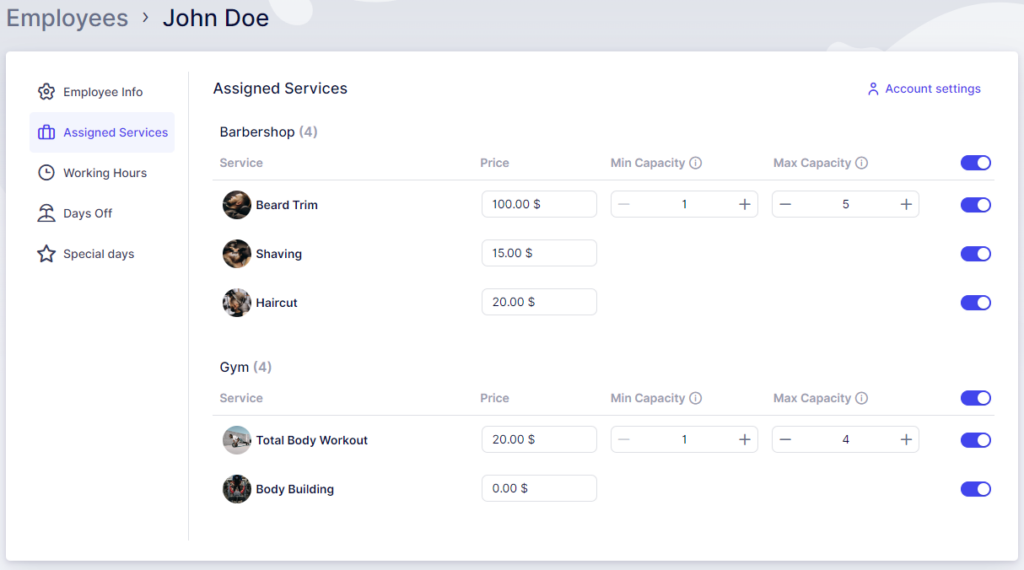
Assigned Services
In the Assigned Services tab, you can manage which Categories and Services an employee will provide by enabling or disabling them. Once services are assigned to the employee, you can set different prices for those services specific to that employee, as well as define custom minimum and maximum capacities.
This feature allows you to tailor each employee’s offerings, pricing, and capacities according to their skills or specialties. If you decide to adjust the default service price or capacity, the process is simple. When updating an employee’s prices or capacities, Calendar Boost will prompt you to choose whether the changes should apply to all employees or only to the selected one. This flexibility is particularly valuable when managing large teams with varied pricing or service capacities.
On the Booking Website, services with different prices will display “From” next to the lowest available price, while the “Choose Employee” step will show a “+” or “–” followed by the price adjustment in parentheses. This ensures complete transparency for customers when selecting both the service and the employee.
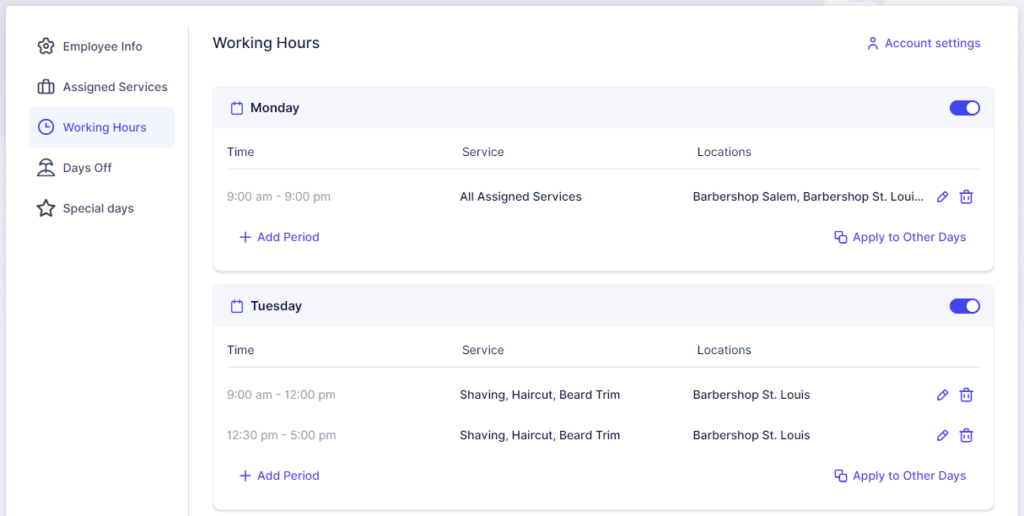
Working Hours
This section enables you to configure your employee’s working schedule, which can be a fixed schedule throughout the week or one that varies based on services and/or locations.
By default, the working hours set during the onboarding process will mirror the Office Hours and apply to all Assigned Services and the Default Location. However, you have the flexibility to make adjustments as needed.
At the top of this page, you can also set limits on the number of appointments the employee can have per day, week, or month. These limits will override the available time slots in the employee's schedule.
![]()
Apply to Other Days
The “Apply to Other Days” feature, located in the bottom right corner of each daily schedule, allows you to quickly replicate working periods from one day to multiple days. Clicking this option opens a popup where you can choose to apply the configured working hours to all days or select specific custom days.
Break Periods
Currently, there’s no direct method to configure break periods within the Working Hours interface. However, you can simulate breaks by creating multiple working periods. The time gap between these periods will automatically serve as a break, during which the employee will not be available for appointments.
Example:
If you create two working periods: 09:00–11:00 and 12:00–15:00,
the time between these periods (11:00–12:00) will act as a break period for the employee.
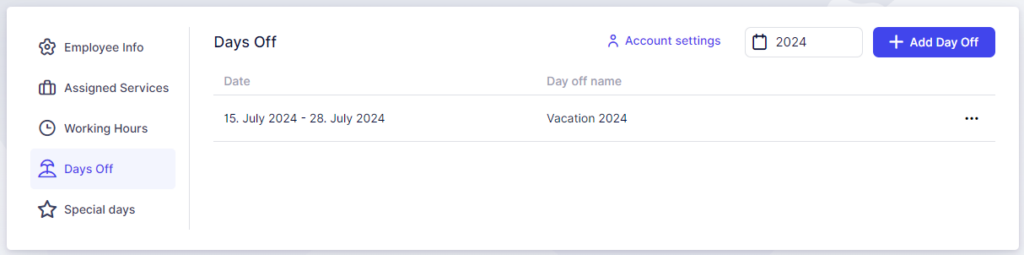
Days Off
The “Days Off” section allows you to easily manage your employees’ time off—whether for vacations, public holidays, or sick days.
To add a Day Off or a range of days:
Click the “+ Add Day Off” button in the top right corner.
A popup will appear where you can:
Name the Day Off.
Select a single day by double-clicking the date.
Choose a range of dates by clicking the start and end dates.
Decide whether this day will be repeated annually (e.g., Christmas) or will be a one-time event (e.g., vacation).
This feature helps you accurately track employee time off and ensures their schedules in Calendar Boost reflect their real-time availability.
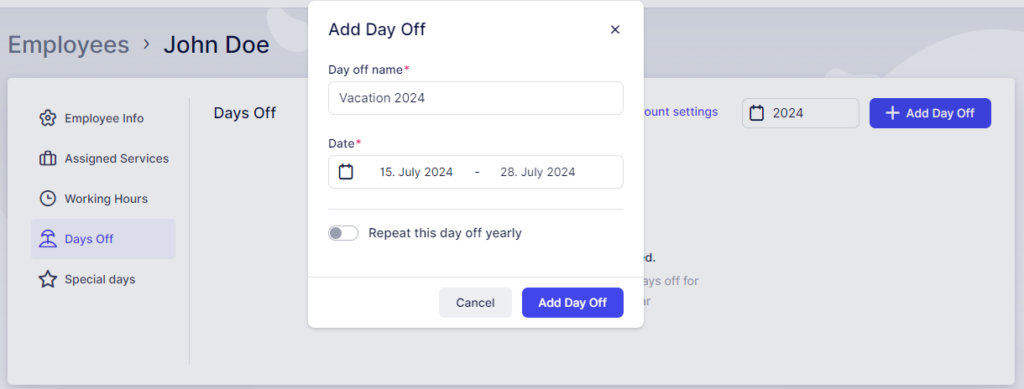
Once you click on "Add Day Off", you'll see a popup at the bottom of the screen, where you'll need to Save Changes.

Special Days
Please Note: The Special Days feature is enabled by default when you start your free trial, but it is a custom feature that must be activated on the Features & Integrations page. If you don’t see it in an employee’s profile, make sure it’s enabled first.
Sometimes, employees may have unique events or appointments that temporarily affect their regular working hours. This is where Special Days come in.
To manage these situations:
Click the “+ Add Special Day” button in the top right corner.
A popup will appear where you can:
Select a single day or a range of dates.
Adjust the time periods for these special days.
Ensure the time periods reflect the employee’s altered schedule or absence.
Example:
If an employee has a doctor’s appointment on August 2nd from 10:00–12:00, create a Special Day for that date and set time periods that accommodate the absence.
This feature in Calendar Boost ensures that your schedules remain accurate and up-to-date, even when employees have special circumstances affecting their availability.
Click on Add Period in order to add this period to the Special Day. You'll notice that this period has been minimized in the popup. Clicking it will allow you to edit it.
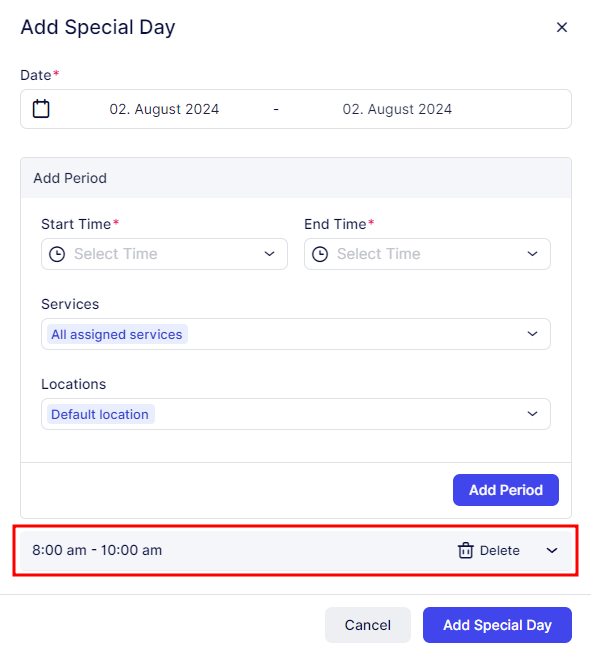
If you intend to include several periods for a Special Day, it's important to add them in sequential order. For instance, add 08:00 - 10:00 first, followed by 12:00 - 17:00. The order matters because the initial period you add will block time slots preceding it. If you add 12:00 - 17:00 before 08:00 - 10:00, you won't be able to select the earlier period afterward. This sequence ensures the correct scheduling for the employee's special circumstances.
After adding the first period, such as 08:00 - 10:00, proceed to add the next period, like 12:00 - 17:00. Click on "Add Period" again if there are additional time slots needed. Once all the necessary periods are added, click on "Add Special Day" to save the entire schedule. It's crucial to remember to click "Add Period" for each new time slot; otherwise, the Special Day will be saved with only the first period included
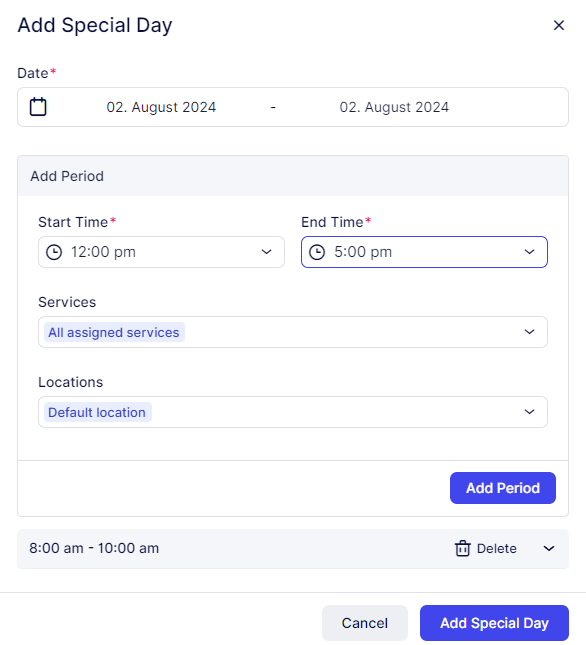
After clicking "Add Special Day," a popup will appear at the bottom of the screen. Here, you'll need to click "Save Changes" to ensure that the Special Day is saved with all the configured time slots and details.
Working with employee list and tracking their business
On the Employees page, you'll find a comprehensive list of all your employees along with their essential details such as photos, names, emails, and phones. If you have numerous employees spread across multiple pages, you can efficiently search for employees by name or utilize the Filters option to search by Services or Locations they are assigned to.
To manage your employees, you have a few options:
- Bulk Delete: Select multiple employees using the checkboxes next to their names and use the "Delete" option at the top of the page.
- Individual Deletion: You can also delete employees one by one by selecting the checkbox next to their name or by clicking on the three-dots menu on the right side of the employee bar and choosing the "Delete Employee" option.
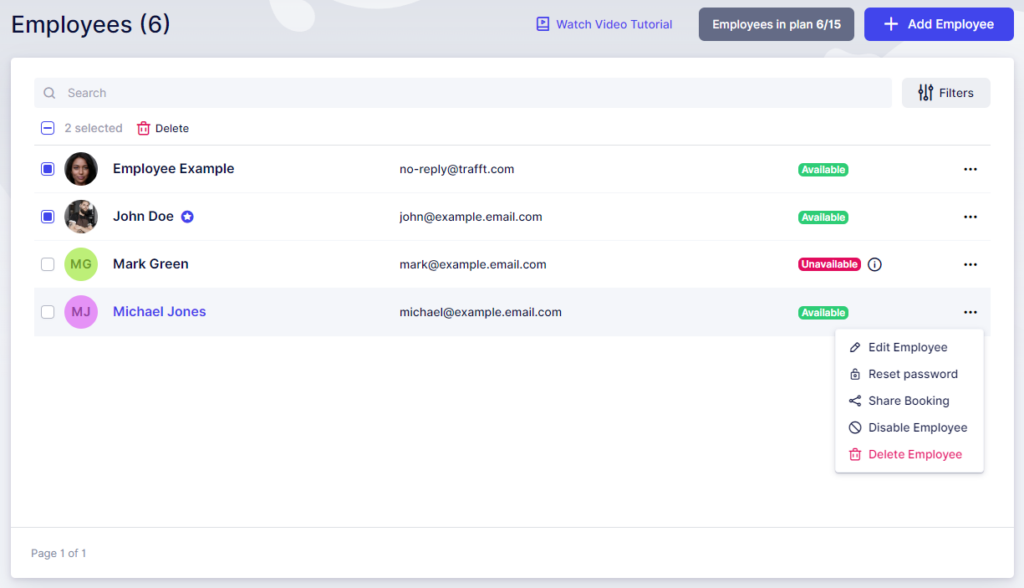
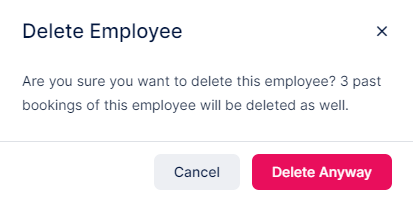
If the employee has future appointments scheduled, you will receive a warning prompt asking for confirmation before deletion. If you proceed with deletion, both the employee and their future appointments will be removed permanently.
Please note that this action cannot be undone.
The three-dots menu (...) also allows you to
- Edit an employee and change the employee's info, assigned services, or working hours;
- Reset the password of the employee;
- Share the booking form where this employee is preselected;
- Disable the employee, so they can't be booked.
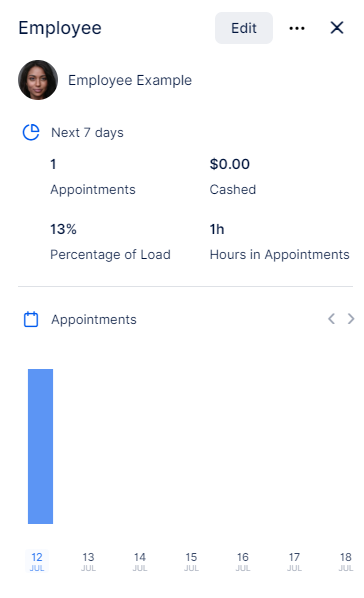
As for tracking employees' performances, this can be done by simply clicking on one employee from the list. Once you click on the employee, the sidebar with additional info will open and show:
- Employee's picture,
- First and last name,
- Working hours,
- Employee's business for the next 7 days including:
- Number of appointments,
- Cashed (earned money, counting only paid appointments)
- Percentage of load (counting the number of booked hours compared to the total number of available hours set in working hours)
- Hours in appointment (number of booked hours)
- The three-dots menu (...) from where you can generate a Booking Link, Edit, or Delete the currently selected employee.
Locations
In Calendar Boost, locations are designed for businesses that operate across multiple places. The option to manage multiple locations is a custom feature, automatically activated during your free trial.
By default, Calendar Boost begins with a single location, suitable for businesses that operate from one place. If your business is fully online or you provide services from a single address, there’s no need to configure multiple locations. Simply enter your company’s address in the Company Settings, and it will serve as your default business location.
Calendar Boost also supports Zoom, Microsoft Teams, and Google Meet as online locations. However, if you need to manage multiple physical locations, this guide will walk you through how to create and organize them within the Calendar Boost platform.
The Locations feature is a premium option and counts toward your total number of Custom Features & Integrations.
Enabling the Locations Feature
During your free trial, the Locations feature is automatically enabled. For existing customers who wish to activate it, follow these steps:
Go to the Features & Integrations section.
Locate the “Multiple Locations” card.
Click “Enable.” Once activated, the card will refresh and display the “Disable” button. This means the feature is ready to use and will now appear in the left-hand menu.
Note:
If you’ve already configured Google Meet, Zoom, or Microsoft Teams integrations, these will automatically appear as online locations. These default online locations cannot be modified or removed, as they are used for virtual service delivery.
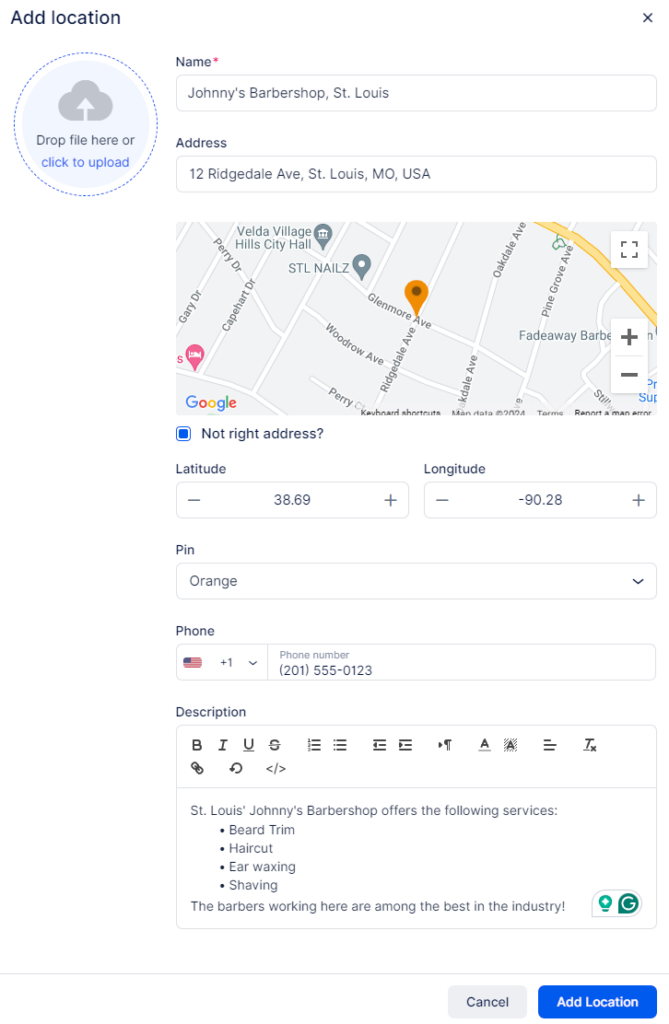
Creating a New Location
Once you access the Locations section, you can create your first location by clicking “+ Add Location.” A popup modal will appear where you can define the new location by completing the following fields:
Image: Upload an image of the location to help customers recognize it or provide a visual description. You can click the circle to upload an image or simply drag and drop it.
Name (mandatory): Enter the name of the location, for example, “Elite Fitness Center, Lagos.”
Address: Start typing the address, and Google Maps will suggest matches. Select the correct one, and the map below will automatically drop a pin at that location. You can manually drag the pin if needed. If the address isn’t correct, check “Not right address?” to manually enter the latitude and longitude.
Pin: Choose a pin color from 8 available options to help visually distinguish your locations on the map.
Phone: Enter the phone number associated with the location.
Description: Write a short description of the location and the services provided there.
This setup ensures that your customers can easily identify, select, and book services at the right location within Calendar Boost.
Once a new location has been added, a “Success” prompt will appear. You can either close it or click the “Go to Location” button to access additional settings for that location.
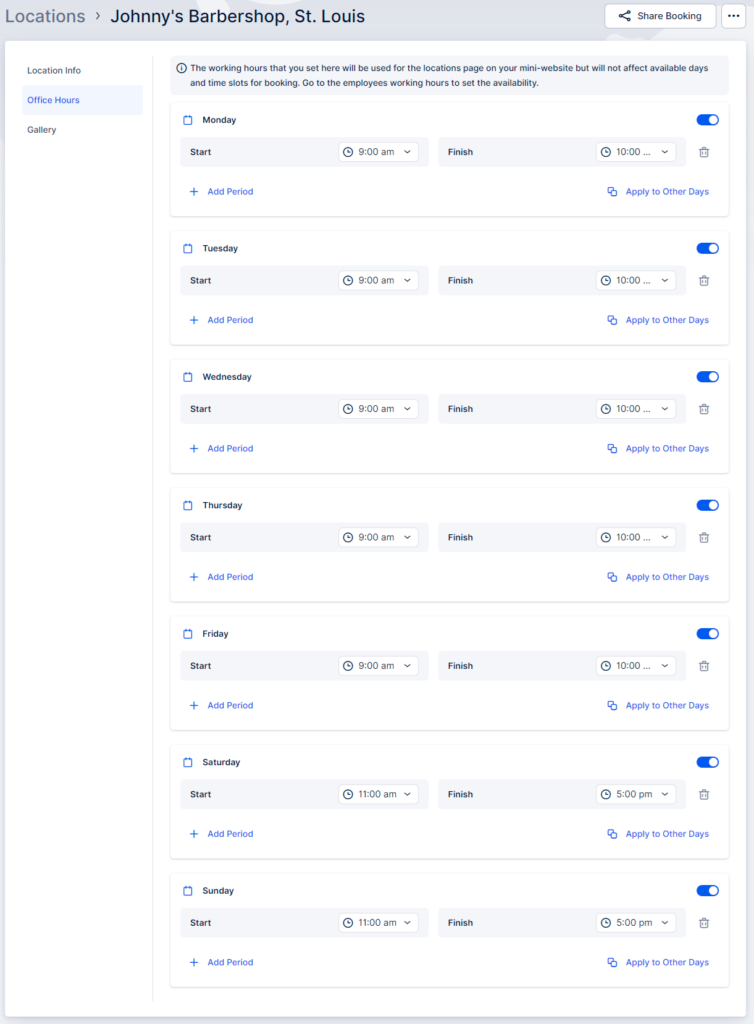
If you choose “Go to Location,” Calendar Boost will take you to the detailed overview page of the location. Here, you can review and modify the information you entered during setup. You’ll also find two tabs on the left side of the page:
Office Hours
Gallery
The Office Hours tab allows you to set the location’s general operating hours. These hours will be displayed on the location’s page of your mini-website, letting customers know when the location is open. However, these hours do not directly affect the availability of services.
To manage when services are actually available for booking, you’ll need to configure each Employee’s Working Hours. This lets you assign specific locations to employees during their scheduled work times. By aligning employee schedules with particular locations, you ensure that services remain accurately available and bookable at the right times and places within Calendar Boost.
The Gallery tab allows you to enhance the location's profile by adding a gallery of images related to the location. These images will be showcased to customers during their booking process once they select the location.
To add images to the gallery:
- Click on the field for uploading photos.
- Upload images from your files to create an engaging visual representation of the location.
Once you have finished entering all location details, remember to click the "Save Changes" button that pops up at the bottom of the screen. This ensures that the location information is saved and displayed correctly on the page for customers to view and select.
Please Note:
For locations to appear during the booking process in Calendar Boost, they must be linked to employees through the Employee Info and Working Hours tabs.
Choose a default location for each employee.
Assign specific locations for individual working periods to create customized schedules.
Since employees can work across multiple locations, Calendar Boost provides flexibility to assign different locations to different working periods.
Working with the Locations List
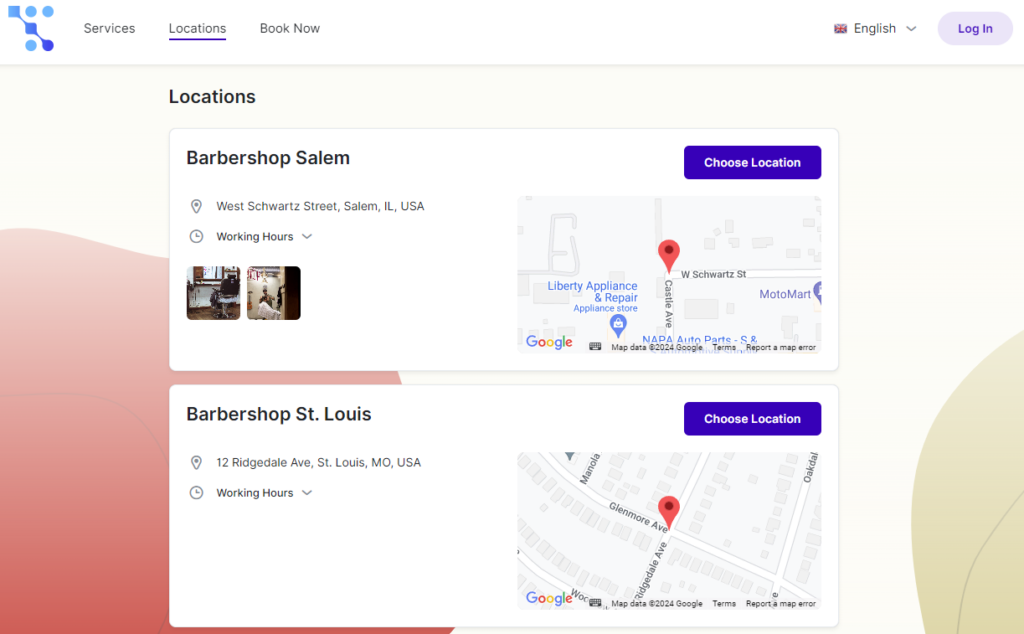
All locations are displayed on the Locations page, showing essential details such as the location name, address, and phone number. Clicking on a specific location opens a sidebar containing more detailed information.
Sidebar Details:
Office Hours: View the location’s operating hours.
Address: The full address is displayed on a map for easy reference.
Gallery: Displays a collection of images associated with the location (if any).
To edit a location, simply click the “Edit” button at the top of the right-hand sidebar.
If you manage multiple locations, you can easily search for a specific one by typing its name in the search bar.
Each location also includes a three-dots (…) menu on the right side, offering the following options:
Edit: Modify the location’s details.
Delete: Remove the location from the list.
Important Note:
If you try to delete a location that has past or upcoming appointments, a warning message will appear to prevent accidental deletion.
If you proceed to delete a location with booked appointments, all associated past and future appointments will also be permanently removed.
⚠️ This action is irreversible and cannot be undone.
On the Booking Website
Customers will find a “Locations” tab at the top of your booking website. Clicking on it will display all your physical locations.
(Please note: Online locations such as Zoom, Google Meet, or Microsoft Teams will not appear in this section.)
Managing Your Business Schedule
Managing your business schedule in Calendar Boost involves several key components: Working Hours, Days Off, Special Days, and Office Hours. Each of these plays a vital role in maintaining an efficient and organized booking system.
Let’s explore these essential elements in detail:
Availability of Time Slots (Services)
The availability of services within Calendar Boost is directly linked to the Working Hours, Days Off, and Special Days configured for your employees.
Here’s how it works:
If your employees have Working Hours set from Monday to Friday, 09:00–17:00, all services assigned to them will be available for booking during those hours. The availability depends on the duration of each service.
To customize service availability for a specific employee, you can create multiple working periods in their profile.
Example:
Employee A handles Service 1 from 09:00–12:00 and Service 2 from 13:00–15:00.
You would create two distinct working periods:
Working Period 1: 09:00–12:00, assigned to Service 1
Working Period 2: 13:00–15:00, assigned to Service 2
This setup allows you to precisely control which services are available during each period, offering flexibility and accuracy in your daily schedule.
Special Days
Special Days in Calendar Boost let you override an employee’s regular working hours for specific dates or date ranges.
For example, if an employee normally works from 09:00–17:00, you can create a Special Day for a certain date where they’ll work 10:00–14:00 instead.
This feature is ideal for handling temporary schedule adjustments such as:
Company events
Training sessions
Public holidays
Personal appointments
Note: Special Days offer flexibility but cannot override Days Off.
Days Off
Days Off are used to completely block off an employee’s availability for one or more days. This is helpful for managing:
Vacations
Sick leaves
Personal days
Public holidays
When a Day Off is assigned, the employee will not be available for appointments on that day, preventing double bookings or scheduling conflicts.
Working Hours
Working Hours are defined per employee, allowing you to set personalized schedules for each team member.
For example:
John: 09:00–17:00
Mark: 12:00–20:00
These working hours apply across the week (Monday to Sunday) and automatically repeat each week unless modified.
By setting distinct working hours, days off, and special days in Calendar Boost, you can create a balanced, transparent, and highly flexible scheduling system that reflects your business’s real operations and availability.
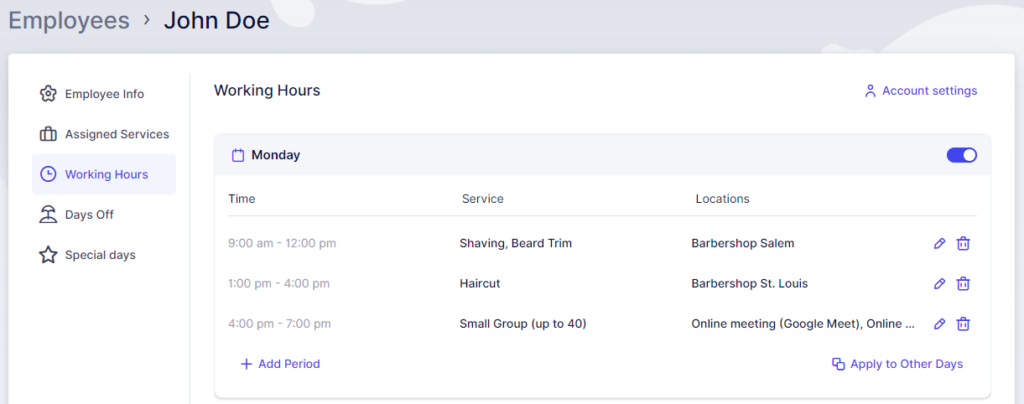
Example Scenario: Assigning Services and Locations
In the example above, the employee is scheduled for "Shaving" and "Beard Trim" services from 09:00 to 12:00 at the Barbershop Salem location.
After a 1-hour break (to allow travel time), the next working period begins at 13:00 and ends at 16:00 at Barbershop St. Louis, where the employee offers only the "Haircut" service.
The third working period immediately follows the second and represents an online session where John Doe conducts a "Small Group (up to 40)" lecture via online platforms such as Google Meet, Zoom, or Microsoft Teams.
Although the employee’s Default Location is set to Barbershop St. Louis in the Employee Info tab, this has been overridden within the working hours for specific services.
Understanding Default and Custom Locations
If both the Default Location and Assigned Services are selected in the working periods, the employee will perform all assigned services only at the default location.
This example demonstrates how you can create a flexible schedule by customizing working hours based on specific locations and services.
Weekly Repetition of Working Hours
The Working Hours defined for an employee repeat every week according to the set schedule.
Using the above example, every Monday will automatically follow the same configuration unless changes are made manually.
Managing Service Updates in Working Hours
It’s important to note that the services or locations defined within a Working Hours Period will not update automatically if new services are later added in the Assigned Services tab.
For example, if “Beard Trim” is already defined in a working period, only that service will be available during that timeframe.
If you later introduce a new service that should also be offered during the same period, you must manually add it to that working period.
To ensure that the employee covers all assigned services, leave the service selection blank when setting up the Working Hours Period.
This approach automatically includes All Assigned Services, so any new service added in the future will be available within the employee’s defined working hours.
Special Days
Consider a situation where your employee needs to attend a seminar from November 6th to November 10th. During this period, the employee will still be available for bookings, but only until noon.
To handle such temporary schedule adjustments without affecting advance bookings, use the Special Days feature.
Go to the employee’s profile.
Navigate to the Special Days tab (enabled automatically during your free trial).
Click “+ Add Special Day.”
A popup window will appear — select either a specific date or a range of dates to define as a Special Day.
This allows you to customize availability for specific dates without altering the employee’s regular weekly schedule.
For more details on setting up Special Days, please refer to the official guide.
When defining periods in Calendar Boost, such as Working Hours and Special Days, it's important to note that you cannot add periods in reverse order. For instance, if you've configured the first period from 09:00 to 12:00, you cannot add another period earlier, such as from 06:00 to 09:00.
To adjust this, simply edit the earliest period and modify it to the desired time range (e.g., 06:00 to 09:00). Once adjusted, you can add another period that follows the new time slot.
Days Off
The Days Off feature in Calendar Boost takes precedence over both Working Hours and Special Days. It allows you to mark specific dates when employees are not supposed to work at all.
Days Off can be added either directly from an employee’s profile or from Settings → Company Days Off. The difference lies in their scope:
Company Days Off apply to all employees (e.g., public holidays).
Employee-specific Days Off affect only that individual’s schedule.
For example, if an employee has a scheduled vacation from July 15th to July 28th, you can easily set this up in their profile. Click on “+ Add Day Off”, enter the event name (e.g., Vacation 2024), and select the date range. You can also double-click to select a single date — ideal for short leaves or sick days.
Additionally, Calendar Boost includes a handy “Repeat this day off yearly” slider. This is perfect for recurring events like birthdays or anniversaries. Once enabled, the system automatically marks that day off each year, saving you time and ensuring consistency in scheduling.
Calendar Integrations
The final factor that influences your employees' schedules is the Calendar integrations:
Each of these integrations includes the "Remove calendar busy slots" option within its configuration settings.
For example, in Google Calendar Integration page, you'll find this:
Once your employees are connected to their calendars, this option checks for existing busy slots in the connected calendars and removes availability during these events in the employee's schedule.
For instance, if your employee works from 09:00 to 12:00 with no other appointments, special days, or days off configured, but has a busy event from 10:00 to 12:00 created in the Google Calendar they're connected to, this time will be blocked for booking in Calendar Boost if the "Remove calendar busy slots" option is enabled, or if the calendar from which the event is pulled is assigned to the employee under Account Settings.
All events coming from the calendars (both free and busy) can be seen in the Calendar section in Calendar Boost.
Payment Settings are designed to help you configure the essential parameters for your business transactions.
To use online payment methods, it is necessary to enable the Online Payments feature on the Features & Integration page beforehand.
Payment Settings
The Payments section in Calendar Boost's Finance tab allows you to configure the currency to be used, the price separator, the position of the price symbol, and the number of decimals displayed when prices are presented to your customers.
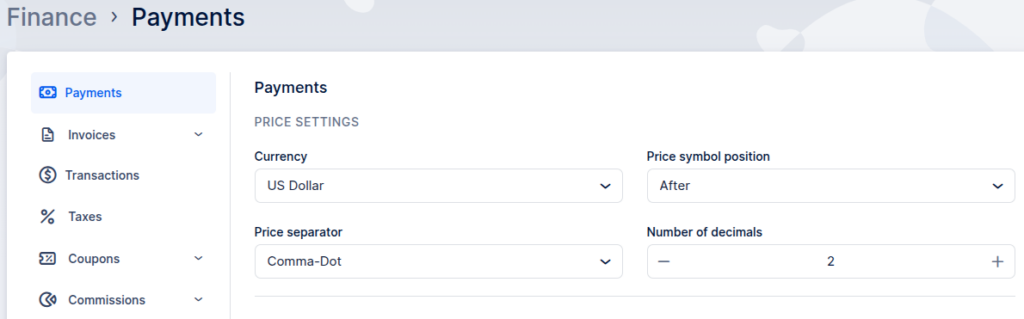
Price Settings
Currency: This option allows you to set the currency that will be displayed with each price and used for all transactions. For convenience, you can quickly locate your preferred currency by searching for it in the provided field.
The default currency is the US Dollar (USD). Currently, Calendar Boost supports only one active currency throughout the platform.
Price Symbol Position: You can choose one of four positions for the currency symbol — Before, Before with space, After, or After with space.
By default, the Before option is selected, resulting in a price format like $100.
Price Separator: This option lets you define the format of numerical separators in prices. You can choose from Comma-Dot, Dot-Comma, or Space-Comma.
The default selection is Comma-Dot, resulting in a price format like 15,000.00.
Number of Decimals: You can define how many decimal places should be shown in your prices.
The default setting is 2, producing a format like 15,000.00.
Payment Methods
The default payment method in Calendar Boost is On-Site, which allows customers to book appointments without making an upfront payment during the booking process.
If you add your Company Bank Account Number in the Company Settings, the system will automatically include it in customer invoices, allowing clients to pay via bank transfer.
When you first visit the Payments Settings, you’ll see an informational prompt along with a button that redirects you to the Features & Integrations page, where online payment options can be enabled.
To activate and use Online Payment Methods, ensure that the Online Payments feature is turned on in the Features & Integrations page.
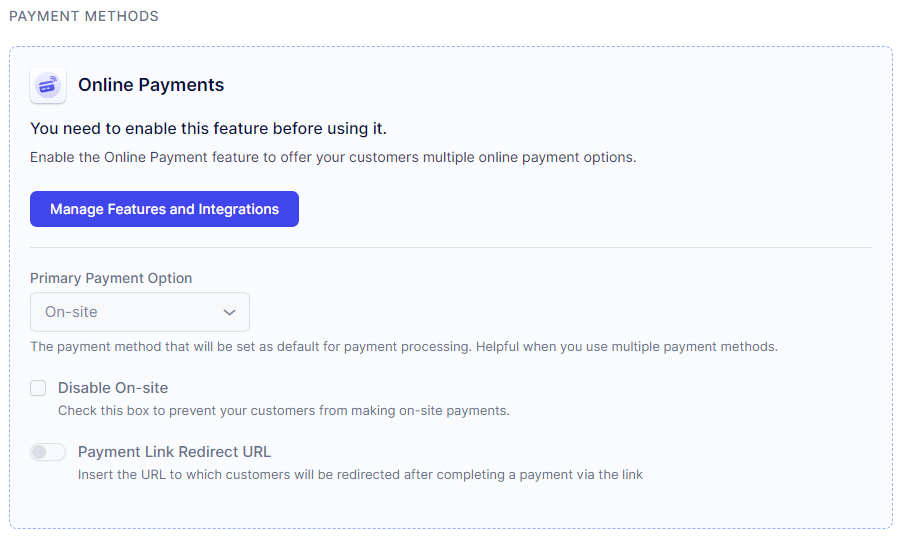
After the feature has been enabled, you will see all available online payment methods.
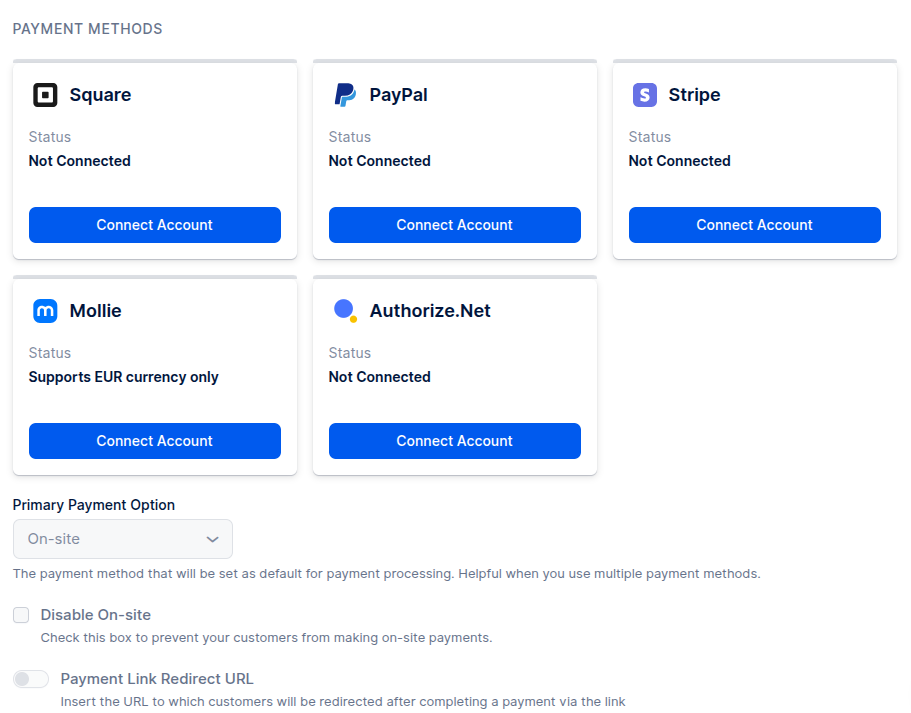
Once you enable at least one online payment method, several new options become available in Calendar Boost:
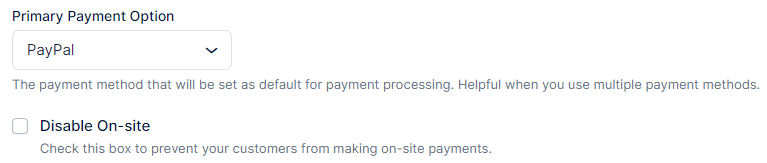
Primary Payment Option: You can change the main payment method, which is set to On-Site by default.
Disable On-Site Payments: You can turn off the On-Site option, ensuring that customers must complete payment before booking.
Payment Link Redirect URL: This feature works with the Payment via Link option. After customers complete a payment using a link, they will automatically be redirected to the URL you define here.
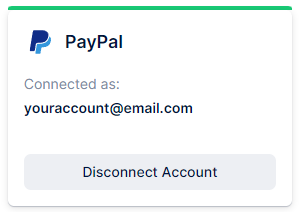
PayPal Integration
To connect your PayPal account in Calendar Boost:
Navigate to Features & Integrations.
Locate the Online Payments section.
Click Set Up, then select Connect Account in the PayPal card.
You’ll be redirected to the PayPal login page. Log in using your credentials.
Once connected, you’ll be redirected back to Calendar Boost, where a confirmation message will appear showing your linked PayPal email.
Note:
Only verified business PayPal accounts can be integrated with Calendar Boost for secure payment processing.
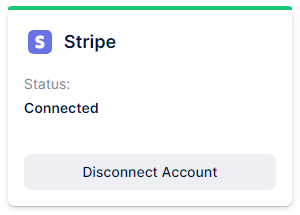
Stripe Integration
To connect your Stripe account in Calendar Boost, follow these steps:
Go to Features & Integrations.
In the Online Payments section, click Set Up.
Under Stripe, select Connect Account.
You’ll be redirected to the Stripe Sign-in page — log in to your Stripe account.
Once successfully logged in, you’ll be automatically redirected back to Calendar Boost, where a confirmation message will indicate that the connection has been established.
Note:
Only verified business Stripe accounts can be integrated with Calendar Boost for secure and seamless payment processing.
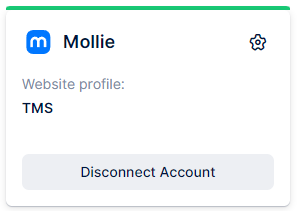
Mollie Integration
To connect your Mollie payments account in Calendar Boost, follow these steps:
Go to Features & Integrations.
In the Online Payments section, click Set Up.
Next to the Mollie Payment option, click Connect Account.
You’ll be redirected to the Mollie login page, where you can sign in, connect, and authorize website profiles and payment methods.
Within your Mollie account, you can manage transaction details, refunds, chargebacks, permissions, and customize the payment page design.
To ensure seamless payment acceptance between Calendar Boost and Mollie, make sure you have:
At least one website profile, and
An active payment method configured in your Mollie account.
Then, on the Online Payments page in Calendar Boost, under Mollie integration, select the desired website profile to link.
Note:
To establish a connection with Mollie, the currency in Calendar Boost must be set to Euro (EUR), as it is the only supported currency across all Mollie payment profiles.
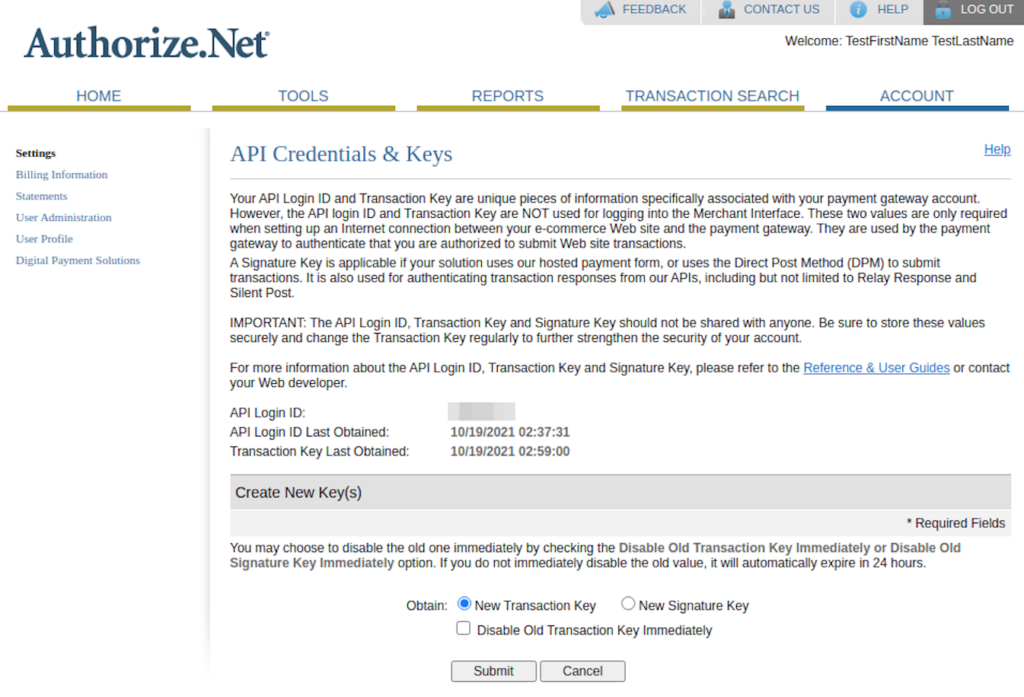
Authorize.Net
Presently, the final payment method available in Trafft is Authorize.net. To establish this connection, you must input your "Authorize login ID" and "Authorize transaction key." Retrieve these details by logging into your Authorize.net account and navigating to API Credentials and Keys in Account settings. There, you will find the API Login ID, which you can copy as the "Authorize login ID." For the transaction key, select the "New Transaction Key" option, submit, and follow the prompts to verify your email address. Once verified, the "Current Transaction Key" will be generated, which you can copy as the "Authorize transaction key."
After entering the necessary credentials, be sure to select the "Save Credentials" option. Subsequently, your customers will have the option to make credit card payments through Authorize.Net
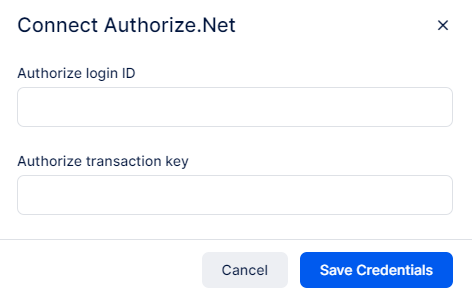
This completes the connection between Trafft and Authorize.Net.
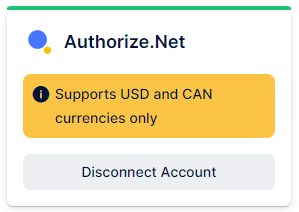
Note: To establish a connection with Authorize.Net, you must configure the currency in Calendar Boost to either USD or CAD. These two currencies are the only ones supported across all payment profiles in Authorize.Net.
After successfully connecting to at least one online payment method, you can disable on-site payments by selecting the checkbox next to “Disable payment on-site.”
Once your payment settings are fully configured, click Save Settings to apply the changes. You can also select your preferred Primary Payment Method from the dropdown menu to make it the default option for future transactions.
Once Online Payments are enabled and connected, Calendar Boost allows you to choose a preferred payment method for each service. This option becomes available when the “Disable payment on-site” setting is activated.
Within each service’s settings, you’ll find the Payment Method option, which is initially set to “All” by default. This default setting gives customers the flexibility to pay either online or on-site. You can configure each service to accept payments exclusively online, exclusively on-site, or keep both options available.
Square
To connect your Square account, navigate to Features & Integrations and find the Online Payments section. Click “Set Up”, then select “Connect Account” under the Square option. You’ll be redirected to the Square login page—sign in to your account, and once authenticated, you’ll be returned to the Calendar Boost page, where a confirmation message (showing your email) will indicate that the connection was successful.
Payment Link Redirect URL
If you use a payment link to collect payments from customers, you can specify a Redirect URL—the page customers will be directed to after successfully completing their payment.
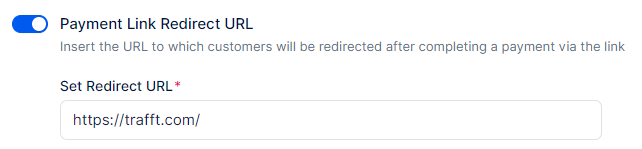
Managing appointments across different time zones can be challenging, but with Calendar Boost’s Time Zone feature, it becomes effortless. Calendar Boost provides flexible time zone settings both in the General Settings and individually for each employee, ensuring smooth coordination of schedules and bookings. This feature is especially useful for businesses and teams operating across multiple time zones, guaranteeing that appointments are accurately displayed and synchronized for both employees and customers.
Global Time Zone
In Calendar Boost’s General Settings, you can define the global time zone for your business. Simply navigate to the bottom of the settings page to select the time zone that applies to your company. If this time zone is intended for all employees, then no further adjustment is needed—the global time zone will automatically apply across your organization.
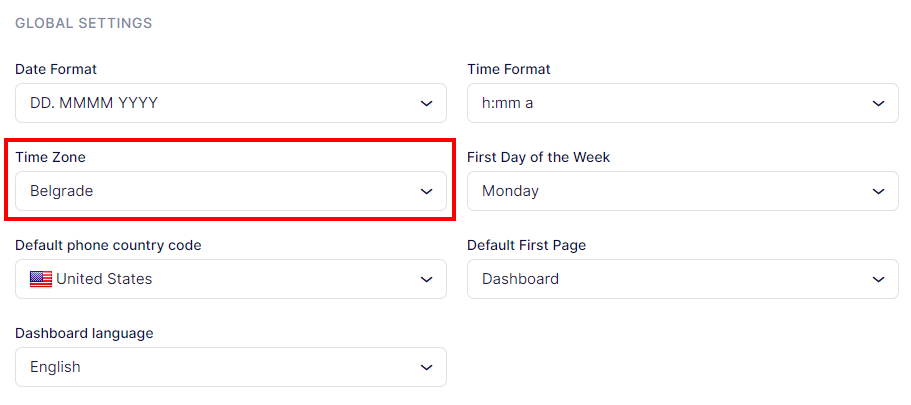
Employees Time Zone
Employee time zones are essential for businesses with global teams or those offering services across multiple regions. Calendar Boost’s Starter and Scaling plans provide employees with access to their personalized dashboards, where they can set their time zone, working hours, special days, and time-off preferences. For users without dashboard access, administrators and super admins can easily manage these settings on their behalf.
To set your schedule as an employee, log into your Calendar Boost dashboard, navigate to Account Settings > Personal Info, and select your Time Zone. Then proceed to Working Hours to define your availability. Appointments will automatically align with your chosen time zone, working hours, days off, and special days.
Customers can also choose their preferred time zone during the booking process, while administrators can configure a default time zone for the admin dashboard to ensure consistent alignment of appointments across different time zones—customer, employee, and admin.
Additionally, admins can configure an employee’s time zone from the Employees section when editing an employee profile. The Time Zone option in this case is found under the Employee Info tab.
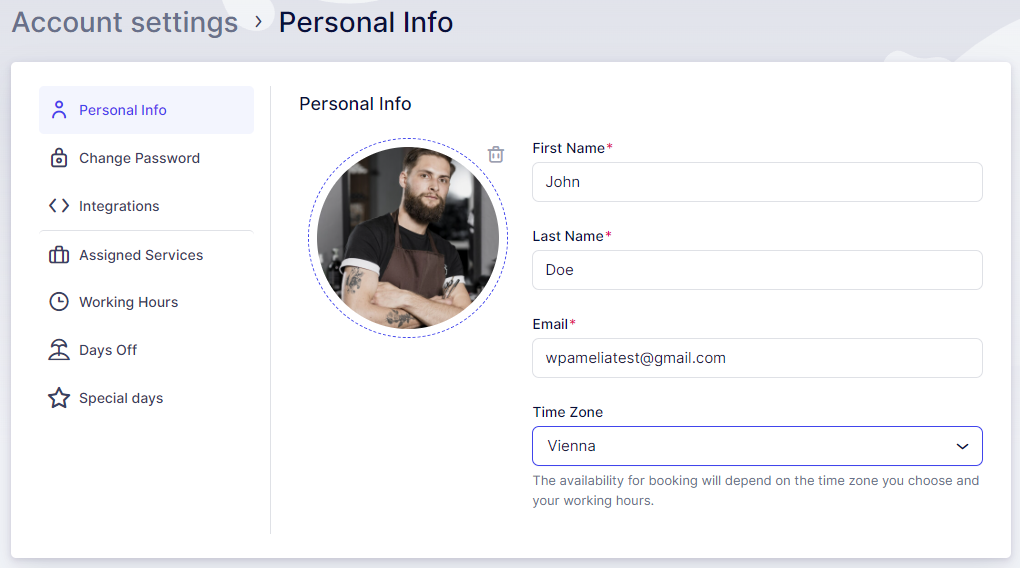
The Working Hours page always displays the selected time zone above the schedule, ensuring clarity and avoiding any confusion.
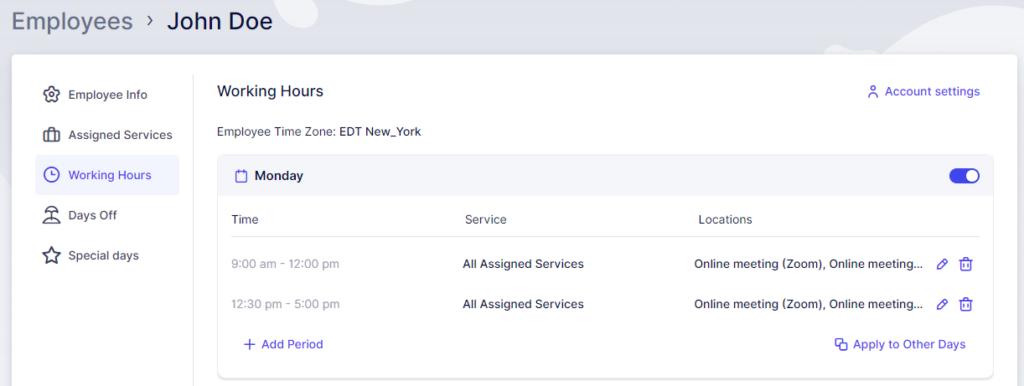
Time Zone Display and Notifications
The time zone display functions based on the employee’s selected time zone. If an employee has designated a specific time zone in their account, all appointments and schedules will follow that setting. However, if no time zone has been selected, Calendar Boost will automatically apply the Default Time Zone defined in the General Settings.
Note: Changing an employee’s time zone after one has already been set will affect their existing availability and scheduled appointments.
Once all time zones and schedules have been properly configured, notifications will automatically adjust to reflect each user’s respective time zone. Customers will receive appointment confirmations, reminders, and updates in their own time zones, ensuring accuracy and convenience. Similarly, employees will receive notifications aligned with their personal time zones, enabling seamless coordination across different regions and smoother global operations.
The Booking Website section in Calendar Boost allows you to fully customize the look and feel of your public booking page. From basic branding elements to detailed page layouts, you have full control over how your services, employees, and information appear to customers.
This section includes several submenus: General, Theme and Appearance, Hero Section, Footer Section, Services Page, Employees Page, and Custom Code.
Each submenu focuses on a specific aspect of your website, making it easier to personalize every element and create a cohesive brand experience.
General
The General settings allow you to configure the foundational elements of your booking website, including:
Website Title and Description: Set the name and tagline that appear in the browser tab and search engines.
Logo and Favicon: Upload your business logo and favicon to reflect your brand identity.
Custom Domain (if available): Connect your own domain for a fully branded booking experience.
These settings form the core identity of your booking page and should be configured first before moving on to other sections.
Theme and Appearance
The Theme and Appearance tab defines the overall look and style of your booking website:
Themes: Choose a default layout that aligns with your business type.
Colors and Fonts: Customize primary colors, buttons, and typography to match your branding.
Layout Options: Adjust spacing, background colors, and other design details for a cohesive visual experience.
Any updates made here are instantly applied across all pages for a consistent design.
Hero Section
The Hero Section is the prominent banner that visitors see first when they open your booking page. Here, you can:
Upload a Hero Image or Background: Add a striking image or solid background for visual impact.
Headline and Subheading: Craft a welcoming message or highlight your key services.
Call to Action Button: Encourage visitors to book directly with a clear and compelling CTA.
This section plays a crucial role in creating a lasting first impression and guiding users toward taking action.
Footer Section
The Footer Section appears at the bottom of your booking page and helps reinforce your brand and navigation flow. Here, you can:
Add Business Information: Include your company name, address, and contact details.
Insert Quick Links: Provide shortcuts to pages such as Terms, Privacy Policy, or About Us.
Add Social Media Links: Connect your visitors to your social channels.
A well-designed footer builds credibility and improves the overall user experience.
Services Page
The Services Page displays all the services available for booking:
Service Display Options: Choose how services are shown—either in a grid or list view.
Service Details: Present descriptions, durations, and pricing information.
Category Management: Group services into categories to simplify browsing.
A well-structured services page helps customers find and book the right service effortlessly.
Employees Page
The Employees Page introduces your team and allows customers to book directly with specific members:
Employee Cards: Showcase profile pictures, names, and roles.
Highlighting Badges (if enabled): Display badges for featured or top-rated employees.
Employee Filtering: Let customers filter by service or location for convenience.
This page is ideal for businesses where clients prefer selecting their preferred staff member.
Custom Code
The Custom Code section is for advanced users who want deeper control over their website’s design and functionality:
Custom CSS: Modify visual elements beyond the built-in options (e.g., button styles or extra colors).
Custom JavaScript: Integrate tracking tools, analytics, or additional interactive features.
Use this section carefully to maintain your website’s performance and compatibility.
Language
The Language section serves two main functions:
When Multilingual Support is Enabled:
You can set the default language for your booking website and invoices. Additionally, you can add extra languages, which will appear in the language drop-down menu on your booking website.When Multilingual Support is Disabled:
You will only see the Default Language drop-down menu. This allows you to specify the single language in which your booking website will be displayed.
This flexibility ensures that your Calendar Boost booking website is accessible and user-friendly for both local and international audiences.
Please Note
These language settings apply only to the booking website.
To change the Admin Section language, please go to General Settings.
Currently, the available languages are:
Brazilian Portuguese, Bulgarian, Czech, Dutch, English, French, German, Italian, Japanese, Russian, Serbian, Spanish, Swedish, Thai, and Turkish.
If you would like to contribute to Calendar Boost’s translations, please contact our support team at help@calendarboost.com.
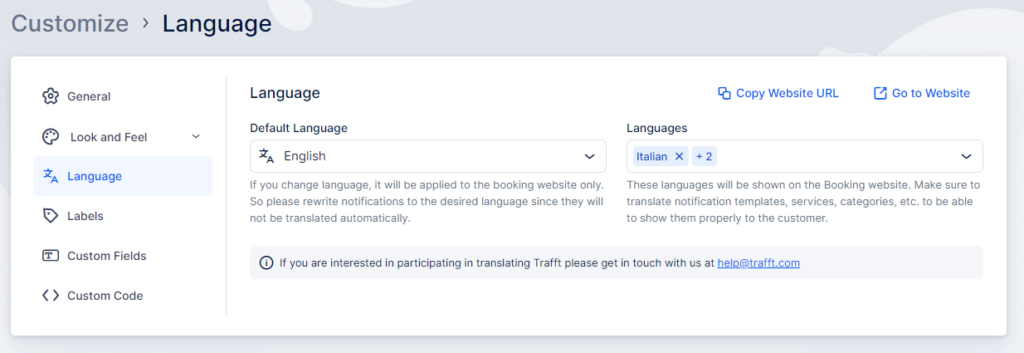
Notification Templates and Language Customization
Default notification templates are provided only in English, but you can fully customize them and write in any language you prefer.
If you have activated the Multilingual Support feature, you can create separate templates for each language selected in the Languages drop-down menu. To do this, click the Translate option located in the upper right corner above the title and the body of the email template.
![]()
Supported Languages
Calendar Boost is currently offered in 31 languages (English included), and more are being added regularly:
Arabic
Brazilian Portuguese
Bulgarian
Chinese (Traditional)
Chinese (China, Simplified)
Chinese (Taiwan, Simplified)
Czech
Danish
Dutch
Finnish
Estonian
French
French (Belgium)
German
Greek
Hebrew
Hungarian
Indonesian
Italian
Japanese
Korean
Malay
Norwegian
Polish
Portuguese
Romanian
Russian
Serbian
Slovak
Slovenian
Spanish
Swedish
Thai
Traditional Chinese
Turkish
Ukrainian
Vietnamese
West Flemish (Belgium)
Labels
You also have the flexibility to personalize the labels used throughout your booking form.
If these fields are left blank, the default labels will automatically be applied.
Currently, there are over 50 labels available for translation or modification, and more are being added continuously.
If a specific label you need is missing, please reach out through the support beacon located in the bottom right corner of the Calendar Boost interface.
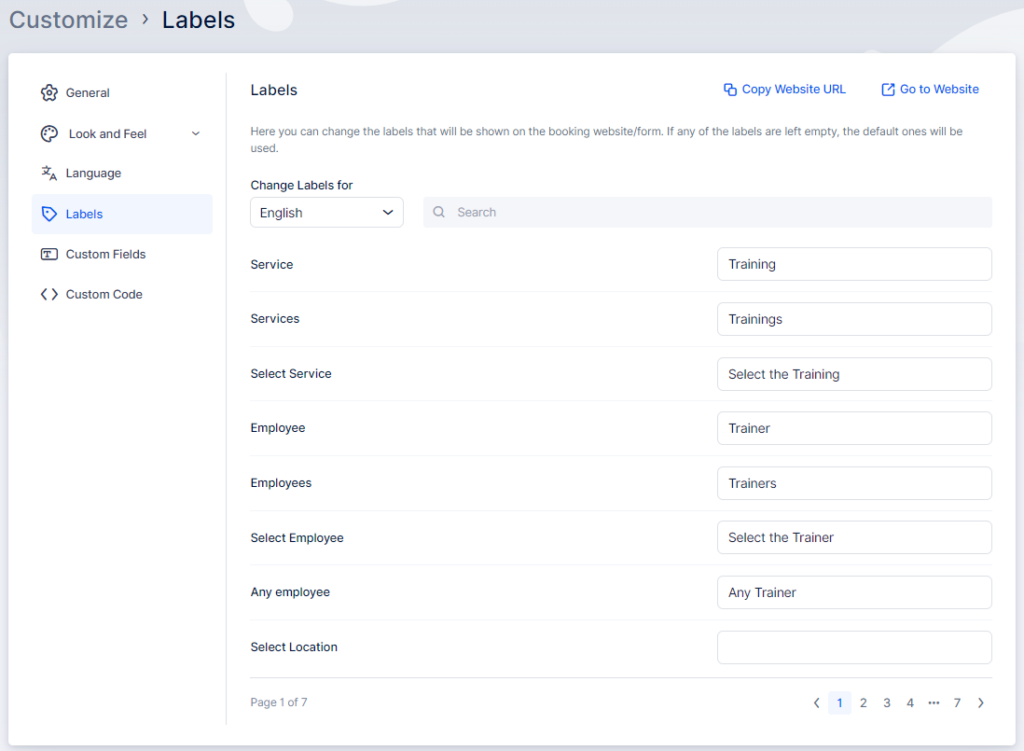
Please note that these labels will be applied on the booking website, not in the back-end (Admin) section of Calendar Boost.
To tailor your booking experience, navigate to the left sidebar and click on the "Customize" button.
This section covers the customization of booking options (form settings, customer account settings, employee selection settings and logic, language used, and labels available for modification).

Customize Page Overview
On the Customize page, you’ll find five sections, each divided into subcategories. The categories covered in this article are listed below. For other customization options, please refer to the linked documentation.
Booking Website
Divided into:
General
Theme and Appearance
Hero Section
Footer Section
Services Page
Employees Page
Custom Code
Booking Form Steps
Divided into:
General
Employees
Customers
Thank You Page
Language
Labels
Custom Fields
(Please note that this section is a custom feature that must be enabled before it becomes visible.)
Divided into:
Customer
Appointment
If the ChatBot feature is enabled, the bot’s settings will also appear below Custom Fields, as shown in the example interface.
Booking Website
General
When you access the Customize section, the Booking Website category automatically expands, displaying the General subsection. This section includes two main components: Account Settings and Website and Branding Settings.
Account Settings
This feature allows you to define your customer access options in Calendar Boost. You can specify whether:
All customers can book appointments (both registered and guest users),
Only guest users can book, or
Only registered users can book.
Registered users can log in through the Customer Panel, accessible via the Log In button located at the top right of the booking page. This section appears automatically when registration is enabled.
Guest users, on the other hand, can view and modify their appointments through email, without needing an account.
This flexibility ensures that you can tailor the booking experience to match your business preferences—whether you prioritize user accounts or prefer quick, frictionless guest bookings.
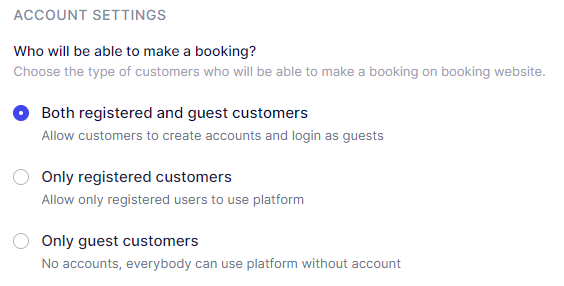
Website and Branding Settings
The Website and Branding Settings provide a variety of customization options to help you align your booking website with your brand identity:
Title: Give your booking website a name that reflects your brand and resonates with your audience.
Description: Improve your website’s visibility on search engines by adding a concise and relevant description. This helps search engines understand your website’s content, potentially boosting its ranking in search results.
Share Preview Image: When your booking link is shared on social media or messaging platforms, a preview image will appear. You can upload a custom image here to represent your brand and make shared links more visually appealing.
Website Logo: Personalize the header and footer of your booking website by adding your company logo. It will appear prominently in both sections, helping to strengthen your brand identity.
Favicon: Add a favicon to make your booking website easily recognizable. This small icon appears next to your website title in the browser tab, providing a polished and professional look.
"Made with Calendar Boost" Mark: Depending on your subscription plan, you may choose to hide the “Made with Calendar Boost” mark on your website. Doing so creates a cleaner, fully branded experience without external platform labeling.
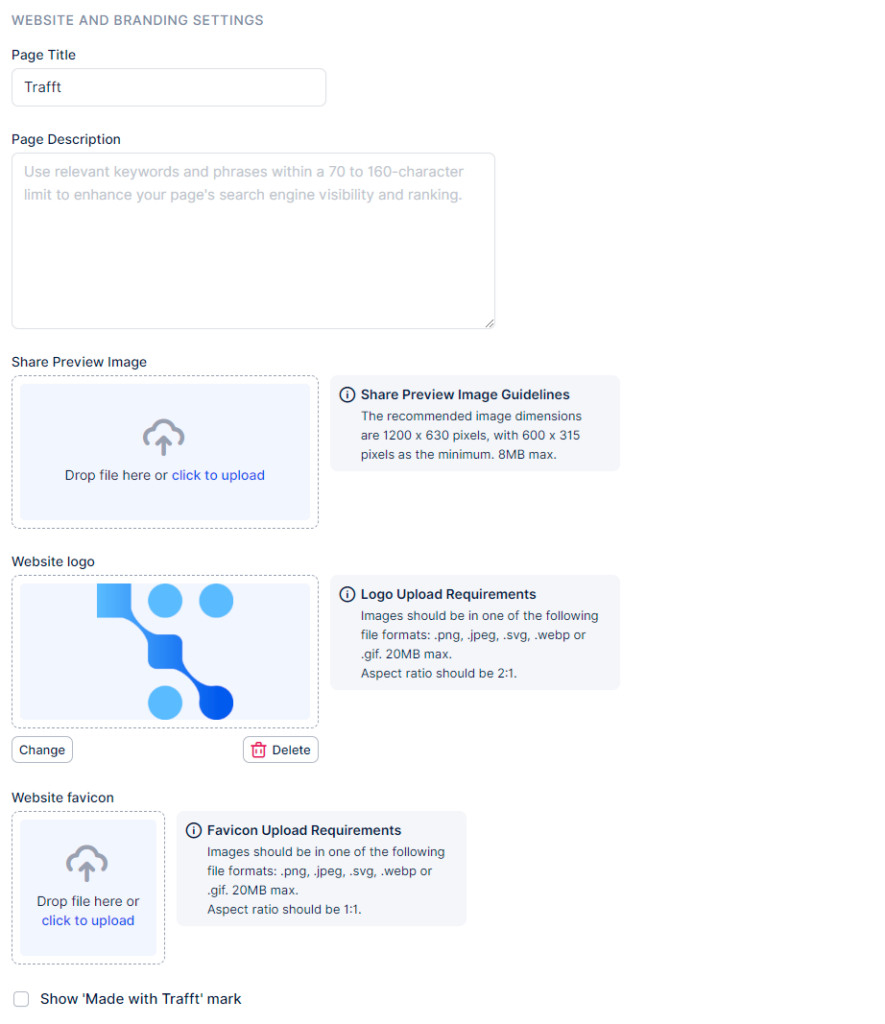
Custom Code
The Custom Code section allows users to add personalized CSS or JavaScript code directly to their booking website.
This feature offers a powerful way to enhance and fine-tune your booking platform. Whether you want to integrate custom widgets, modify layouts to reflect your brand style, or embed third-party tools, Custom Code gives you full control to shape both the appearance and functionality of your booking website.
With this flexibility, you can design a distinct and seamless booking experience that aligns perfectly with your brand identity.
For more detailed information and examples on how to use Custom Code effectively, please visit the Calendar Boost Customization Guide.
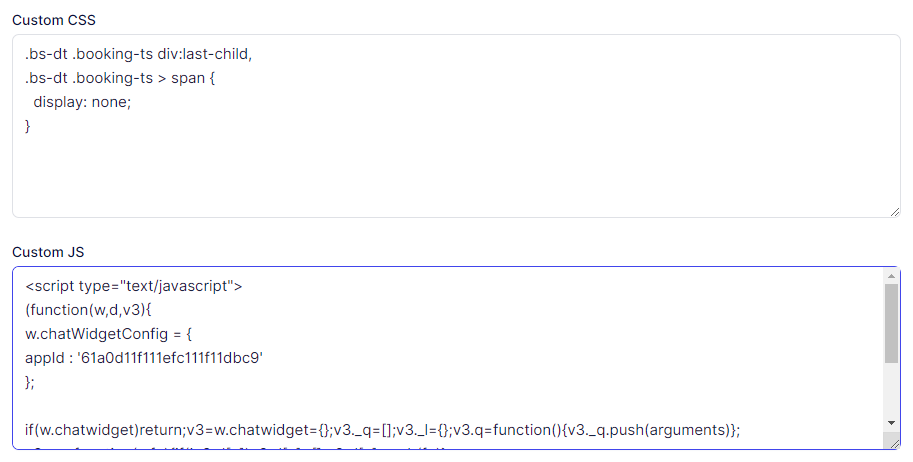
Booking Form Steps
General
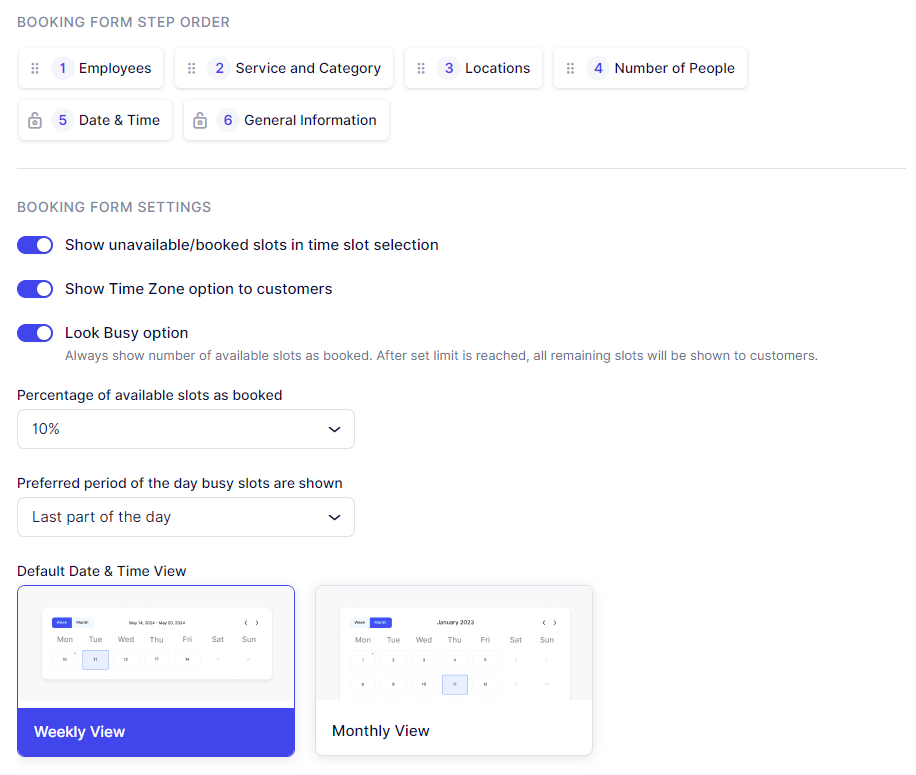
Here’s a refined and professional version of your content — clear, smooth, and consistent in tone, while preserving every technical detail:
General Settings – Booking Form Steps
The General section of the Booking Form Steps settings provides full control over how your booking form operates and appears. It allows you to manage step order, control display preferences, and activate smart features such as “Look Busy” or time zone visibility.
Booking Form Step Order
You can easily rearrange the sequence of booking steps using drag-and-drop functionality. This flexibility helps you create a flow that best fits your customer journey. However, note that the General Information step — where customers provide their personal details — always remains the final step and cannot be moved.
When features like Recurring Appointments or Resources are enabled, the Date & Time step automatically becomes the fifth step in the booking flow. This step’s position is fixed, as it’s essential for defining recurring appointments and requires all prior steps to be completed.
Display Options
Show unavailable/booked slots:
Enable this option to display already booked time slots during the Time Selection step. These slots will appear as unavailable, allowing customers to view your schedule without being able to select those times.Show Time Zone option to customers:
Ideal for businesses serving clients across different regions, this feature automatically detects and displays the customer’s time zone based on their device location. For example, if your staff operates in UTC and the customer is in UTC+4, a 07:00 slot for the employee will appear as 11:00 for the customer.
If a city isn’t recognized, it’s not an issue — what matters is that the correct time zone offset is displayed.
Look Busy Option
The Look Busy feature lets you simulate a busier schedule by hiding a chosen percentage of your available time slots. This gives your calendar a more exclusive appearance. When paired with the “Show unavailable/booked slots” option, those hidden slots appear as already booked.
Percentage of available slots as booked: Define the portion of your day (in percentage) that should appear booked.
Preferred period of the day busy slots are shown: Choose whether those busy slots should appear at the first or last part of the day.
Default Date & Time View
You can set the default date and time display to either Weekly or Monthly view. Customers can freely switch between both views at any time.
Employee Selection Settings
In the Employee section, you can determine how customers select their service provider and control the booking logic when no selection is made.
Customer can choose an employee:
When enabled, clients can pick a specific staff member or select Any Employee, which automatically assigns one based on your configured logic.Hide "Any Employee" option from selection:
Activate this setting to remove the “Any Employee” option entirely, requiring customers to choose a specific person.Hide employee selection:
If you’d prefer not to display this step at all, enable this option to fully hide the employee selection process from your booking page.
If a customer opts for the "Any Employee" choice on the booking website or neglects to choose a specific employee, you can define the logic for assigning an employee under the "Employee selection logic" dropdown. You have several options to choose from, including Round Robin, which assigns employees in a circular order, as well as options based on the Least Busy employee, the employee with the Highest or Lowest price.
By default, Calendar Boost offers the nearest available time slots below each employee during the booking process, offering your customers a faster way of selecting the nearest available time slot without scrolling through the calendar. This option can also be disabled on this page by disabling the Show the nearest available slots.
Customers
Here’s a refined, polished, and consistent version of your content — rewritten to align with the same tone and structure as the earlier section, while replacing Trafft with Calendar Boost and removing all hyphens:
Customer Settings
The Customer settings section allows you to customize how customer information and interactions are handled throughout the booking process. You can control what details customers provide, define redirect behavior after specific actions, and manage communication preferences.
Show Email Field on the Booking Form
Enable this option to allow customers to enter their email address during booking. You can also make this field mandatory to ensure customers provide their email before proceeding.
This setting applies to both the back end and front end of the booking process:
If the email field is mandatory, customers cannot continue without filling it out.
If the email field is optional, they may choose to skip it.
Please note: if the email field is hidden or left empty, PayPal (if configured as a payment option) will automatically be disabled.
Show Phone Number Field on the Booking Form
Similar to the email field, you can decide whether to display or hide the phone number field. You may also select the Set phone number field as mandatory option to make it a required input during booking.
Use Custom Appointment Cancelation URL
After a customer cancels or fails to cancel an appointment, you can redirect them to custom web pages you have created. These pages might display personalized messages, additional options, or feedback forms.
You can enter two different URLs here:
One for successful cancelations
Another for unsuccessful cancelations
Please note that Calendar Boost does not design or configure these pages — it only provides the redirect fields so that you can use your own external links.
Ask Customer for a Reason When Canceling an Appointment
Activate this feature to prompt customers to provide a reason when canceling an appointment. This input can be optional or set as mandatory, depending on your preference.
Redirect URL After a Successful Booking
Similar to the cancelation redirect settings, you can specify a custom page where customers will be redirected after completing a successful booking. This page may include a thank you message, additional information, or promotional content related to the booking.
Language Settings
In the Language section, you can translate your booking website and invoices into different languages using the Languages dropdown menu.
Available language options currently include:
Arabic, Brazilian Portuguese, Bulgarian, Chinese (Traditional), Chinese (Simplified, China), Chinese (Simplified, Taiwan), Czech, Danish, Dutch, English, Finnish, French, German, Greek, Hebrew, Hungarian, Italian, Japanese, Korean, Malay, Norwegian, Polish, Portuguese, Romanian, Russian, Serbian, Slovak, Slovenian, Spanish, Swedish, Ukrainian, and Vietnamese.
Please note that the back end (Admin section) of Calendar Boost is currently available only in English, Czech, Serbian, and Spanish, and this is configured through the General Settings page.
If you are interested in contributing to the translation of Calendar Boost, please reach out to help@calendarboost.com.
Multilingual Support
The appearance of the Language Customize options depends on whether Multilingual Support is enabled under Features & Integrations:
When Multilingual Support is disabled, you can only set one default language for your booking website.
When enabled, you can customize multiple languages, allowing your customers to switch between translations seamlessly.
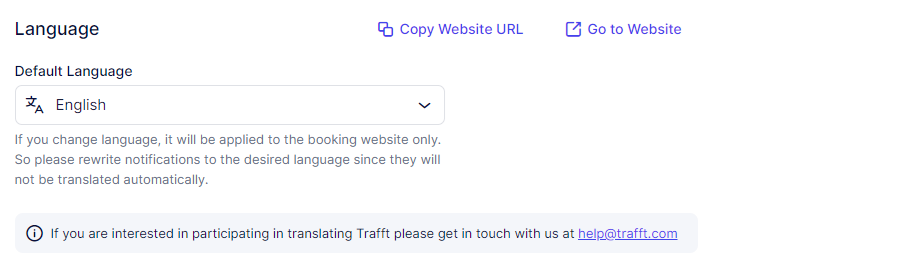
- With Multilingual Support enabled, you can configure the default website language and add additional languages for customers to choose from the language drop-down menu on the booking website.
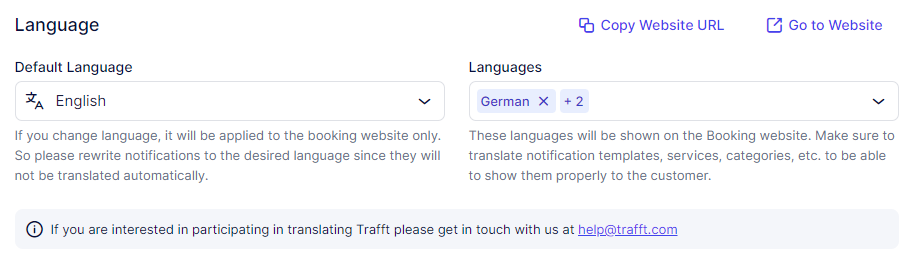
Labels
You have the option to customize the labels on your booking form according to your preferences. If you leave these fields blank, the default labels will be used. Currently, there are almost 60 labels available for modification, and we regularly introduce new ones. Feel free to reach out to us if there's a specific label you need that is not yet available.
In the "Change Labels for" drop-down, you can select languages you previously added in the Languages section, so you can change the labels for each language individually.
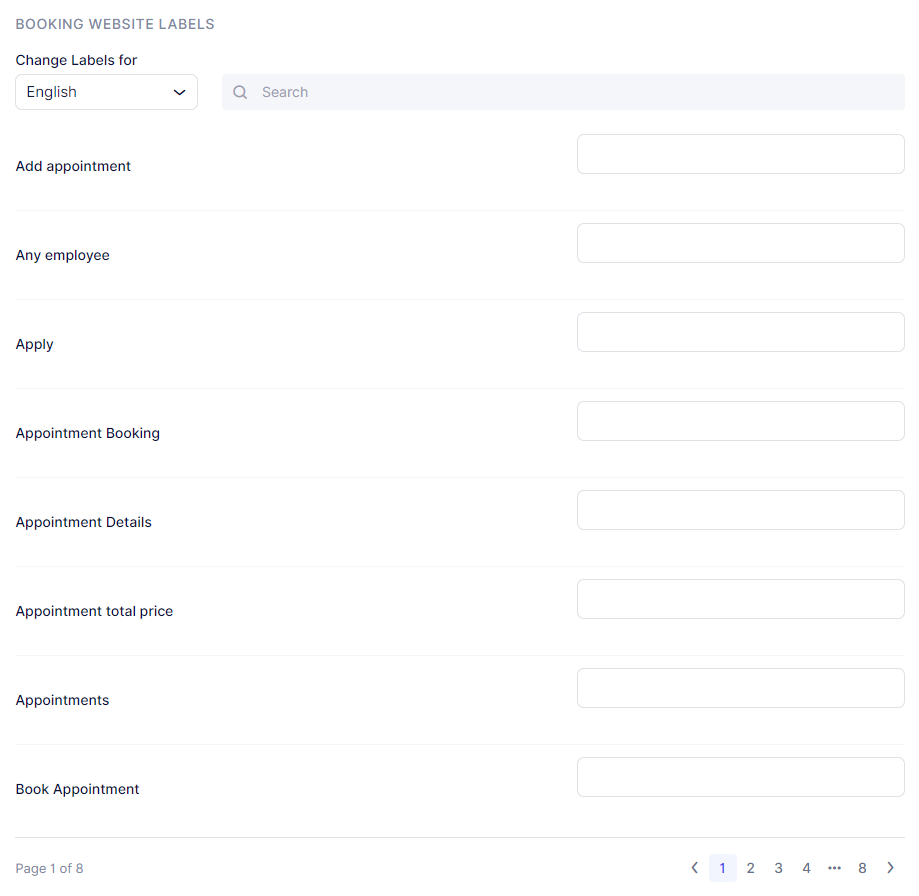
Custom Fields
The Custom Fields section allows you to create and manage additional fields for both Appointments and Customers. These fields help you collect specific, customized information to better understand your clients and their needs.
Appointment Custom Fields
Adding custom fields to the Appointment form allows you to gather additional details from customers during the booking process.
You can use these fields to request information such as:
Preferences or service choices
Special requirements or accessibility needs
Notes or instructions relevant to the appointment
This flexibility ensures that each booking captures all necessary details to deliver a personalized service experience.
Customer Custom Fields
Custom fields for the Customer form enable you to collect information about the customers themselves.
This could include:
Extended contact information
Demographic details
Preferences, habits, or important notes
These fields help you build richer customer profiles, enabling better communication and service delivery.
For complete guidance on creating, editing, and applying custom fields, please visit the Custom Fields documentation page.
That page provides a step-by-step walkthrough on how to tailor your booking forms and streamline data collection for your business.
Chatbot (Beta)
Introducing the Chatbot feature in Calendar Boost — an intelligent assistant designed to simplify and accelerate your booking process.
The Chatbot provides a friendly, real-time interface that allows customers to:
Schedule appointments quickly and effortlessly
Receive instant responses to common questions
Navigate your services and availability with ease
By integrating the Chatbot into your booking website, you can significantly improve user experience, increase engagement, and reduce manual workload.
To learn more about configuring and optimizing the Chatbot for your business, please visit the Chatbot Feature page.
Customize Section Overview
This article explores the various customization options available in the Customize section of Calendar Boost, giving you full control over the visual presentation of your booking website.
From color palettes and themes to font styles and layout adjustments, you can tailor every detail to reflect your brand’s identity and create an engaging, user-friendly experience for your customers.
If you are looking for information on Booking Options Customization, please click here.
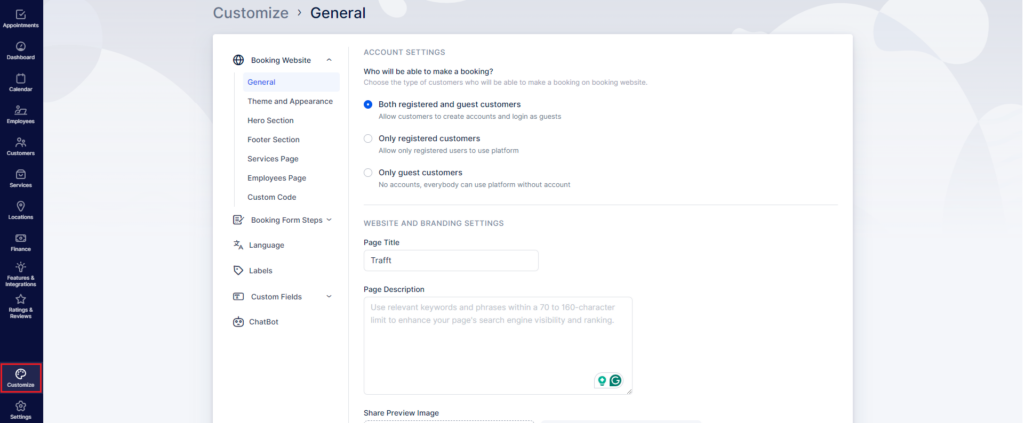
Customize Section Overview
The Customize section in Calendar Boost is organized into five main parts, each containing its own subcategories. The categories covered in this article are listed below. For more details on other customization areas, please visit this page.
Booking Website, divided into:
General
Theme and Appearance
Hero Section
Footer Section
Services Page
Employees Page
Custom Code
Booking Form Steps, divided into:
General
Employees
Customers
Thank You Page
Language
Labels
Custom Fields
(Please note that this section is a custom feature and must be enabled before it becomes visible.)
Customer
Appointment
Additionally, if you have activated the ChatBot feature, its settings will appear just below the “Custom Fields” section, as shown in the example above.
Booking Website: Theme and Appearance
Within the Theme and Appearance section, you can select from eight pre-defined themes, available in both Light and Dark versions, to style your booking website. This flexibility allows you to align the website’s appearance with your brand identity and customer experience preferences.
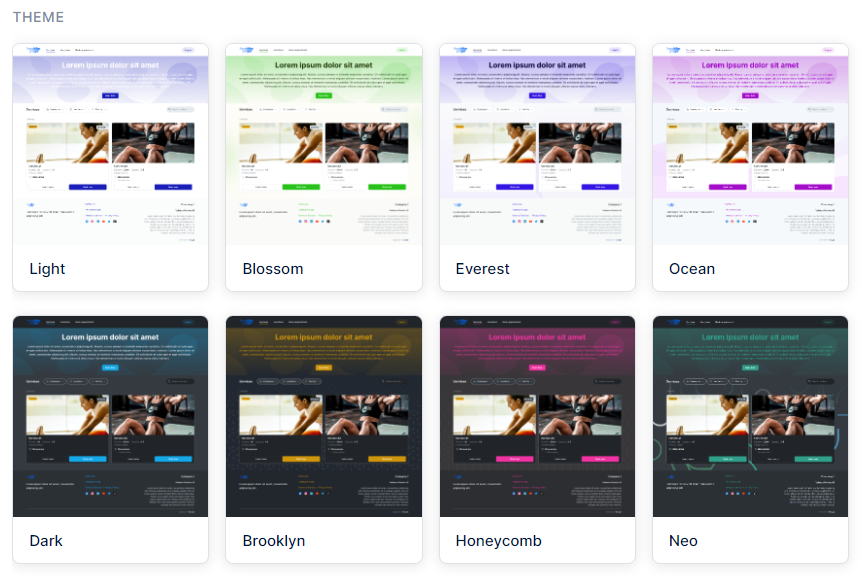
Here’s the refined and polished version with your requested formatting and Calendar Boost branding:
Theme and Appearance Customization
Below the theme selection area, Calendar Boost allows you to personalize the appearance of your booking website even further. These additional settings help you align your site’s visual identity with your business branding:
Select Primary Color
Choose from a range of pre-set color options or click on the color box beside the HEX code to open a color picker and select your preferred shade. If your business already has defined brand colors, you can also enter a specific HEX code directly for precision.
Select Background Theme Color
Set the main background color for your booking website. This defines the overall tone and visual atmosphere of your page.
Select Font
Pick from a variety of professional and modern fonts, including Inter, Roboto, Montserrat, Poppins, Archivo, Maven Pro, and Roboto Slab. You can preview your selected font immediately to see how it complements your design.
To explore additional fonts, visit the Custom Code section to learn how to add your own.
Interface Appearance
Choose how visual elements—such as service cards and single service pages—are displayed.
Light Theme: For a bright, minimal look.
Dark Theme: For a sleek, modern black-based interface.
Website Background Image
Customize your website background pattern from eight available designs. Each pattern can be color-adjusted to perfectly match your brand palette, helping create a cohesive and professional presentation.
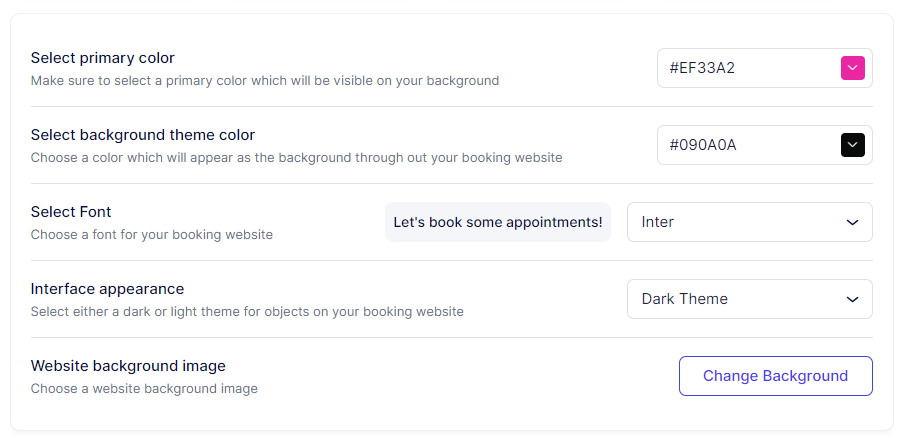
Hero Section
In the Hero Section, you have the opportunity to elevate the customization of your booking experience. You can choose the size of your Hero section and specify the content within it, including the heading, description, and text alignments.
The CTA Button URL can be used to redirect the customers to a different web page, specified in this field (opens in a new tab).
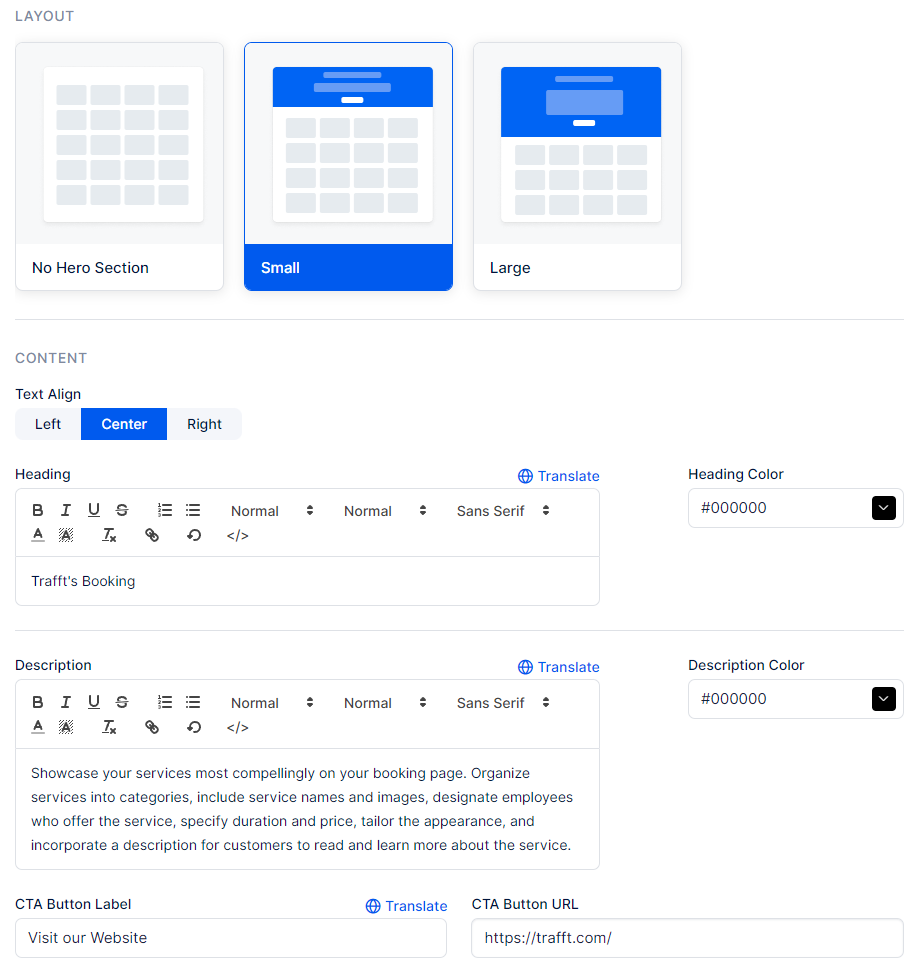
To add an image to your Hero Section, scroll down to the "Hero Section Background" section. Here, you can also apply a background fade effect.
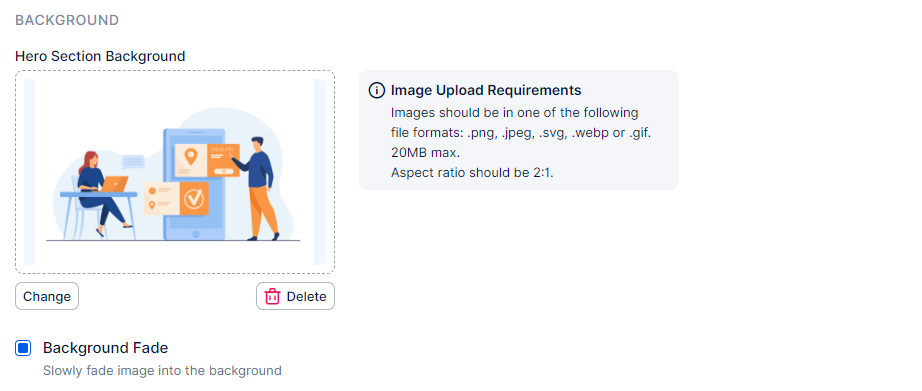
Footer Section
We've taken the customization of the booking website a step further by offering you the option to customize your Footer Section too. Initially, you can choose the content that will appear in your Footer Section and determine whether it will be arranged in two or three columns.
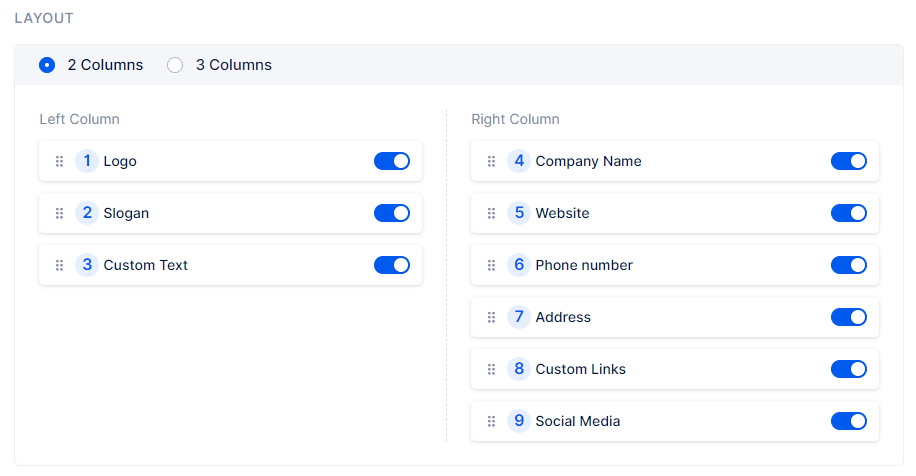
The logo you previously uploaded in the Header Section can be utilized in the footer. In the Logo segment, you can define its size, choosing between small or large.
![]()
If enabled, the company Slogan, followed by links to your company’s Social Media (Facebook, YouTube, Instagram, X, LinkedIn, and TikTok) profiles will appear next. Here, you can define the slogan of your company and add links to the social media pages.
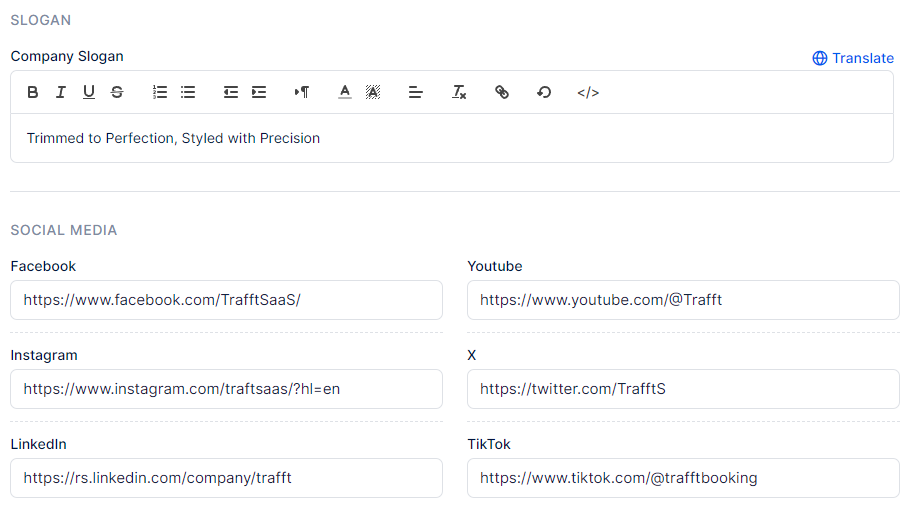
Custom Links & Policies
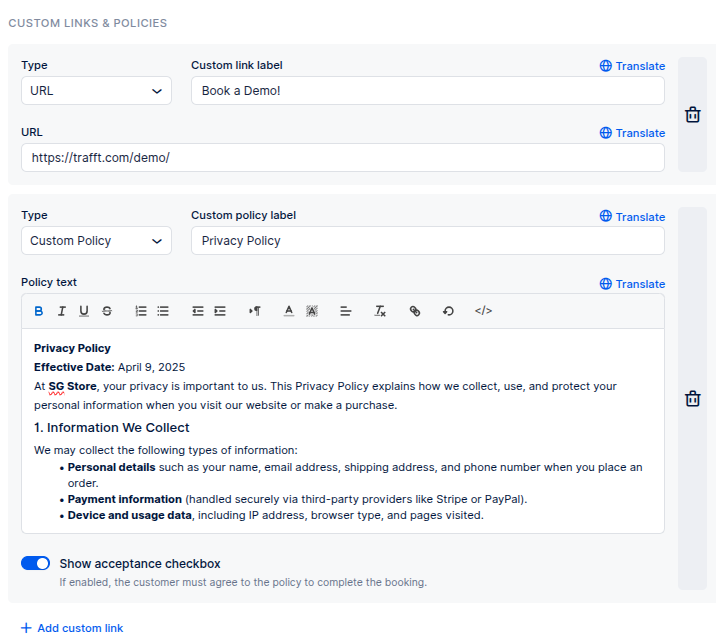
Custom Links and Policies
Custom Links
Custom Links in Calendar Boost are designed to enhance your customer’s experience by providing easy access to additional information or helpful resources. These links appear at the bottom of your booking page and can direct users to:
External websites or resources
Terms and Conditions
Contact or Support pages
FAQs or any other relevant content
Adding custom links ensures your customers have quick access to important pages without navigating away from the booking flow.
Custom Policies
Custom Policies allow you to display essential information, such as business terms, liability notices, or service agreements, directly on your booking page. These policies appear both at the bottom of your booking website and as part of the final step in the booking process.
To make sure customers acknowledge your policy, you can enable the “Show acceptance checkbox” option. When activated, customers must confirm acceptance of your policy before completing their booking, ensuring transparency and compliance.
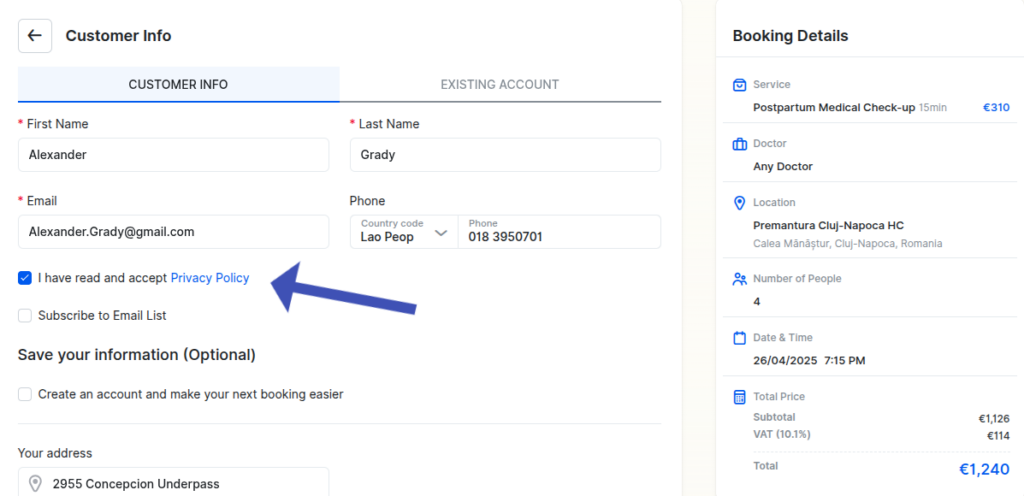
Once added, the social media links and custom links & policies will appear in the footer of your booking website:

The last, unnamed, Company Info section serves as a notice and automatically retrieves information about your company (business name, address, website, and phone number) from Settings -> Company Settings. You can use the hyperlink in this section to quickly access the Company Settings and adjust these details if necessary.
Services Page Settings
In the "Services Page Settings", you can specify the presentation of your services on the Services page of the booking website. This includes the desired view of the services section, configuring the service image size, deciding whether filters will appear on the booking website, and determining their orientation, whether horizontal or vertical.
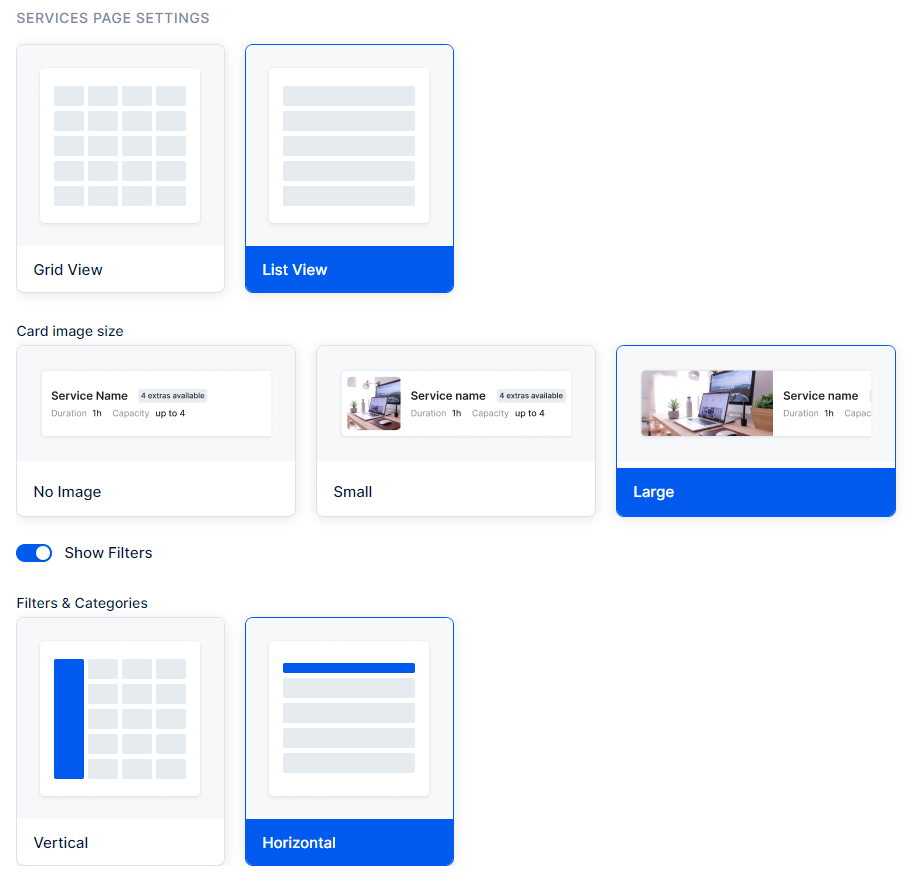
Employees Page Settings
The Employees Page Settings in Calendar Boost let you control how your team members are presented on your public booking website.
At the top of this page, you can enable or disable the Employees Page entirely, depending on whether you want your staff to be visible to customers.
You can also define how employees are displayed by selecting between two layout options:
Grid View: Displays employees in cards for a modern, visually engaging look.
List View: Displays employees in a simple, structured list for easier navigation.
Each employee card can be configured to show:
No Image, Small Image, or Large Image – depending on your preferred design style.
Filters – You can choose to hide filters or make them visible. If enabled, filters can be displayed:
Vertically – in a side column beside the employees.
Horizontally – in a row above the employees.
If the Ratings & Reviews feature is enabled, each employee card will also display their average star rating and customer reviews, helping customers make informed booking choices.
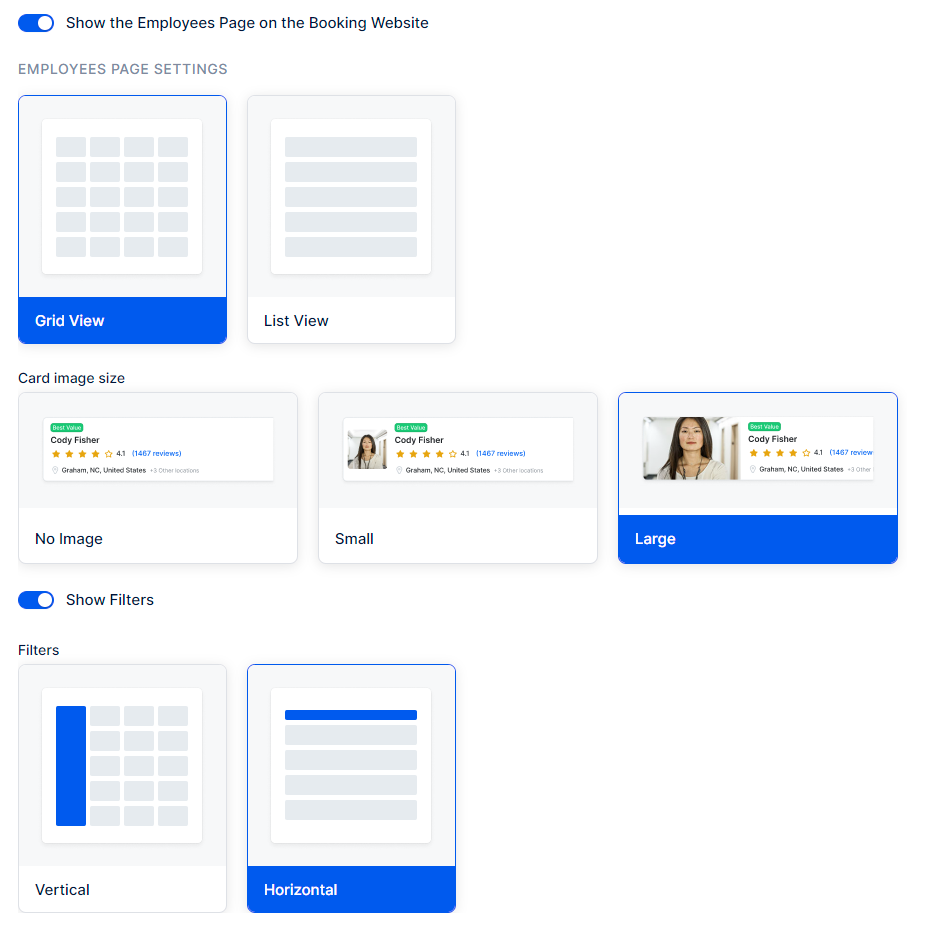
Booking Form Steps
Customize Thank You Page
In the "Customize Thank You Page" section, you have the option to customize the content that appears after your customer successfully completes their booking. You can set a different image, heading, and description, replacing the default "Thank you!" text, "Your appointment is scheduled. We appreciate your trust and look forward to seeing you." text, and default icon, respectively.
As indicated in the screenshot below, if you include multiple languages in the Language section, you will also be able to translate these sections into other languages.
The "Reset to defaults", located in the top right corner, allows you to reset all the "Thank you" content to Calendar Boost default values.
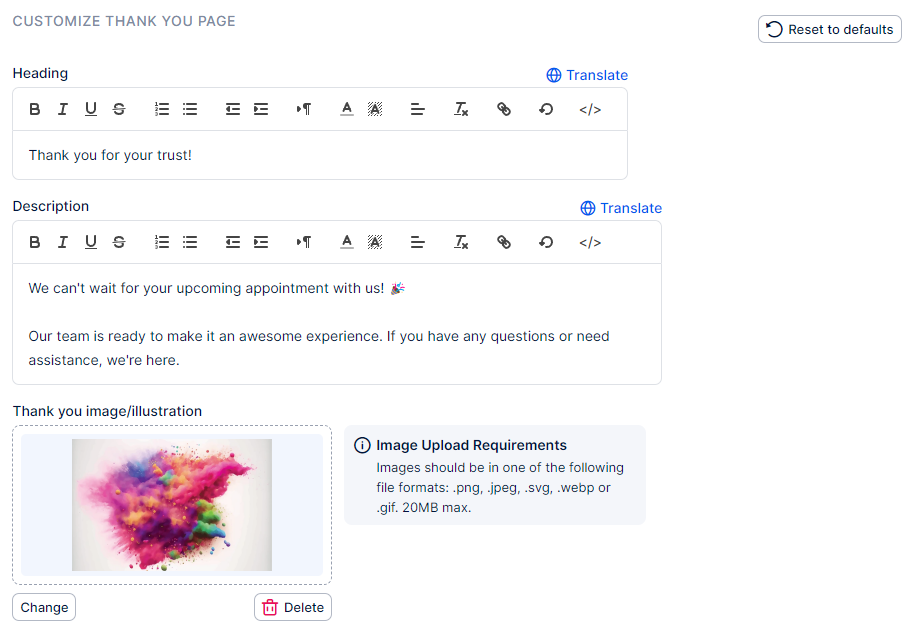
When accessing your Admin section, you'll find the "Share Booking" button at the top. This button enables you to share your availability directly with your customers.
If you offer private services that you prefer not to display on the booking website but still want customers to access, this functionality becomes essential. It allows customers to book these private services seamlessly.

Clicking this button will open a new modal window where you will be able to choose the way in which the availability will be shared:
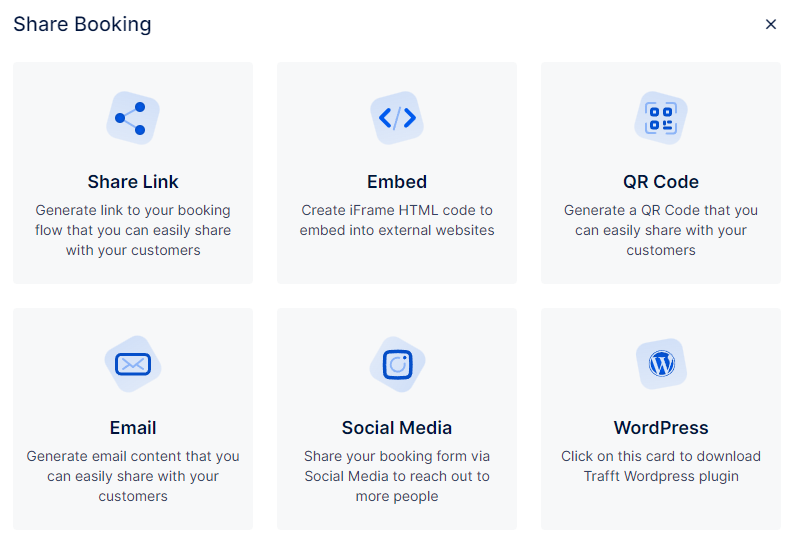
The WordPress option automatically downloads the WordPress plugin to your computer, but all other options allow you to define the appointment parameters such as the Service Category, the Service, the Employee, the Location, a specific date range, and/or the specific time slots.
If you select a specific service that has service Extras, they will be offered as an option as well.
The Use Date Range option allows you to select a single date (by double-clicking the date) or a range of dates when you will offer appointments, while the Set specific timeslots option allows you to select multiple timeslots (you can select a single date with multiple timeslots, or you can select multiple dates with different timeslots).
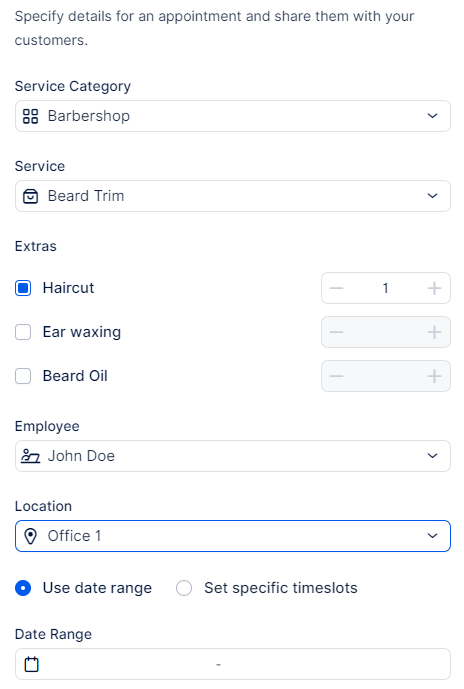
While the filters are the same for each sharing option, the end result is different.
Share Link
The end result of using the Share Link option is a generated link and a generated short link that you can copy and share with your customers.
Below the short link, you can tick a checkbox that destroys the link after the first booking is complete.
Facebook, Twitter, LinkedIn, and Email options automatically perform on-click actions and either redirect you to your social network profile, where you can share the link, or open an Email tool, so the link can be sent to your customers via email.
Finally, at the bottom of the modal window, you will see the appointment details that you're sharing.
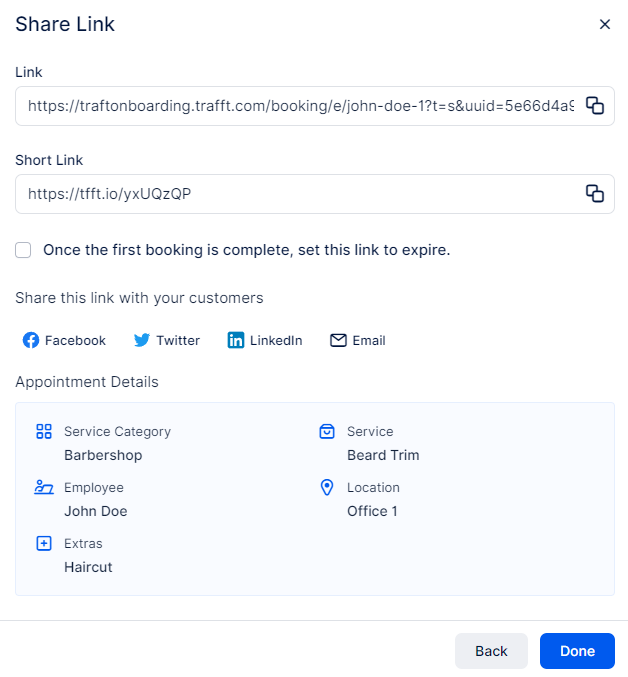
Please note:
Calendar Boost doesn't save the generated links, so make sure to copy them before closing the modal.
You can then paste the link into a new browser window to see what your customers will see. Depending on how Calendar Boost was configured, and which filters you chose when you generated the link, the step you land on in the form may vary from selecting everything from the beginning to simply seeing the available dates and times for the appointment.
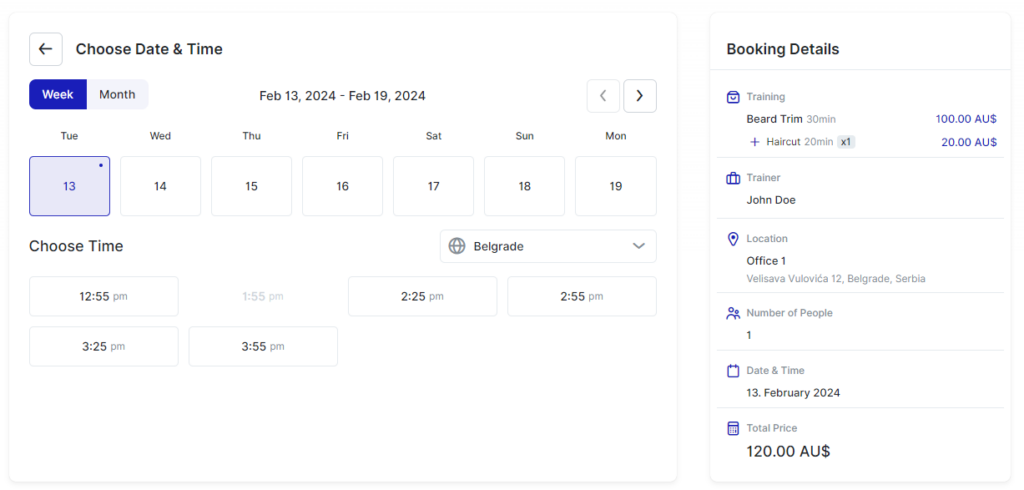
Here’s the revised version adapted for Calendar Boost, keeping a clean instructional tone:
Embed
In Calendar Boost, you can seamlessly embed your booking page into another website to provide customers with a smooth, integrated scheduling experience.
Aside from the embed code available in the Customize section, you can also generate a more specific embed using the Share Booking functionality. This allows you to define exactly what to embed by applying filters such as Category, Service, Employee, Location, or Date.
Once you set these parameters—just as you would when using the Share Link option—Calendar Boost will automatically generate an iframe (embed code) for you. Simply copy this code using the “Copy code to clipboard” button and paste it into your desired webpage. This quick action saves time and ensures accurate embedding without manually selecting the code.
The Appointment Details section below the embed code provides a summary of what’s being shared, helping you confirm that the embedded content matches your selected filters.
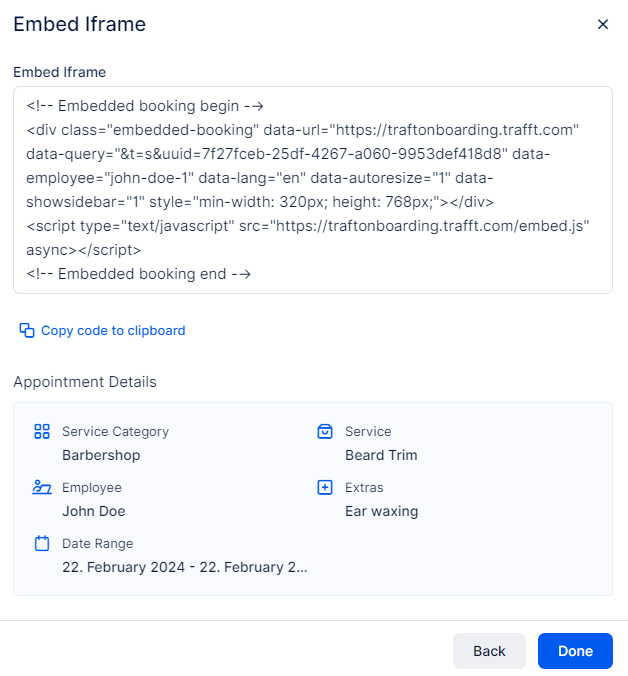
QR Code
When you click the QR Code option, Calendar Boost will offer two choices:
- Set Appointment Parameters (just like in the Share Link and the Embed options);
- Get a QR code immediately - this option creates a QR code that functions in the same way as your Booking website, so your customers will go through the entire booking process to make an appointment.
Once the QR code is generated, you will be able to copy its URL link, or download the image so you can share it with your customers.

If you choose the Email option, once you configure the booking parameters, you will see an email draft that you can copy using the "Copy to clipboard" option.
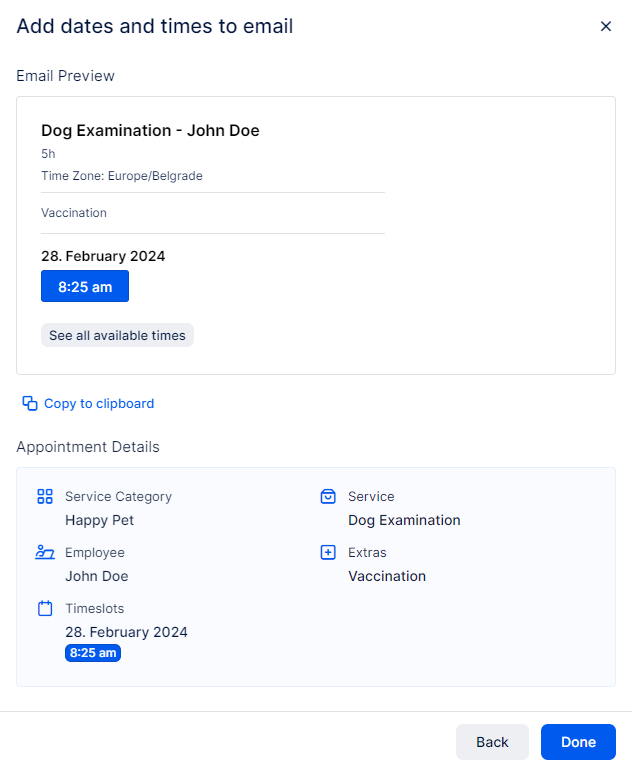
Once you paste this code in an email, it will be displayed exactly the way it is displayed in Calendar Boost "share booking" modal window.
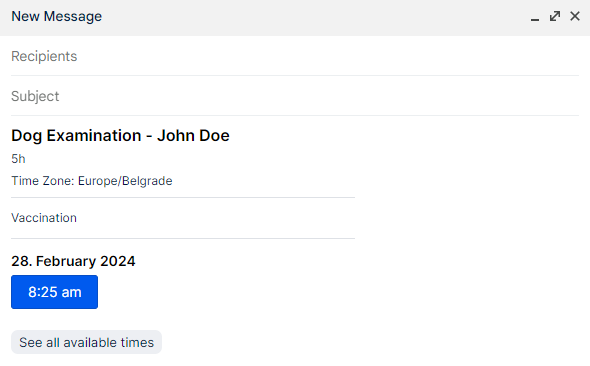
Social Media
After defining the filters for what you're about to share, you will see 7 predefined images that you will be able to select for your Social Media Story. The 8th option allows you to upload your own story image.
Please note that we recommend using a vertical orientation format, with a 9:16 aspect ratio (e.g., 1080x1920px).
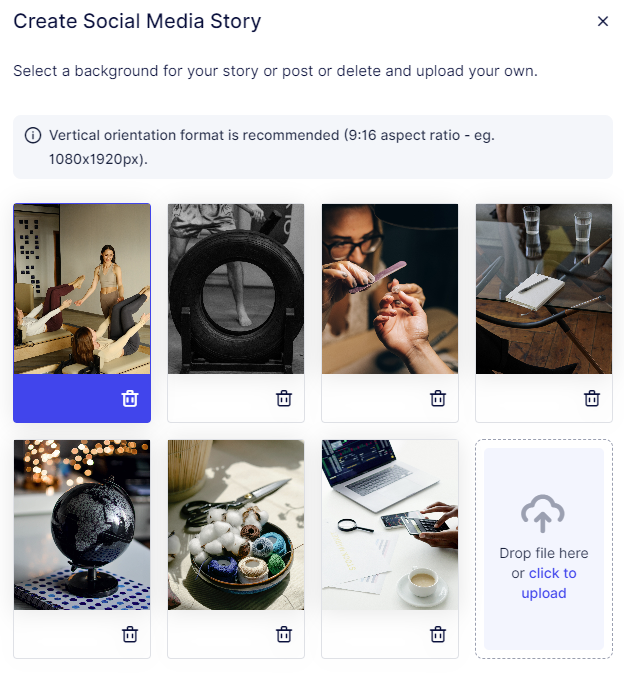
Once you select (or upload) the image, click on Next to continue to the next step where you will define the content for the story.
The Title describes what you're sharing while the Description below allows you to describe the offer to your social media audience. You can choose one of the fonts offered and select the font color, and everything will be displayed in the preview below.
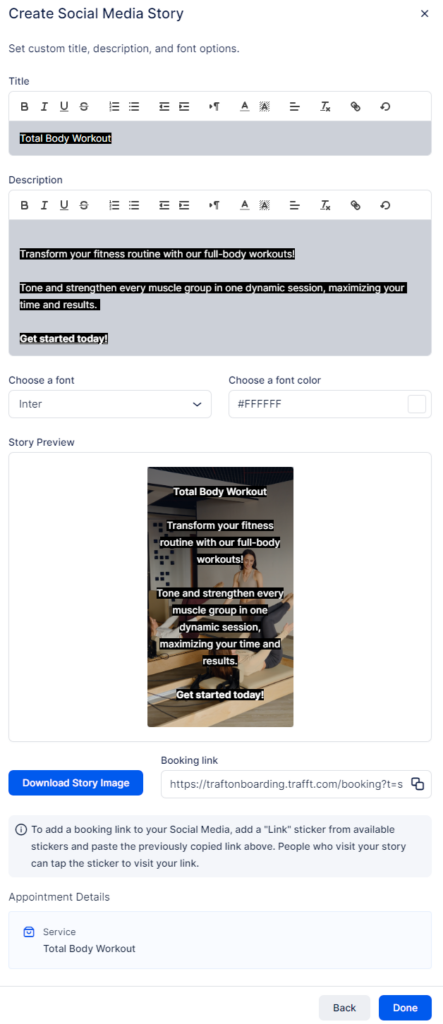
Using the provided link, you can add a "Link" sticker from available stickers and paste the previously copied link above. People who visit your story can tap the sticker to visit your link.
Once you're done editing the image for the story, click the "Download Story Image" button to download the image and upload it to your social media profile.
WordPress Plugin
Clicking the "WordPress" card within the "Share Booking" popup modal will automatically download the zipped installation file for Calendar Boost WordPress plugin.
Once you download the plugin to your computer, you need to install it on your website. For detailed information about how this integration can be used, please check out this page.
Here’s your content with “Trafft” replaced by Calendar Boost and all hyphens removed, while keeping the tone professional and clear:
Accessing Your Calendar Boost Booking Website
You can access your Calendar Boost booking website in two ways:
Booking Website Button:
Click on the “Booking Website” button located in the top left corner of the admin dashboard. This will open the website automatically in a new tab.From the Customize Page:
Copy Website URL: Clicking this option will copy the website link, allowing you to paste it directly into your browser.
Go to Website: Clicking this option will open the website in a new tab instantly.
When you first open the booking website, you will land on the Services page. Here, your customers can view all the services you offer, complete with images, names, badges, extras, durations, locations, prices, and capacities.
The displayed duration reflects only the service time, excluding any additional extras. Prices shown include the service price along with any individual prices assigned to employees. If these prices vary, the display will indicate “From X”, featuring the lowest defined price.
For more details, customers can explore the “Learn More” section, where they will find service descriptions and a list of extras available for selection during booking. This ensures customers are well informed before finalizing their bookings.
Additionally, customers can conveniently filter the booking website by categories, employees, and locations. They can also sort results by price (lowest and highest), popularity, or name (ascending and descending). A search bar is also provided for quick service searches.
Finally, the footer of the website displays the information you chose to show in the Customize → Layout Settings → Footer Section.
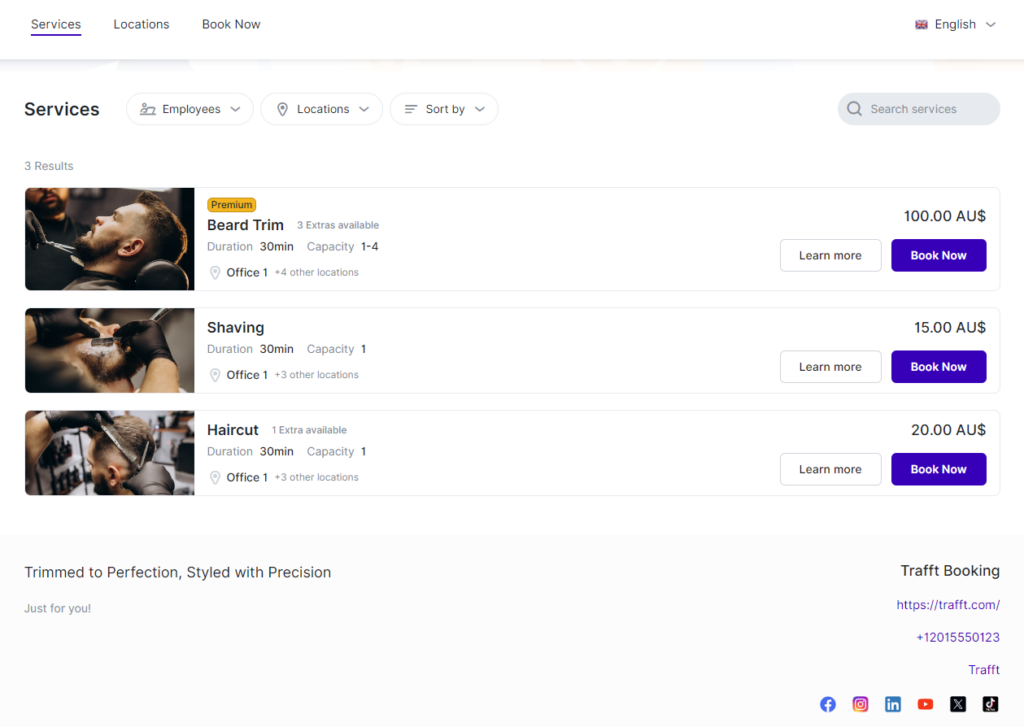
Learn More
Here's how the "Learn More" page appears on the Booking Website, featuring the service's name, duration, location, extras, employees, and a detailed description of the service. If online payment is available, icons of the payment provider(s) will be displayed beneath the "Book Now" button.
When multiple locations are available, this button will be clickable. Clicking it will reveal all the locations where the service is provided.
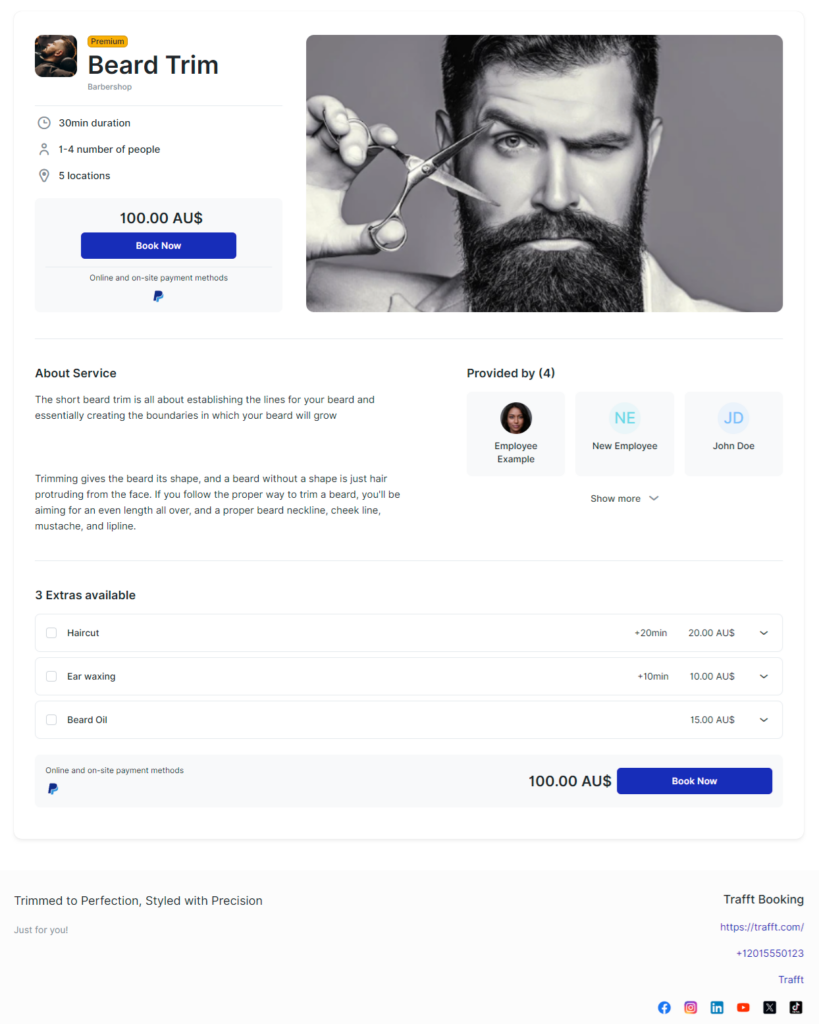
The footer of the page will display the information you choose to display. You have the option to choose between two or three columns for your footer layout. To make this adjustment and define the information that will be shown, navigate to the Footer Section in the Customize page of the admin section.
Booking an Appointment
When your customers visit your Calendar Boost booking website, they have two convenient options to book an appointment:
Book Now from Top Navigation
Customers can click the “Book Now” button in the top navigation menu. If you have multiple categories, they will first select a category and then the specific service they wish to book. The number of available services will be displayed in each category. Once a category is selected, the “Choose” button will become active next to each service. A simple click on the “Choose” button will initiate the booking process for the selected service.Book Now Next to Service
Alternatively, customers can click the “Book Now” button next to a specific service on the booking website’s landing page. This will immediately start the booking process for that service. Calendar Boost’s booking form will then follow the flow you have configured in the Customize → Look and Feel → Layout Settings section.
These options provide flexibility for your customers to easily navigate and book the services they desire on your booking website.
The following steps in the booking process may vary depending on your setup. If there are Extras added to your services, they will be offered first. Customers will see the durations, prices, and descriptions of these Extras, allowing them to make informed choices about additional services they may wish to include with their booking.
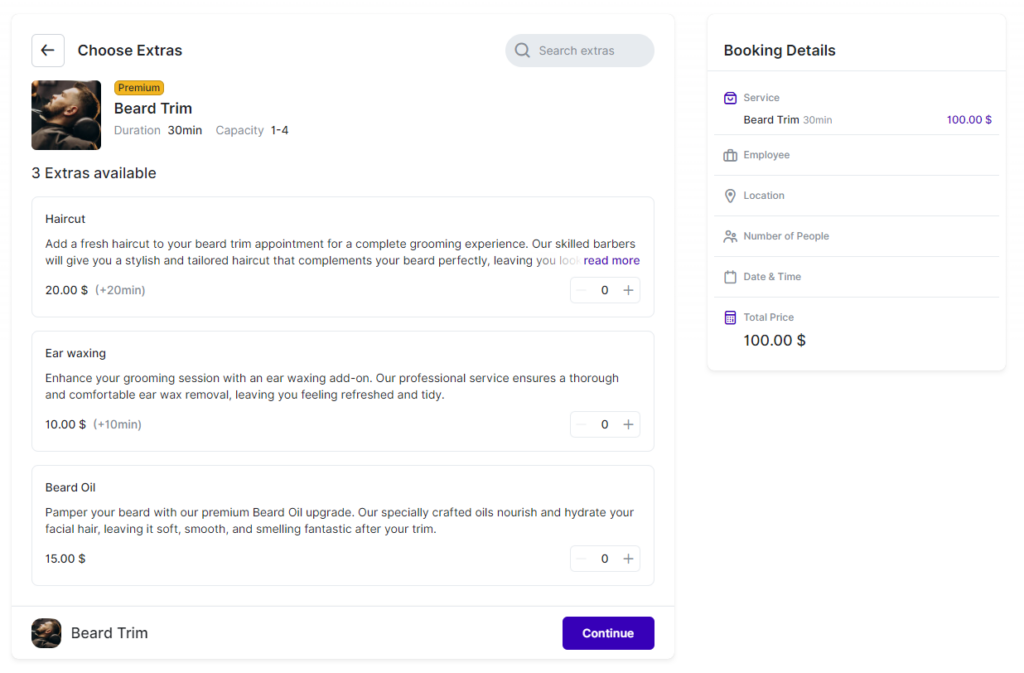
If a customer adds an Extra (you define the quantity they can select), the price and duration of the appointment will automatically adjust in the right-hand menu. This ensures that customers are informed about the updated price and duration before proceeding. Clicking on the "Continue" button will then take your customers to the next step, which may vary based on your setup.
By default, customers will have the option to choose the employee, unless you have disabled this feature in the Customize section. This allows customers to select their preferred service provider if multiple employees are available for the chosen service.
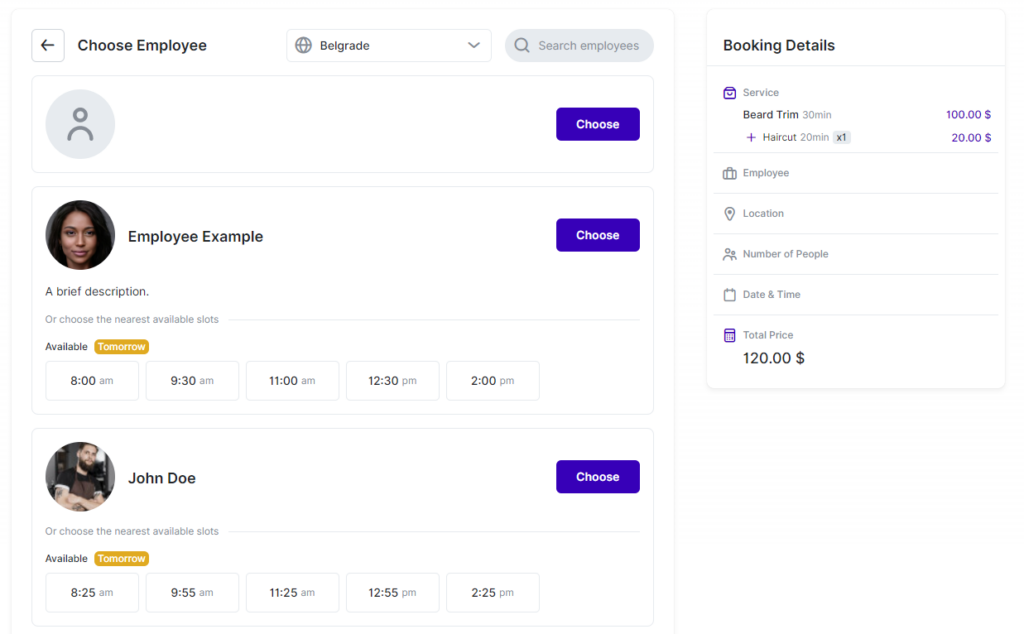
Below each employee, customers will see the employee's description (if added), along with the nearest available time slots. This is designed to save time for customers, providing convenient options if the proposed nearest slots fit their schedule. If customers need more options or the proposed nearest slots don't suit their needs, they can click on "Choose" next to each employee to select their preferred employee and proceed to the next step.
By default, the next step is selecting the location where the chosen employee provides the selected service. This assumes you have multiple locations configured in the employee's Working Hours settings.
Please Note: If you have multiple locations, each employee must have a default location configured in their profile. Additional locations that an employee may cover should be defined in their working hours. You can select a location per day, per working period, or combine locations within a single working period. This flexibility is useful, for example, for online appointments via Zoom, Google Meet, or Microsoft Teams, where the physical location may not matter to the employee.

If you have multiple physical locations, you can define their addresses in the "Locations" section within the back-end. Google Maps integration is available to assist you in selecting the correct location. Once these locations are configured, customers visiting your booking website will be able to select their preferred location for their appointment. Clicking on "Choose" allows customers to select the location and proceed to the next step in the booking process.
In this scenario, the next step in the booking process involves selecting the number of participants if the service is configured as a Group Service. Customers have the option to choose whether they are booking an appointment only for themselves ("Just me") or if they are bringing additional participants by clicking on "Choose a number of people." Here, they can select the number of participants they are booking for, with the maximum capacity being set by the service and employee. Once this capacity is reached, the "+" button for adding more people will become disabled. The minimum number available for selection will also be displayed in the field.
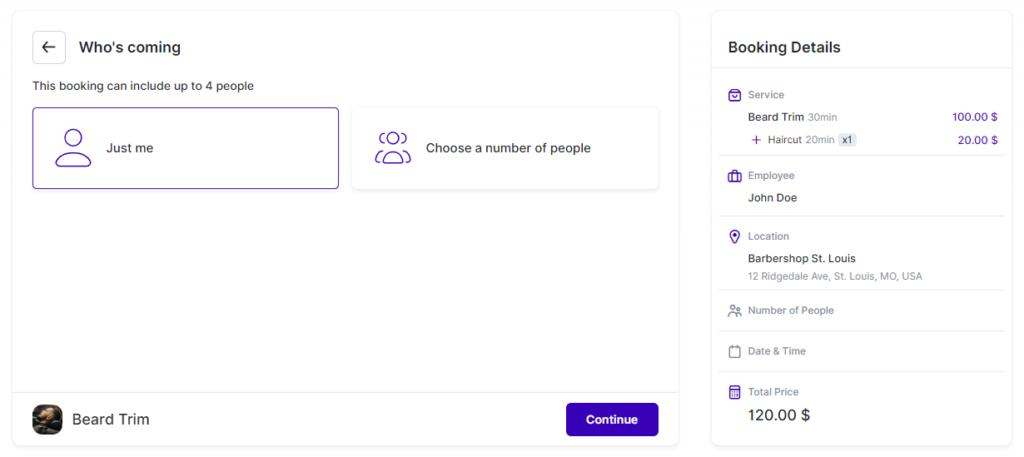
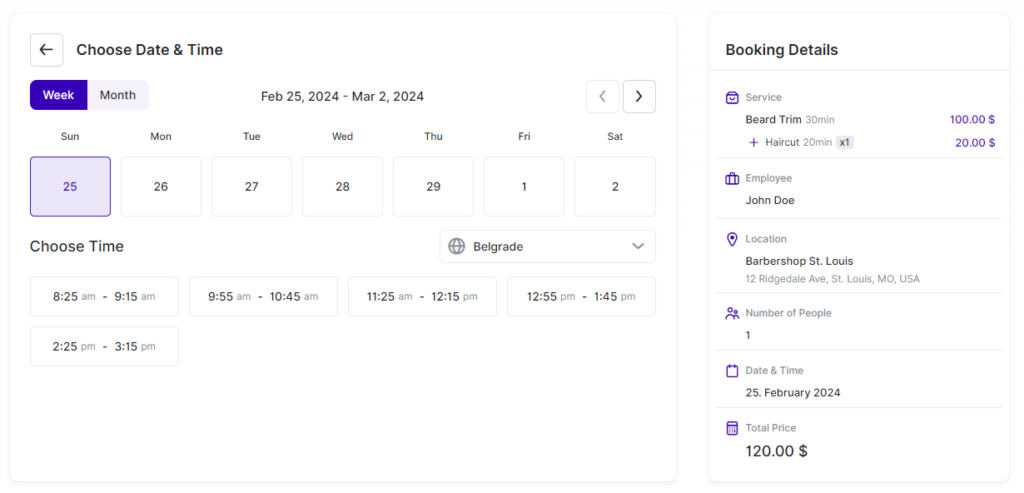

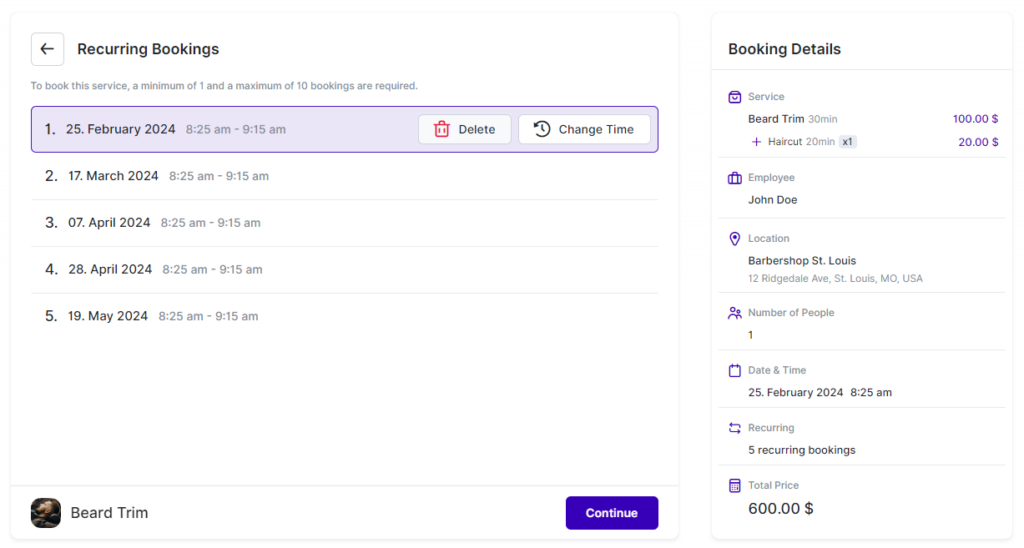

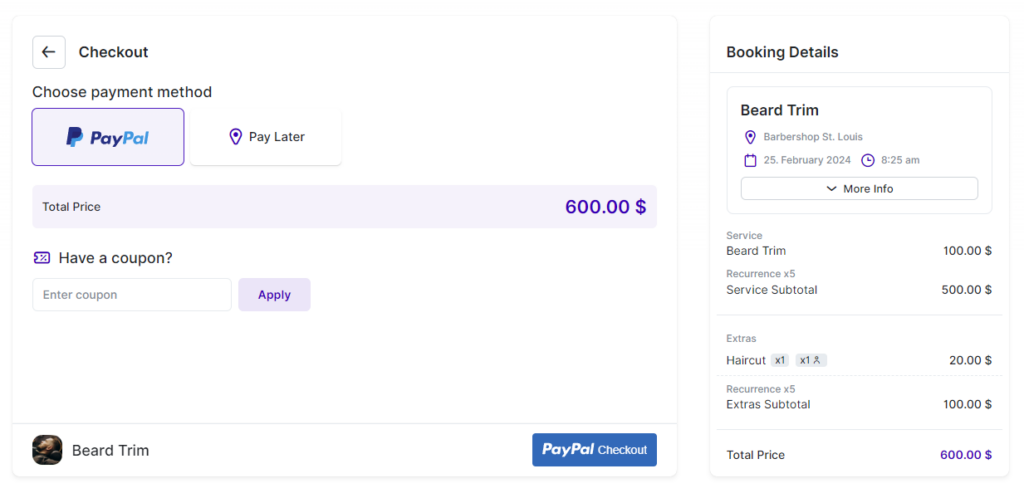
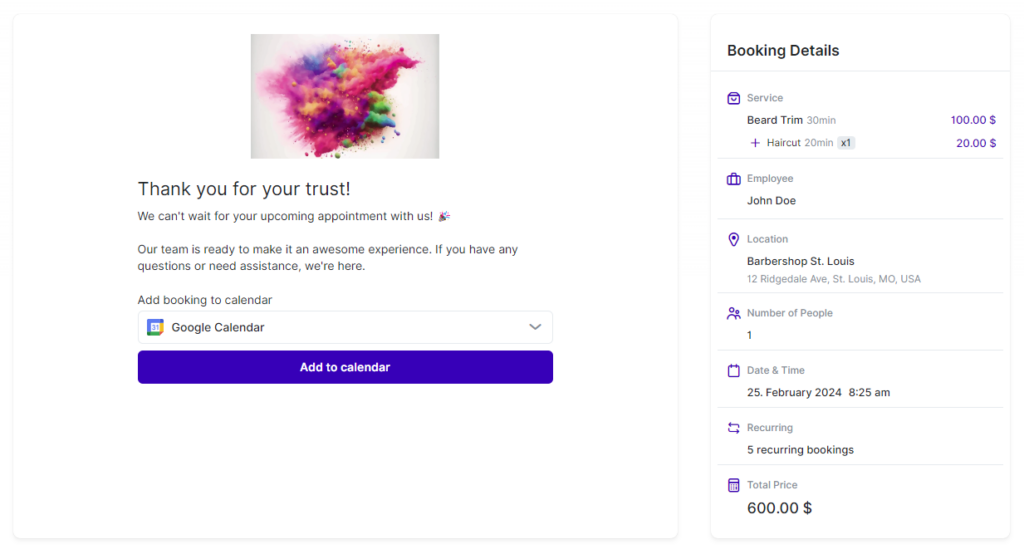
In the world of Calendar Boost, customization goes beyond the built-in settings. For those seeking a more tailored experience, the "Custom Code" section provides a gateway to further personalization. This section allows users to inject their own CSS or JavaScript code directly into their booking website.
Whether it's adding a custom widget, tweaking the layout to match branding guidelines, or integrating with third-party tools, the Custom Code feature empowers users to take full control of their booking website's appearance and functionality. Let's delve into how you can harness the power of custom code to create a unique booking experience for your customers.
Custom CSS
Here’s your revised version with all Trafft references replaced by Calendar Boost and all hyphens removed, while keeping the professional and explanatory tone intact:
Custom CSS
In the Custom CSS section, users can inject their own Cascading Style Sheets (CSS) code directly into the booking website. This powerful tool allows for fine grained control over the appearance of elements on the site. Whether it is adjusting font styles, colors, margins, or hiding specific elements, the Custom CSS option provides the flexibility to tailor the booking website to your exact specifications.
Example
By default, Calendar Boost’s booking form displays both the start and end times of appointments. However, if you wish to modify this behavior and hide the end times using custom CSS, you can achieve this by adding the following code snippet:
.bs-dt .booking-ts div:last-child,
.bs-dt .booking-ts > span {
  display: none;
}
How It Works
This CSS code targets elements within Calendar Boost’s booking form to hide the display of end times for appointments.
To apply this custom CSS code:
Navigate to the Customize/Custom Code → Custom CSS section in your Calendar Boost dashboard.
Copy and paste the provided CSS snippet into the Custom CSS editor.
Save your changes.
Upon saving, the end times of appointments will no longer be displayed in the booking form, providing a cleaner and more streamlined booking experience for your customers.
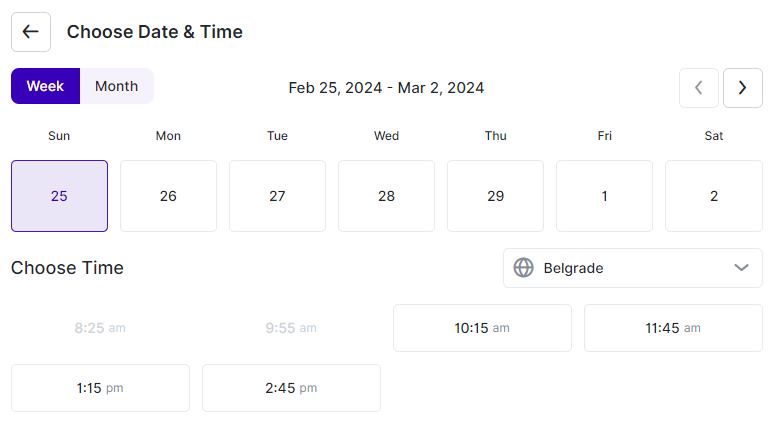
Here’s your rewritten version with all Trafft mentions changed to Calendar Boost and all hyphens removed, while keeping the structure clear and professional:
Custom JS
The Custom JS section offers a playground for JavaScript (JS) enthusiasts. By adding custom JS code here, users can enhance the functionality of their booking website. From implementing interactive features to integrating with external services, the possibilities are vast. Users can tap into this feature to create dynamic and responsive booking experiences for their customers.
Example
A common use case for custom JavaScript (JS) is integrating a Chat Widget into your booking website. Many chat support platforms offer custom JS code that allows you to easily add their chat beacon to any website. Below is an example of how you can implement this feature using custom JS:
<script type="text/javascript">
(function(w,d,v3){
w.chatWidgetConfig = {
appId : '61a0d11f111efc111f11dbc9'
};

if(w.chatwidget)return;v3=w.chatwidget={};v3._q=[];v3._l={};v3.q=function(){v3._q.push(arguments)};
v3.on=function(e,fn){if(!v3._l[e])v3._l[e]=[];v3._l[e].push(fn)};
var s=d.createElement('script');s.type='text/javascript';s.async=true;
s.src='https://app.chatwidget.com/javascripts/insert.js';var ss=d.getElementsByTagName('script')[0];
ss.parentNode.insertBefore(s,ss)})(window, document);
</script>
How It Works
This script sets up the necessary configuration for the Chat Widget provided by your chat support platform.
To integrate your chat widget using custom JS:
Replace
'61a0d11f111efc111f11dbc9'with your actual Chat Widget appId provided by your chat support platform.Copy the provided JS code snippet.
Paste the code into the Custom JS section of your Calendar Boost dashboard.
Save your changes.
Once saved, the Chat Widget will be embedded into your booking website, allowing customers to easily reach out for support while booking appointments.
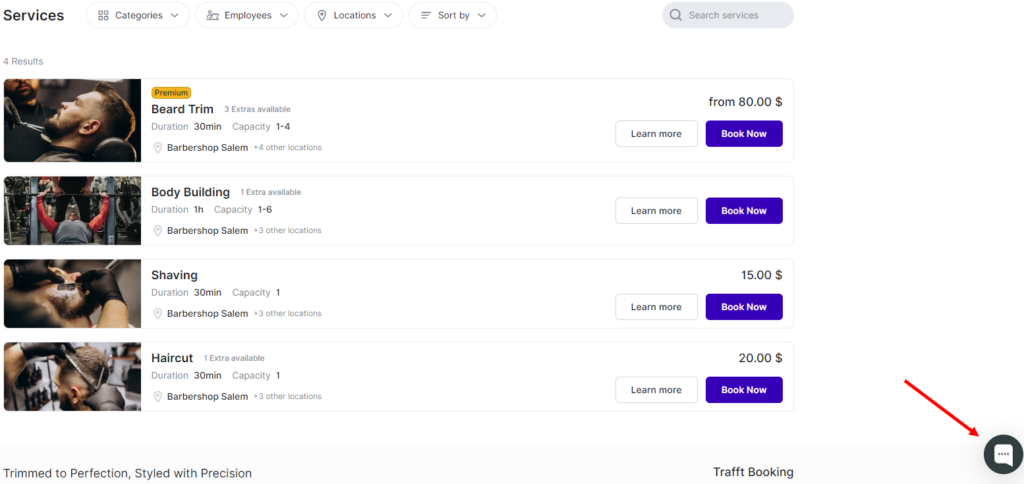
Within the Customize section, under General/Account Settings, you are presented with three distinct options to tailor your booking experience:
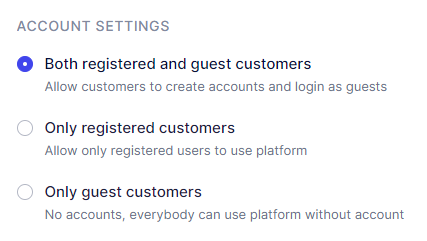
By selecting either of the first two options, you empower your customers to create profiles and log into your booking website.
Upon visiting your booking website, customers can click on the "Login" button located in the upper right corner to either create their profile or log into it. They can also create their profile through the booking form during the final step where customer information is populated.
At the login screen, customers have several options to access their accounts:
- Email and Password: Customers can log in using the email address and password they used to create their profile.
- Social Media Integration: If enabled, customers can also log in using their Google, LinkedIn, or Facebook accounts if they are linked to their Calendar Boost profiles.
- Registration: New customers without an account can easily register by clicking the "Register" option.
- Password Reset: For those who have forgotten their password, a "Forgot Password" option is available to initiate the password reset process.
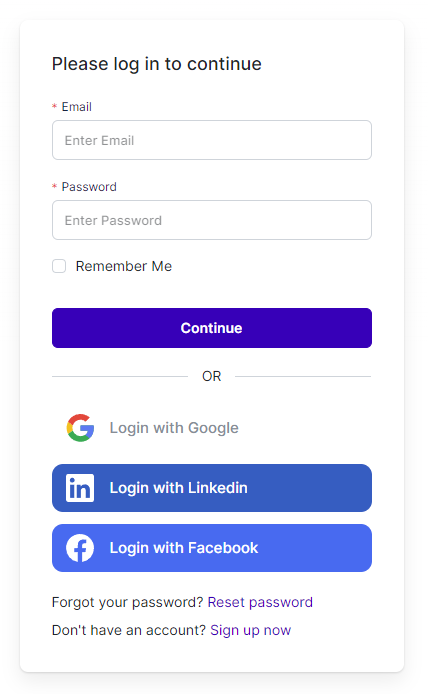
After logging in, customers are directed to the "My Bookings" tab, their personalized dashboard displaying appointments within a specified date range, if any are scheduled.
On the "My Appointments" page, customers have convenient tools to manage their bookings. They can filter appointments and see all their appointments, only past appointments, or only upcoming appointments. For online appointments, customers will see a Google Meet and/or Zoom icon next to the service name, enabling direct access to the meeting platform.
Each appointment has a three-dots icon. Clicking on this icon provides options to "Cancel" or "Reschedule" the appointment, giving customers flexibility in managing their schedules.
For customers who have made a deposit or chosen the "On-Site" payment method, but you offer online payments configured in your admin section, the "Pay" button will be available. This button is located next to the three-dots menu associated with each appointment.
Clicking on the "Pay" button opens a page where customers can select from your configured online payment methods to complete their payment for the appointment. This streamlined process ensures smooth and convenient transactions for both you and your customers.
Clicking on any appointment opens a sidebar on the right-hand side, displaying comprehensive details about the selected appointment. The sidebar includes the service name, along with a Google Meet/Zoom icon for online appointments. Customers can easily access the online appointment by clicking on the icon or copying the link provided next to it.
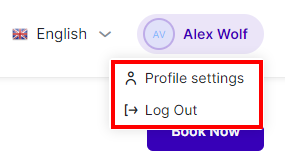
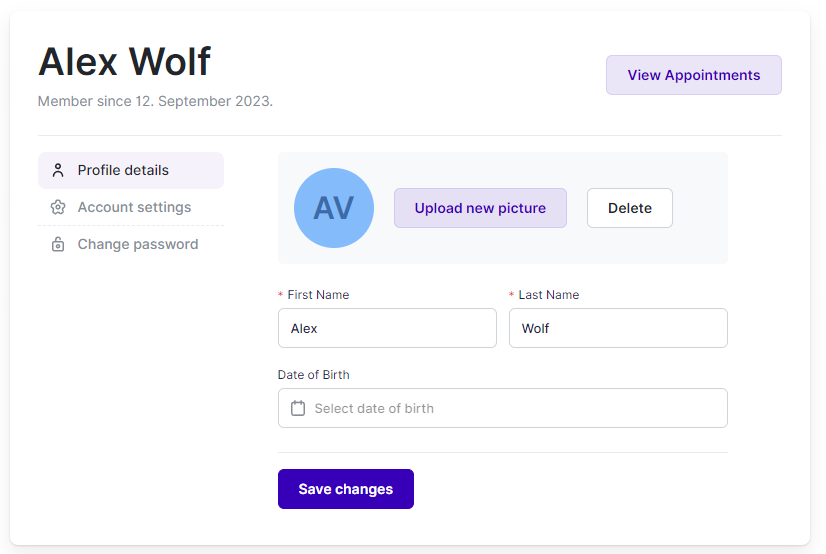
Below the Profile details section, customers will find Account Settings. Here, they can add or update their email addresses and phone numbers. Additionally, customers have the option to delete their profile entirely if they choose. This feature is designed to align with data privacy regulations, providing customers with control over their personal information.
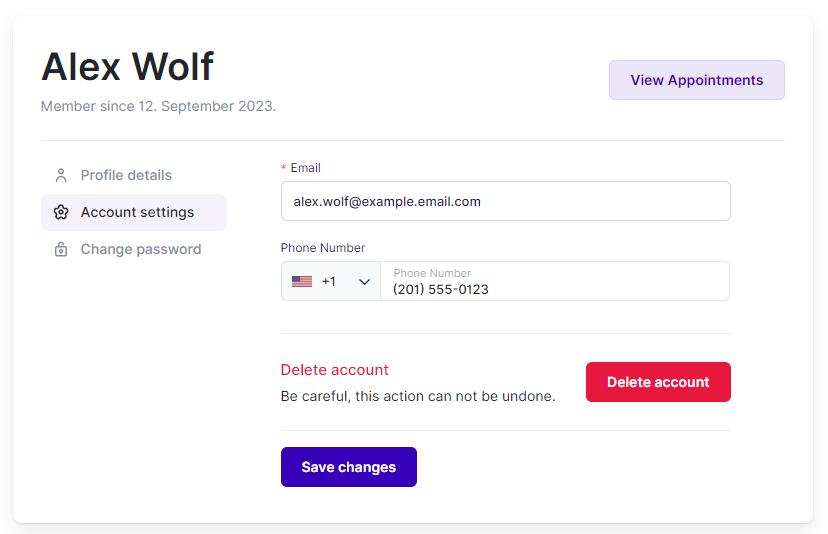
The last tab in User Settings is the "Change Password" tab. Here, customers can update their passwords to enhance account security. This feature allows customers to manage and maintain the security of their accounts easily.